
Managed Antivirus Quick Start Guide
This section provides a Quick Start Guide to setup and use the Managed Antivirus feature covering the following information along with links back to the main Help section for further detail:
- Update or Install the Advanced Monitoring Agent
- Designate a Site Concentrator (if required)
- View and Configure Protection Policies
- Enable Managed Antivirus
- Uninstall Existing Antivirus Products
- Reboot
- Run Scans
- View Managed Antivirus Information
- Edit Managed Antivirus Settings including Migrate Engine
- Disable Managed Antivirus
Update or Install the Advanced Monitoring Agent
To use Managed Antivirus on Mac devices, you must update or install Mac Agent 3.2.0 on the devices. For information about installing and updating the Mac Agent, see Mac Agent installation. The Windows Agent automatically updates to the latest GA release.
For supported Operating Systems, see Monitoring Agent and System Requirements.
Designate a Site Concentrator (if required)
Antivirus laboratories develop new detection methods to combat new threats which can result in frequent virus signature definition database releases, even multiple releases within the same day.
To ensure monitored computers are fully protected, Managed Antivirus automatically updates to the latest virus signature based on its Protection Policy schedule. Checking for updates every few hours then downloading new definitions when available.
If there are a large number of Windows workstations or servers at a site, you can assign one as the Site Concentrator. The Site Concentrator acts as a repository for all Windows Advanced Monitoring Agents on the network. It downloads and caches files, both for Managed Antivirus and other features. This includes the initial Antivirus pattern definition file and any incremental difference updates. Once in the Site Concentrator, the Windows Advanced Monitoring Agents on the network can retrieve the files from there rather than download from the internet and helping to reduce network traffic.
To act as the Site Concentrator the device requires the Windows Advanced Monitoring Agent installed in Server Mode.
To designate a device as the Site Concentrator:
- Expand the Client in the left Monitoring & Management pane
- Right-click on the target Site (or highlight the Site and go to Edit)
- Select Edit Site
- Go to the Site Concentrator tab
- Choose the device from the drop-down then populate the Site Concentrator fields
- OK to save and apply
Important: Off-site Laptops
The Site Concentrator may not always be reachable from off-site devices. To ensure these machines always have the latest definition files regardless of location, Bitdefender attempts to retrieve the required files from the Site Concentrator. Where unreachable, Managed Antivirus goes direct for updates.
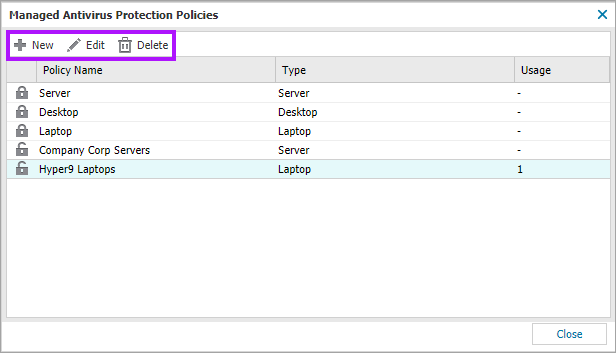
View and Configure Protection Policies
Protection Policies control every aspect of Managed Antivirus. This includes scan schedules, remediation actions taken on threat discovery and end-user interactions. We have included default policies to get you started, as well as the option to create your own custom policies to meet your precise requirements.
Bitdefender policies are common to both Windows and Mac installations. Managed Antivirus settings supported by the computer's Operating System are applied.
The User Audit Report records any Protection Policy changes. The Feature Policy Report lists all policies currently in use across all policy supporting features.
To view and manage policies:
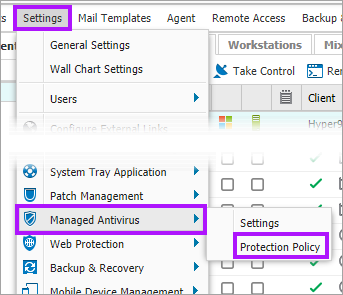
In the All Devices view, go to Settings > Managed Antivirus > Protection Policy
- Edit (View) default policies
- Manage (Add, Edit (view) or Delete) custom policies
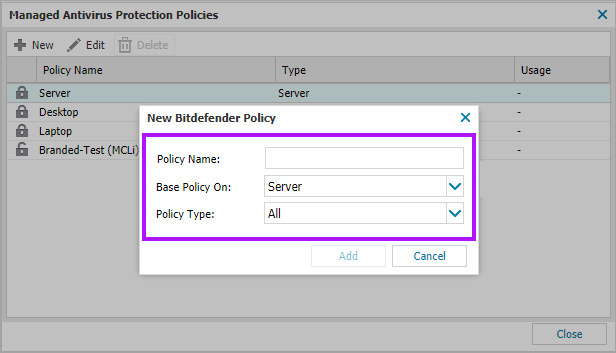
Add
- Click New
- Enter a Policy Name for identification
- Choose an existing policy to Base policy on
- Set the Policy Type, select from All, Server, Workstation or Laptop
- Add to confirm
- Proceed to the policy dialog to setup all elements of the protection. See Bitdefender Engine - Protection Policies for full configuration settings
- Save to create
We recommend creating Client specific policies. These not only allow you to create policies that precisely match the client's requirements, but can be combined with the Manage feature policies for client groups feature. Where enabled, this feature allows users in the Client Group to manage their assigned policies. As any changes will affect the devices using that policy we do not recommend using shared policies with this feature.
Edit
- Highlight the target policy
- Click Edit or double-click on the policy to display its configuration screen
- Make any needed changes. See Bitdefender Engine - Protection Policies for full configuration settings
- Save to apply
Delete
- Highlight the target policy
- Click Delete
- Confirm the policy's removal when prompted
- System default policies
- Policies currently in use.
- Policies set as the default for a Client or Site, including when there are no devices registered against them.
Enable Managed Antivirus
Tailor Managed Antivirus deployment to match your company's precise protection requirements. Enable Managed Antivirus on every Windows server or Windows and Mac workstation across the customer base, at selected Clients or Sites, down to individual computers.
Managed Antivirus is Policy driven. Servers and workstations inherit policies from a Site. Sites inherit policies from a Client. Clients inherit policies for Device Types (Servers and Workstations).
Multiple Devices, Clients and Sites
- In the All Devices view, go to Settings > Managed Antivirus > Settings
- Select the level to update. Device Type (Server or Workstation), Client or Site
- Turn Setting: On or Use Parent (On)
- Select the Policy from the Device Policy drop-down menu
- OK to save and apply or Reset to clear the current changes
Individual Devices
- In the All Devices view North-pane, right-click on the device in the North-pane (or from the Server, Workstation or device drop-down)
- Select Edit <device-type>
- Navigate to the Managed Antivirus section
- Turn Setting: On or Use Policy Setting (On)
- Select the Policy from the Device Policy drop-down menu
- OK to save and apply or Reset to clear the current changes
The Automatically remove conflicting Antivirus products settings are inherited from the Protection Policy
Managed Antivirus (Bitdefender) on Macs
To ensure full protection. The user must authorize Bitdefender's access to the computer.
Review End user actions: macOS High Sierra (10.13) and later for further information.
Uninstall Existing Antivirus Products (Windows Only)
Running Antivirus solutions side-by-side on the same computer can be catastrophic. The programs will not only severely affect performance, but can also cause conflicts. Examples include, one program continually scans the other, both programs attempt to neutralize the same threat or one product may detect the other as a threat and try to remove it.
To avoid this scenario, Managed Antivirus will not install where it detects another antivirus product on the computer. Any incompatible products present on Managed Antivirus enabled computers appear in the device's Summary tab.
To install Managed Antivirus, first remove any incompatible products and reboot the computer to remove any remnants of the product held in memory. For example, Active Protection.
Manual Removal via the Summary tab
You can instruct Managed Antivirus enabled devices to remove existing supported products via the Summary tab for the device on the All Devices view. This removes the existing solution and replaces it with Managed Antivirus.
- In the All Devices view North-pane, select the device
- Go to its Summary tab
- Locate Managed Antivirus - Not Compatible – PRODUCT NAME detected entry
- Click the Force Installation link (where supported)
If the existing product is unsupported, you will need to manually remove the existing product by running that products uninstaller and reboot for each device.
Automatic Removal of existing (supported) Antivirus products
As manual removals can be a time-consuming process, particularly when dealing with a large fleet of servers or workstations. You can automatically remove any (supported) incompatible Antivirus solutions through the Competitor Antivirus Removal Tool (CART) in the Protection Policy.
Choose whether to automatically remove any conflicting Antivirus products and select the reboot behavior in the Installation Settings of the Managed Antivirus Protection Policy by enabling or disabling the options to:
- Automatically remove conflicting antivirus products
- Automatically reboot device when required
Please see: Bitdefender Engine - Protection Policies for further details configuring a Protection Policy.
Only supported Antivirus products are detected and any unsupported solutions will require manual removal via that product’s uninstaller. Please see: Bitdefender Engine - Supported Products for Removal for a list of antivirus products supported by automatic removal.
Reboot
The All Devices view indicates when a computer requires a reboot to continue the installation. This appears in the North-pane Reboot column, WallChart and the Summary tab.
To initiate a reboot:
- In the All Devices view North-pane, select the target device(s). Shift and left-click for a range, Control and left-click for specific computers
- Right-click on one of the selections (or from the Servers, Workstations or Devices drop-down)
- Choose Reboot > Now or Later. Multiple Devices: confirm the devices and schedule after selecting Later
The computer may require a further reboot to complete the Managed Antivirus installation after removing any supported existing antivirus solutions,
Run Scans
Quick and Deep scans run based on the Protection Policy schedule. To control scans there is also the option to start, pause, resume and cancel scans from the All Devices view:
- In the All Devices view North-pane, select the target device(s). Shift and left-click for a range, Control and left-click for specific computers
- Right-click on one of the selection (or from the Servers, Workstations or Devices drop-down)
- Choose Managed Antivirus and select the scan action. For example, Quick Scan
Depending on the Protection Policy settings, the end-user can also manage manual scans.
Additional options in the device's context menu:
- Update Threat Definitions
- Snooze Antivirus for the scheduled period
- Detect Competing Products and report this information in the Summary tab
Managed Antivirus Scans run based on the local time of the computer.
View Managed Antivirus Information
All Devices view
Managed Antivirus Check
The Managed Antivirus Check monitors the Managed Antivirus Agent on each device. This checks is automatically added when Managed Antivirus installs.
Failure conditions for the Check include:
- Quarantine of a threat that requires intervention
- Managed Antivirus Agent stops uploading data
- The Check has not run for the configured number of days on an Active Protection disabled device. (Protection Policy settings include the number of days threshold)
Click the More Information against the Managed Antivirus Check in the Checks tab on the All Devices view. This returns:
- Number of items in quarantine
- When the Managed Antivirus Agent on that device last uploaded data
- Active Protection Status
- Date and time of the last Quick and Deep scans
- Type of scan currently running (where applicable)
Disk Encryption Manager Service Check (Bitdefender)
This check monitors the Disk Encryption Manager Service. This check is automatically added when Disk Encryption Manager installs (where Disk Encryption Manager is enabled in the Protection Policy).
The check passes when the service is reported as running and fails where the service is in any other state.
Click the More Information against the Disk Encryption Manager Service Check (Bitdefender) in the Checks tab on the All Devices view. This returns:
- Policy name: Name of the policy in use on the device
- Encryption status: Status will be one of Encrypted, Unencrypted, Encrypting, Decrypting or Suspended (device offline during encryption or decryption process)
- Last communication: Last date and time the device communicated encryption status details to N-sight RMM
- Next communication: Next expected date and time that the device communicates encryption status details to N-sight RMM
- Date time: Last date and time the device communicated encryption status details to N-sight RMM
- Mount point: Lists the all disks mounted on the device
- Boot drive: Indicates if the Mount point is the boot drive or not
- Protection type: Details the protection type (Passphrase, TPM or TPM + PIN)
- Check state: The current Fail or Pass state of the check
- Drive state: Status will be one of Encrypted, Unencrypted, Encrypting, Decrypting or Suspended (device offline during encryption or decryption process)
- Encryption state: Overall device encryption state at Transition time
- Transition time: Time and date of a change to the Encryption state
- Duration: Length of time the device has been in the Encryption state
Disk Encryption Manager Check (Bitdefender) - <drive letter>
This check monitors the Disk Encryption status on the indicated drive letter. This check is automatically added for each drive in the device when Disk Encryption Manager installs (where Disk Encryption Manager is enabled in the Protection Policy).
Click the More Information against the Disk Encryption Manager Service Check (Bitdefender) in the Checks tab on the All Devices view. This returns:
- Policy name: Name of the policy in use on the device
- Drive state: State will be one of Encrypted, Unencrypted, Encrypting, Decrypting or Suspended (device offline during encryption or decryption process)
- Drive capacity: Storage capacity of the drive
- Encryption algorithm: Denotes the encryption algorithm used
- Protection type: Details the protection type (Passphrase, TPM or TPM + PIN)
- Boot disk: Either Yes or No, denoting if this is the boot disk or not
- Encryptable: Denotes if the drive is capable of being encrypted or not (regardless of current encryption state)
- Last communication: Last date and time the device communicated encryption status details to N-sight RMM
- Next communication: Next expected date and time that the device communicates encryption status details to N-sight RMM
- Device encryption overview
- Date time: Last date and time the device communicated encryption status details to N-sight RMM
- Mount point: Lists all disks mounted on the device
- Boot drive: indicates if the Mount point is the boot drive or not
- Protection type: details the protection type (Passphrase, TPM or TPM + PIN)
- Check state: The current Fail or Pass state of the check
- Drive state: Status will be one of Encrypted, Unencrypted, Encrypting, Decrypting or Suspended (device offline during encryption or decryption process)
Antivirus Tab
The Antivirus tab becomes available once Managed Antivirus has successfully installed on a Windows or Mac computer. This tab contains information on discovered Threats, Scans and Quarantine items. Depending on the section and engine, additional options may be available. From adding a Policy exclusion directly from the Threats tab, to performing Actions on Quarantine items.
Reports
The Reports menu on the All Devices view contains three Managed Antivirus Reports and two Disk Encryption Manager reports.
Threat Report: displays information on the detected threats based on the Client, Site and time-frame selection.
Protection Report: provides information on those Antivirus products an Antivirus Update Check is enabled for. Filter the results by Product, Client, Site and Device.
Quarantine Report: show those threats currently in quarantine filtered by Client and Site.
Disk Encryption Report: Provides a graphical overview of Encryption Statuses and Encryption Enabled Vs Disabled by default. You can also opt to add Device and Volume details if required
Recovery Key Report: Provides a list of ALL Recovery Keys and their associated Key ID / Protector ID / Recovery Key ID in one location. Usually produced should a customer leave but require their drives to remain encrypted along with the required Recovery Keys to unlock the devices. The report does not require the end-users to supply their Key ID / Protector ID / Recovery Key ID to be run. To provide a single Recovery Key to one end-user in the event they require it, please see: Provide a Recovery Key for an End-user
Disable Managed Antivirus
Like its deployment, Managed Antivirus can be removed across the entire customer base on every Windows server or workstation, at selected Clients or Sites down to individual computers. Please be aware that Managed Antivirus requires a device reboot to complete the uninstall process.
Multiple Devices, Clients and Sites
When no longer required, remove Managed Antivirus from every device across the customer base, at selected Clients or Sites:
- In the All Devices view, go to Settings > Managed Antivirus > Settings
- Select the Device level to update, Device Type (Server or Workstation), Client or Site
- Turn Setting: Off or Use Parent (Off)
- OK to save and apply or Reset to clear the current changes
Individual Devices
- In the All Devices view North-pane, right-click on the device (or from the Server, Workstation or Mixed drop-down)
- Go to Edit <device-type>
- Navigate to the Managed Antivirus section
- Turn Setting: Off or Use Policy Setting (Off)
- OK to save and apply or Reset to clear the current changes
When Disk Encryption Manager has also been deployed, care must be taken to ensure the disks are set to decrypt or remain encrypted appropriately, as Disk Encryption Manager manger will uninstall along with Managed Antivirus. Review Removing Disk Encryption Manager with or without Decrypting Devices before proceeding with disabling Managed Antivirus.
Managed Antivirus requires a device reboot to complete uninstall process
What do you want to do?
- View Managed Antivirus URLs
- What is Malware?
- View the Windows Managed Antivirus Agent User Guide
- View the Mac Agent Managed Antivirus User Guide