
Enable Backup & Recovery
You can enable Backup & Recovery for multiple devices at the device type level (all Servers or Workstations), Client or Site level, or on individual servers and workstations.
Enable Backup & Recovery on Multiple Devices
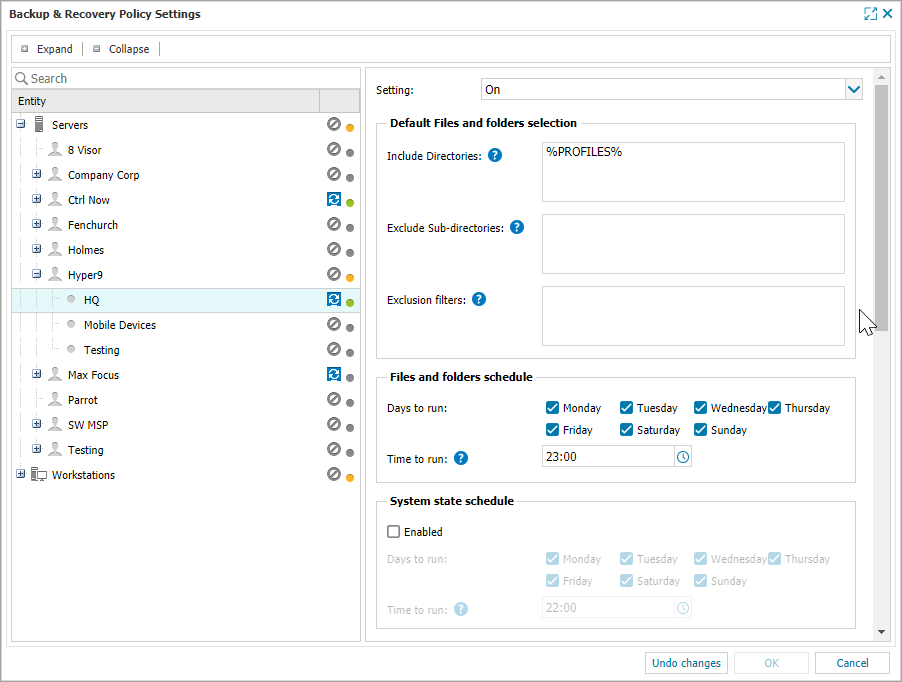
- On the RMM Dashboard, go to Settings > Backup & Recovery > Settings

- Select the target entities from the Entity list of servers and workstations
- Change Setting: to On to enable and manage Backup & Recovery on the selected entities
- If you selected workstation entities, choose the Backup & Recovery edition:
- Documents edition—Automatically backup essential office files twice per day. No configuration is required.
- Professional edition—Full system backup and configurable settings
The Professional or Documents editions are available for Windows workstations.
The Documents edition is available for Mac workstations running Agent 3.1.0 or later. - Configure as required. For information, see the Backup & Recovery: Settings.
- Click OK to save and apply
Sites inherit the policy set at the Client level they are within. Clients inherit the policy set for the Device type (Server or Workstation). Laptops fall under the Workstation device type. Use Parent refers to the level above the one selected.
Feature status indicators (colored dots) in the Settings dialog indicate if the feature is enabled or disabled at the entity level, and whether devices under an entity have the same settings:
- Green - Feature or functionality enabled for all devices under that entity. This includes device level settings
- Grey - Feature or functionality disabled on at least one device under that entity. This includes device level settings
- Orange – One of the child entities has a different configuration to the parent. Where a Client only has one Site, its status indicator reflects that of the Site.
For more information on these states, see Feature and Functionality Settings Iconography.
Backup data sources, Schedule and LocalSpeedVault are configurable post-installation in the device's Backup Manager, accessible on the device itself or directly from the Dashboard.
If changes are made to the Schedule, Backup selection or LocalSpeedVault in the Backup Manager, the policy is set at the individual level and the device no longer inherits the policy settings for the overall device type, Client or Site.
Enable Backup & Recovery on an Individual Device
- Right-click the device in the north pane of the Dashboard
- Go to Edit Server or Edit Workstation then Backup & Recovery
- Change Setting:
- Use Policy Setting (Status: On or off) - this will apply the policy currently in place for the Client, Site or overall device type (server or workstation)
- On - to enable and manage Backup & Recovery on this specific device only
- If you a selected workstation, choose the Backup & Recovery edition:
- Documents edition—Automatically backup essential office files twice per day. No configuration is required.
- Professional edition—Full system backup and configurable settings
The Professional or Documents editions are available for Windows workstations.
The Documents edition is available for Mac workstations running Agent 3.1.0 or later. - Configure as required. For information, see the Backup & Recovery: Settings.
- Click OK to save and apply
Device level settings take precedence over those set at the policy level. To place the device back under policy control, select Use Policy Settings in the Settings drop-down menu.
Backup & Recovery: Settings
The following settings are available when you configure Backup & Recovery for servers and when you configure the Backup & Recovery Professional edition for workstations:
- Files and Folders
- System State
- Bandwidth Throttling
- Missed Backups
- LocalSpeedVault
- Archive
- Password Protect Local Backup Manager
Backup & Recovery - Automatically Added Checks
Regardless of the selected Backup & Recovery edition, as part of the installation process two checks are automatically added to the device to monitor the Backup & Recovery state.
| Operating System | Check | Description |
|---|---|---|
| Windows | Windows Service Check - Backup Service Controller (24x7) | Monitors the Backup Service Controller service |
| Backup Check - Backup & Recovery (Daily Safety Check) | Reports on the backup sessions | |
| Mac | OSX Daemon Check - com.cloudbackup.BackupFP (24x7) | Monitors the internal process associated with Backup Manager |
| Backup Check - Backup & Recovery (Daily Safety Check) | Reports on the backup sessions state |
Checks automatically added by a feature cannot be deleted from the Dashboard. They are only removed when you uninstall the feature.
In addition to the automatically added checks, you can also add a Daily Safety Backup & Recovery Selected Size Check (available for both Windows and Mac) to monitor the backup size of the selected plugins (data sources) based on completed sessions.
When enabling a Backup & Recovery use the Run Checks option to initiate the installation process outside of the Check cycle.