Archive
If Backup and Recovery options do not appear in N-sight RMM, use Cove instead.
To start a 30-day free trial of Cove:
- Open the app switcher in the Product Bar.
- Select Cove Data Protection (Cove).
Completed backup sessions cannot be archived retroactively.
Archiving prevents a backup session from being removed after its retention period has expired. Archived sessions are stored forever (unless they are manually deleted).
Archiving is not available for workstations or laptops using Backup & Recovery Documents.
The Archive schedule configures Backup and Recovery to create the next Backup Session after the scheduled time, as an Archived Backup. When you configure the archive schedule, you must schedule it to run before the Backup Session you want to archive.
If you have a weekly Backup Session scheduled for 10pm, and you want the last backup of the month to be archived, you set the archive schedule to run on the same day as the Backup Session but at an earlier time, for example, at 9:45pm.
To enable archiving:
- In the All Devices view, go to Settings > Backup & Recovery > Settings
- Select the target entities from the Entity list of servers and workstations
- Ensure Setting: is set to On
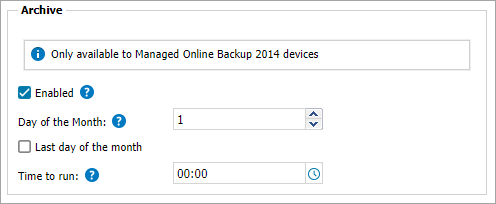
- Tick the Enabled check box in the Archive section

- Enter the Day of the Month or select Last day of the Month
- Set the Time to run
The Archive schedule refers to the local time of the computer where the Agent is installed.
- Click OK to save and apply
Day of the Month is an absolute date. If you select the 29th to 31st day of the month, the archive does not occur on months that do not have that many days (i.e. February).
Cleaning up unneeded archiving sessions
If you no longer want to store an archived backup session, you can remove it from storage in the Backup Manager:
- Launch the Backup Manager from the All Devices view or directly on the remote computer
- Go to Preferences > Archiving
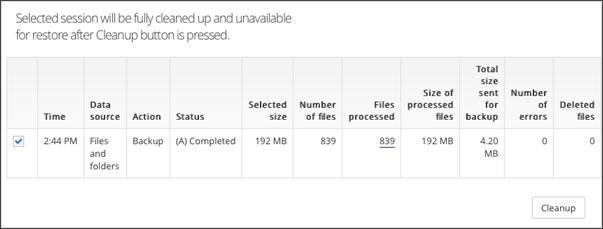
- Click Cleanup to view the list of all archived sessions
- Select the sessions to clean up
- Click Cleanup
- Confirm your intention to clean up the selected sessions
This action removes the archived (A) mark from the session. The session is then cleared from storage and is no longer available for recovery.
What do you want to do?

