
SNMP Check for Windows
Simple Network Management Protocol (SNMP) is a common, non-proprietary protocol supported by a number of different vendors and is integrated into most network devices available today giving a valuable insight into their performance.
SNMP can be used to query network devices (where SNMP is supported and enabled) providing an effective method of monitoring and troubleshooting computers, switches, routers, UPS units etc
SNMP management software sends Protocol Data Units (PDUs) to SNMP agents, which contain OID (Object Identifiers) defined in the MIB (Management Information Base) loaded by the SNMP management software. The MIB is a database that defines exactly what the SNMP management software can monitor on that device, with everything that can be monitored is allocated a unique OID.
The Advanced Monitoring Agent queries the SNMP management software (i.e. HP's Insight Manager or Dell's Open Manage) for SNMP GET messages, the Agent itself does not generate any SNMP information. The results of this query are then sent back to the N-sight RMM user interface, generating an Alert where the returned result does not meet the expected range or value.
We have provided a range of system (predefined) SNMP Checks, along with the ability to create your own repository of custom SNMP Checks as well as add a specific SNMP Check for one device via Manual Settings when configuring the Check.
The SNMP Check is available as a 24x7 Check for servers and workstations; and as a Daily Safety Check for workstations.
You can suppress alerts until the number of consecutive check failures reaches the configured threshold. For details, see Configure alert thresholds to suppress alerts.
The Workstation Agent SNMP Check only queries the local machine. To run SNMP Checks against any external devices, the Agent must be manually installed in Server Mode. For information about Server Mode, see Select the Agent Mode for workstations.
As the check emanates from the Agent, you cannot validate the entered check or SNMP Protocol settings when configuring these checks on the All Devices view. As such, care must be taken when entering these details to ensure an invalid result is not returned.
Check Configuration
Add
- In the All Devices view North-pane, select the device
- Go to the Checks tab
- Click Add Check
- Choose the check frequency
- Add 24x7 Check [Servers and Workstations]
- Add DSC Check [Workstations]
- Click SNMP Check
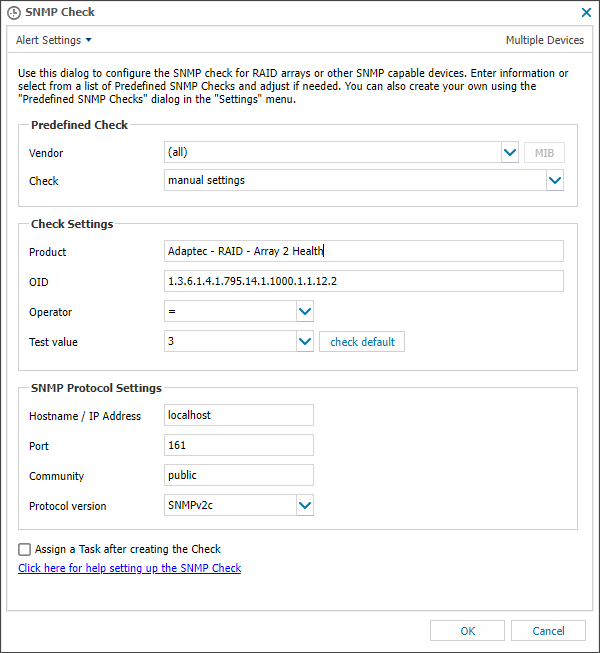
- Select Predefined Check and Configure Check Settings
- Select the Predefined Check from the Vendor and Check drop-downs
- Amend the Check Settings if required to match device requirements
- Select Manual Settings from the Vendor and Check drop-downs
- Populate the SNMP OID (Object Identifier) information in Check Settings
Product: Descriptive name of the monitored product or type for identification on the All Devices view
OID: The numeric value used to distinguish each variable in an SNMP message
To avoid any OID identification problems, please exclude the leading period when entering an OID in the SNMP Check. For example, enter 1.2.3.4.5.6.7 not .1.2.3.4.5.6.7
Operator: Relational operator to define the pass condition for the Check (greater than, equal to...)
Test Value: The expected value returned by the OID to indicate success
The Check passes where the returned OID and expected Value match the conditions entered in the Check Settings section
- Configure the SNMP Protocol Settings section (required)
- Hostname/IP address: Address of the device to run the check against. Default address: localhost
Port: Port the SNMP Management Software listens on for SNMP Agents. Default SNMP port: 161
Community: The (case sensitive) string used by SNMP Agents to authenticate against the SNMP Management Software. The default value: public
Protocol Version: Version of SNMP used by the SNMP Management Software, SNMPv1 or SNMPv2c
- OK to save and apply
- To run an Automated Tasks when a Check fails, select Assign a Task after creating the Check and choose the script
- Select the script
- Click Next
- Enter the Command Line parameters (if required)
- Set a Script timeout in the range 1 - 3600 seconds (default 120 seconds)
- Finish to save and apply
Predefined Checks (System or SNMP Custom Repository)
Custom Device Check (Manual Settings)
Assign the Check against a specific vendor or choose All
Edit
- In the All Devices viewNorth-pane, select the device
- Go to the Checks tab
- Select the target SNMP Check
- From the Check drop-down
- Edit Check (also available from the Check's right-click menu)
- Choose the script, enter the Command Line parameters, set a Script timeout and configure the assigned Task
- OK to save and apply
Delete
- In the All Devices view North-pane, select the device
- Go to the Checks tab
- Select the target SNMP Check
- From the Check drop-down
- Delete Check (also available from the Check's right-click menu)
- Review the summary and select OK to confirm removal
The SNMP Check repository files are downloaded from the N-sight RMM user interface to ensure the Agent has the latest check settings. This download takes place as part of the Agent installation process or the next time the Agent checks-in after a change was made to the SNMP repository.
Please be aware that this may lead to a delay in the availability of newly added or amended Checks in the Agent.
What do you want to do?
- Add a Custom OID
- Setup Custom Predefined Checks
- Additional OIDs
- Parallel SNMP Queries
- Configure the SNMP Timeout per device
- Configure alert thresholds to suppress alerts
- SNMP Troubleshooting
- Install and Enable SNMP for Windows
- Timeticks, Hexadecimal/MAC addresses and Octet Strings
- Associated Check with On-Check Failure Automated Task
- Visit the Script Manager section
- Add or Edit Check Behavior (Agent version)
- Agent Check Configuration