Add checks
You can add checks to one or more devices to monitor system health. For details about specific checks and settings, see:
You can also add checks to multiple devices using Monitoring templates.
Checks are only added to devices that support them. For example, a Disk Space Check for drive D:\ is only added to devices with a D:\ partition. Similarly, Windows checks are only added to a Windows devices.
During check synchronization, you can view all changes from View > Pending Actions, where you can to revoke a change if needed. Check changes are also recorded in the User Audit Report.
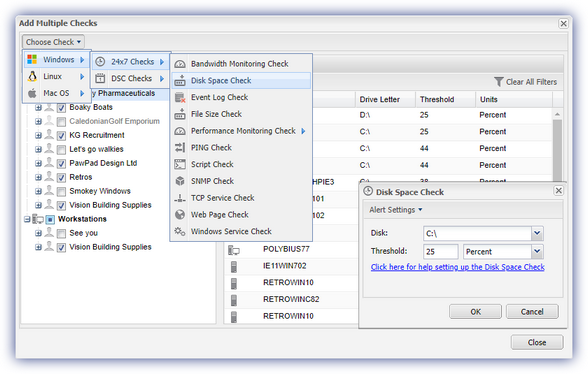
Add multiple checks using the File menu
- In the All Devices view, select File > Add Check.
- In the Add Multiple Checks dialog, select Choose Check.
- Select the operating system and check type.
- In the Apply to panel on the left, select the servers and workstations where you want the check added.
- In the right panel, select Add New.
- Configure the check settings. For details, see the relevant Windows, Mac, or Linux sections.
- (Optional) Use the Alert Settings dropdown menu to configure the check alert settings.
- Select OK.
- When prompted, review your settings and select OK to confirm.
Add multiple checks from the Checks tab
- In the All Devices view North-pane, select a device.
- Go to the Checks tab in the South-pane.
- Select Add Check.
- Choose the frequency and check type. Only available checks are enabled.
- Add 247 > <check_name>
- Add DSC > <check_name>
- Select Multiple Devices.
- In the Apply to panel on the left, select the servers and workstations where you want the check added.
- In the right panel, select Add New.
- Configure the check settings. For details, see the relevant Windows, Mac, or Linux sections.
- (Optional) Use the Alert Settings dropdown menu to configure the check alert settings.
- Select OK.
- When prompted, review your settings and select OK to confirm.
Add a check from the Checks tab
- In the All Devices view North-pane, select a device.
- Go to the Checks tab in the South-pane.
- Select Add Check.
- Choose the frequency and check type. Only available checks are enabled.
- Add 247 > <check_name>
- Add DSC > <check_name>
- Configure the check settings. For details, see the relevant Windows, Mac, or Linux sections.
- (Optional) Use the Alert Settings dropdown menu to configure alert settings.
- To run an Automated Task when the Check fails, select Assign a Task after creating the Check. (This option is not supported for all checks.)
- Select OK to save and apply.
If you selected Assign a Task:
- Choose the Automated Task script.
- Select Next to configure parameters.
- Enter any required Command Line or Script parameters.
- (Optional) Set maximum permitted execution time for the script.
- Select Finish to save and apply the task.
New checks display in the South-pane Checks tab with a plus icon ![]() and report as Awaiting synchronization. This changes to Awaiting first run after the check configuration is downloaded to the Agent. After the check runs, the results are uploaded to the All Devices view.
and report as Awaiting synchronization. This changes to Awaiting first run after the check configuration is downloaded to the Agent. After the check runs, the results are uploaded to the All Devices view.
Changes made directly in the Agent take precedence over modifications made from the All Devices view.
If checks are edited simultaneously in both locations, the Agent configuration will be applied.


