
Set up tenants in Cloud Commander
Cloud Commander will be decommissioned and stop functioning on May 13, 2026. You can use the product until that date.
Review and update workflows to remove any dependencies before the product is decommissioned.
Support, bug fixes, and security patches will be available until April 13, 2026.
To unlock the full value of Cloud Commander, set up your customers' Microsoft tenants. When tenants are set up in Cloud Commander, you can monitor and manage them all in a single console.
This article includes the following instructions:
Prerequisites
- You need the Cloud Commander Microsoft Cloud Access Administrators role or be a member of a group with that role.
- Your customers' Conditional Access policies allow access. See Set up your customer's Conditional Access policies.
Set up CSP tenants
A CSP tenant belongs to a customer you have a CSP agreement with, and its source is the Microsoft Partner Center.
A progress tracker guides you through the setup process. It shows each step, provides descriptions, and displays the current status in the Status column.
Start tenant setup
-
In the , select
 Settings > Microsoft Cloud Access and select the row for a tenant.
 - Select Set up tenant.
A CSP tenant has Microsoft Partner Center listed in the Source column.
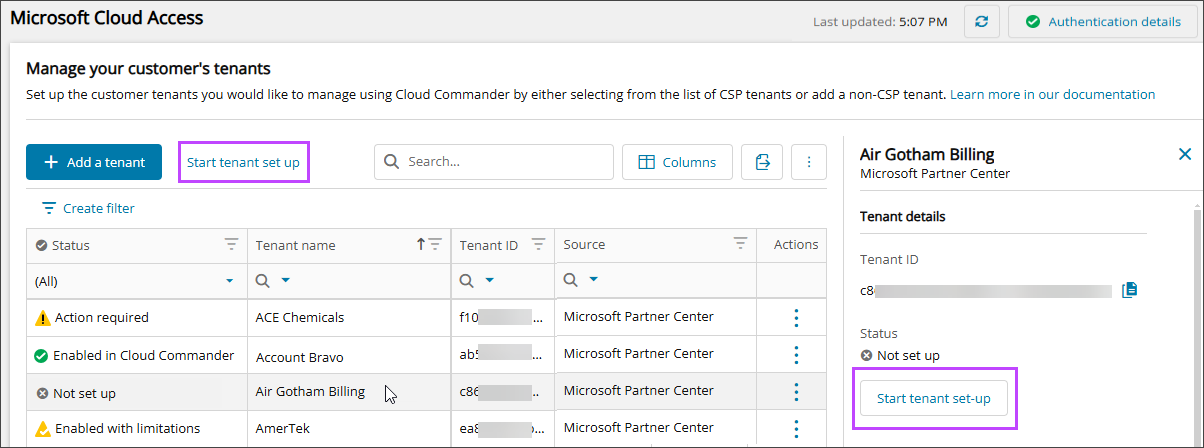
The details panel shows the tenant's setup progress tracker. You can navigate away from this view at any time—the setup continues in the background. You can also set up multiple tenants simultaneously.
Progress tracker steps
1. Create Customer
Cloud Commander creates a new customer record for the selected tenant. This step usually takes a few seconds.
2. Establish an admin relationship
Cloud Commander checks if your organization already has admin relationships with the customer and if any of those relationships are valid.
Scenario 1: No valid admin relationships found
If no valid admin relationships are found, Cloud Commander creates a new one and provides a message template to request customer approval in the next step.
Scenario 2: Valid admin relationships found
If valid admin relationships are found, you choose which existing admin relationship to use or choose to create a new admin relationship.
- In the progress tracker, select Establish an admin relationship.
- Choose whether you want to use an existing relationship or create a new one. See GDAP admin relationships: Reuse or create new?.
- If you chose to use an existing admin relationship:
- Select the admin relationship to use. Discovered admin relationships that are not valid for Cloud Commander are disabled.
- The expiry date for the relationship displays to help you decide whether to use it or choose another with a later expiry.
- Select Confirm.
- If you chose to create a new admin relationship, select Confirm.
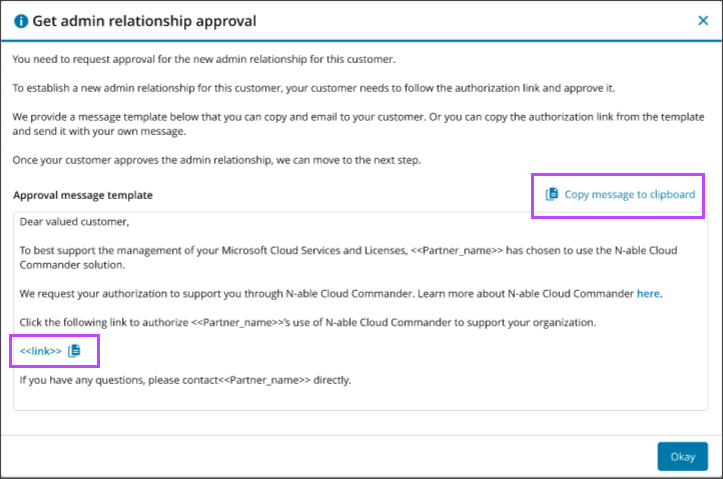
3. Get admin relationship approval
If you chose to use an existing admin relationship, this step quickly moves on to finalize the relationship because customer approval is already confirmed.
If you chose to create a new admin relationship, you need to request approval.
To request customer approval for the relationship, we provide a message template you can copy and send to them. If you prefer to write your own message, copy the authorization link from the template and send it to your customer.
- In the progress tracker, select View approval message template.
- Copy the message template or the authorization link and click Okay.
- Send the message or authorization link to a global administrator for the customer so they can approve the request.
The customer Admin account must have multi-factor authentication (MFA) enabled.
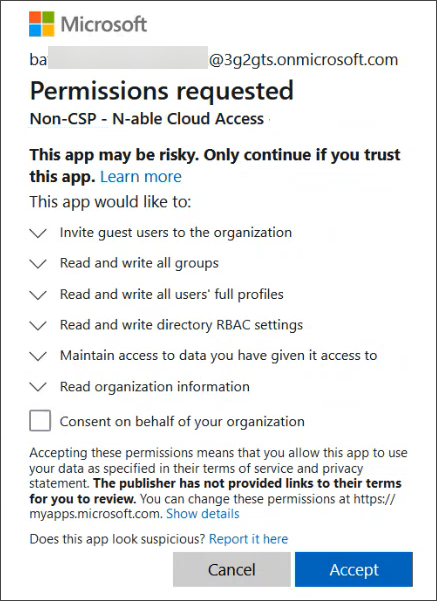
When the customer clicks the link, they:
- Sign into Microsoft using their Admin credentials, including MFA, for their organization.
- Review the permissions requested and select Accept.
To follow least privilege practice, we recommend not selecting Consent on behalf of your organization. Doing so may grant unintended elevated privileges to users in your organization.
Now we have to wait for your customer to approve the admin relationship in the Microsoft Partner Center. We automatically keep checking Microsoft for the admin relationship approval.
After the admin relationship is approved, there may be a delay of up to five minutes before the approval is synchronized from Microsoft Partner Center to Cloud Commander.
4. Finalize relationship
Once approval is synced, Cloud Commander registers its application with the customer tenant. This grants access to manage:
- Users
- Groups
- Authentication methods
- Licenses
- Other tenant resources
If issues occur, error details are provided:
- Microsoft error details: Error code, Microsoft message, timestamp from the Microsoft record, and Correlation ID, which is an automatically generated unique identifier (GUID) for the request.
- Cloud Commander error details: Tracking ID and an Event ID.
For help, see Troubleshoot errors in Cloud Commander.
5. Set up groups and roles
Cloud Commander assigns you to the Default platform user groups scoped to the tenant. This allows you to monitor and manage the tenant.
6. Sync all users
Cloud Commander syncs users from Microsoft Entra ID. This step may take a few minutes.
7. Schedule reports
Cloud Commander schedules two daily reports:
- Microsoft Secure Score
- Microsoft Available Licenses
Reports update at midnight. They may appear empty until the first update runs.
Successful tenant setup
When setup completes:
- The tenant is enabled and displays in the customer selector.
- You can begin monitoring and managing it in Cloud Commander.
If the tenant is Enabled with limitations, it means setup is complete, but additional permissions are needed before you can use all the Cloud Commander features. For instructions, see Request additional permissions for tenants.
Admin relationships with GDAP are created with an expiration of two years, which is the maximum time allowed by Microsoft. When a tenant admin relationship expires, we recommend disabling the tenant in Cloud Commander and repeating the approval process by setting up the tenant again. See Expiration of admin relationships.
Set up non-CSP tenants
A non-CSP tenant belongs to a customer you don't have a CSP agreement with and its source is Microsoft 365.
A non-CSP tenant may not have a partner relationship, or it may have a relationship to another partner other than you. Some customers may have multiple partners, pay-as-you-go agreements, or Enterprise Agreements. Customers may use an MSP for a variety of services but may not want to join their tenant into your CSP agreement.
However, you can still administer these non-CSP tenants the same way you administer CSP tenants.
1. Add non-CSP tenant
- In the , select Settings > Microsoft Cloud Access.
- Select Add a tenant.
- Enter a temporary Tenant Name for the tenant in Cloud Commander until the full relationship is established. The true name of the tenant, based on the tenant ID, is accessed from Microsoft during the setup.
- Enter the unique Tenant ID for the tenant. For instructions to find your Microsoft Entra tenant ID, see the Microsoft documentation.
- Enter a Guest account email address to create a guest account for yourself in the tenant. The email must belong to your MSP tenant and be able to receive emails to accept the guest account invitation.
- Select Add tenant.
The non-CSP tenant displays in the Microsoft Cloud Access list of tenants. No account connection exists for the tenant yet because customer approval is required.
2. Get approval to create a guest account in the customer tenant
We create a guest account in the customer tenant so you can authenticate as the guest and accept the permissions for Cloud Commander.
- Select the tenant and select Request customer approval.
An approval message template displays with a link to authorize the guest account creation.
- Select Copy message to clipboard and send the message to a global administrator for the customer to approve the request. When the customer clicks the link, they:
- Sign into Microsoft using an Admin account for their organization.
- Review the permissions requested and select Accept.
To follow least privilege practice, we recommend not selecting Consent on behalf of your organization. Doing so may grant unintended elevated privileges to users in your organization.
After the customer approves the request, the guest account is created, and Microsoft sends an email invitation to the guest account email you entered earlier.
3. Accept the guest account invitation
If you don't receive an email invitation from Microsoft, check your spam folder.
- Go to the guest email account, open the email invitation from Microsoft, and select Accept invitation.
- Sign into Microsoft using your guest account credentials.
- Review the permissions requested and select Accept.
- If multi-factor authentication is not already set up for the account, follow the prompts to set it up.
4. Accept the permissions for Cloud Commander to access the tenant
- After you authenticate with the guest account, you are prompted to review the permissions requested and select Accept.
To follow least privilege practice, we recommend not selecting Consent on behalf of your organization. Doing so may grant unintended elevated privileges to users in your organization.
Now the tenant is registered with the Cloud Commander application.
5. Finalize approval
- In the Microsoft Cloud Access view, select the tenant and select Finalize approval.
Now the non-CSP tenant is enabled and available in the Cloud Commander customer selector.
Next steps
- View user details for the tenant
Related articles
Updated: Jan 09, 2026