
Password Secrets Vaults
Password Secrets Vaults provide secure storage options for passwords and other types of data strings. That security is managed entirely by the Take Control user, as the password that is used to add secrets to the vaults is entirely unique to the technician, and is not stored anywhere else in the system.
The sensitive information stored in your Secrets Vaults can be used by authorized technicians during a remote session. The information contained in each Vault is securely encrypted and cannot be read without the password created by each Technician. Not even the N-able Support team has access to this encrypted information.
Create a Vault
- Go to Management > Secrets Vaults > Vault: Add.
- Enter a Name and Description for the new Vault, and select Continue.

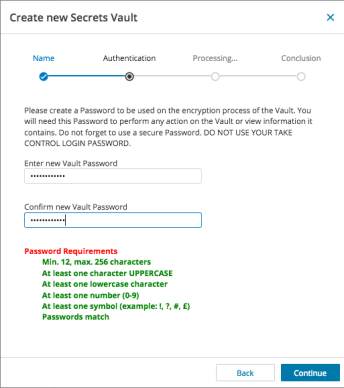
- Enter the password that will be used to encrypt the Vault's data and select Continue.
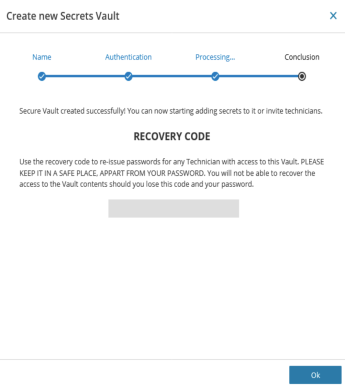
- If all password requirements are met, the New Vault is successfully created and the Recovery Code is generated. Ensure you keep a secure record of the recovery code. Select OK to complete the Vault creation process.
- To grant additional technicians access to the vault, select the Technicians tab from the Secrets Vault window and choose Add. Technicians must have the permission Secrets Vaults at Full Access level to be selectable. See Learn about permissions for Take Control technicians .
- Select a technician to add to the Secrets Vault and click Next.
- Copy the Temporary Shared Secret, select the check box confirming you have copied the Temporary Shared Secret and click Next.
- Enter the Vault Password and click Save.
The password validation happens in real time - as the user enters a password of sufficient strength and complexity, and then confirms the Vault Passwords match, each password validation requirement turns green.
If you lose or forget your password for the Vault, use the Recovery Code as the means to recover the Vault's password. If you have lost the password and the Recovery Code, the data in the vault is irretrievably lost.
After successfully creating your Vault and granting access to additional technicians, you are ready to add Secrets to it.
Add Secrets to your Vault
- Go to Management > Secrets Vaults, choose the target Vault and select Secrets: Add.
- Enter a name for the Secret and select a Secret Type. This is broken down into OS Credentials (a user name/password combo), Notes, and Master Password. Select Add another to add additional Secrets to the Vault. Select Continue when finished.

- To authenticate the new Secret, enter the Vault Password. This ensures that technicians adding Secrets have sufficient permissions to do so. Select Save to complete addition of the Secret to the Vault.
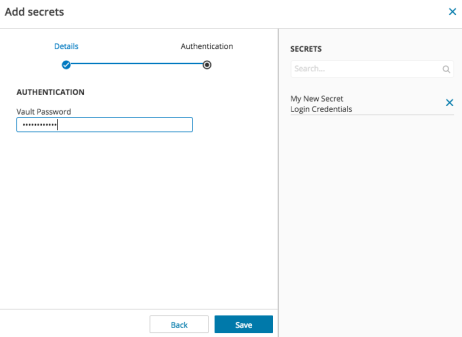
The Password field is the password for the Secret, NOT the Vault password.
After the Vault and Secret have been created, you can then use a Secrets Vault during a support session.
Use the Secrets Vault during a support session
Access the Advanced menu in the Remote Viewer to add a password to a Secrets Vault during a support session. After launching a support session on a device where your secrets are accessible, and you will see the  icon in the top right corner of the Remote Viewer.
This icon will be grayed out until a password field is selected.
- Select the password field where you want to use the Secret, and select to view the Vaults to which you have access.
- Choose a Vault to expand it's secret and select the one you want to use.
- Enter the Vault password, and select Insert to apply the password.

During a support session, select the Advanced Menu  and choose Add Remote Credentials to a Vault to request the user input their account data. This is an easy way for the user to securely vault their account information without it being viewed by the technician. The user's credentials are stored in an encrypted passwords vault and cannot be viewed by anyone, but can be used at a later date by a technician during a remote support session.
What do you want to do?