
Add a group
Cloud Commander will be decommissioned and stop functioning on May 13, 2026. You can use the product until that date.
Review and update workflows to remove any dependencies before the product is decommissioned.
Support, bug fixes, and security patches will be available until April 13, 2026.
Depending on your group and platform role assignments, you can add the following group types in Cloud Commander:
Platform user group: A platform user group is exclusive to Cloud Commander and is used to assign platform roles to members performing tasks in Cloud Commander. See Assign members to platform user groups.
Microsoft Entra ID group: A Microsoft Entra ID group includes Microsoft 365 groups, Microsoft Security groups, and Distribution groups. These groups can be imported from the cloud or created in Cloud Commander and then written to Microsoft Entra ID. You can assign platform roles to Microsoft Entra ID groups.
- Microsoft 365 group: Facilitates collaboration by providing members with access to a shared mailbox, calendar, files, SharePoint site, and more.
- Microsoft Security group: Manages access and permissions to resources.
- Distribution group: Distributes messages to all its members.
Prerequisites
- You must be assigned the User Groups Administrators role scoped to the tenants you want to manage.
Add a group
- In the , select
 Identity > Groups.
 - Use the customer selector to choose the customers you want to view.
- If the group list is empty or you can't find a specific group, refresh the page to show the most recent data.
- Select New group.
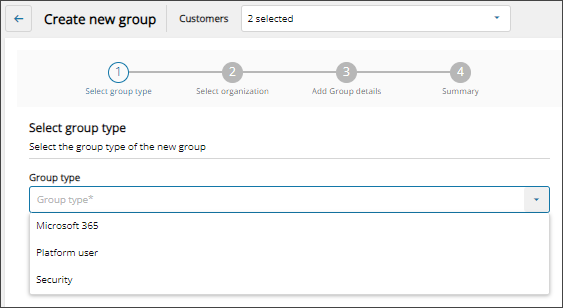
When multiple customers are selected in the customer selector at the top of the dialog only options that apply to all selected customers display.
- Use the drop-down menu to select the Group type and select Next. For information about group types, see Groups.
- If you have multiple customers selected in the customer selector, select the Organization to assign to the group and select Next.
- Enter a Group name and a Description for the group.
- If you are adding a Microsoft 365 or Distribution group, you can edit the populated Email address.
- For Microsoft 365 and Microsoft Security groups, you can turn on or off the toggle to enable email and security.
- Select Next.
- If you are adding a Distribution group:
- Configure group settings to determine how the group can be accessed by others and select Next.
- Select Add owners to add at least one owner who will be designated to manage the group. A group owner can delete email from the group inbox.
- Select the checkbox for each user you want to add as an owner and select Next.
- Review the summary of your chosen owners and select Done.
The new owners display on the list.

- Select Next.
- Review your selections. If you need to make changes, select Back. Otherwise, select Confirm to add the new group.
The new group is added and you can view it on the Groups list. If you don't see the new group or if the group displays a temporary domain, refresh the screen at the top of the user interface.
Next steps
Related articles
Updated: Jan 09, 2026