
Create Ticket Tasks and Task Templates
Use Task Templates to apply a pre-configured list of tasks to a ticket. Categorize Task Templates based on common issues reported by your customers, and provide a check list of tasks that technicians can use to diagnose and fix the problem.
Add additional tasks to a ticket after applying a template, or create one-off tasks that are not part of a template. When a task is marked complete, a time entry is added to the ticket to account for the time needed to complete the task.
Create Task Templates
- Navigate to Settings > Tickets & Workflows and select Task Templates.
- Click Add Task Template and enter a name and description for the template, and click Add A New Task.
- Enter a name, description and estimated time for the task, and select a parent task from the Dependency field, if applicable.
- Click OK to confirm the addition of the task to the template.
- Continue to add tasks as needed and select Save Task Template when finished.
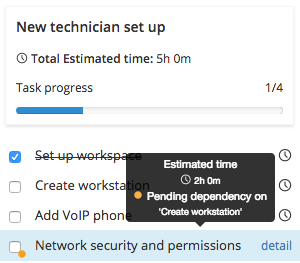
The Dependency field contains a parent task that requires a separate dependent task to be completed first. The dependent task has an orange dot next to it which indicates the pending dependency.
The Task Template is saved and can now be added to tickets.
Add Tasks to a ticket
Add Task Templates to tickets to apply all tasks included in the template.
- Navigate to the Helpdesk and create a new ticket.
- After saving the ticket, select
 from the menu to the right of the ticket window to open the Ticket Task editor.
 - Select a Task Template from the drop down menu, or click Add Task to create a new task for the ticket and enter a name for the new list of tasks.
- Select Add Task and enter a name, description, estimated time, task owner and assigned user. Select a parent Task from the Dependency field, if applicable.
- Select Add to confirm the addition of the task to the ticket task list.
- Continue to add tasks as needed and click Save Task when finished.
Enter an estimated time for the task and when that task is completed, a time entry is added to the ticket and the technician can add a description of work before saving the time entry.
When each task in the list is marked complete, a time entry is created in the ticket for the estimated time included in the task. Notify users from the time entry to make sure a specific technician is aware of the tasks completion.
What would you like to do?