
Add Canned Responses to tickets
Technicians can spend hours replying to customers from within their tickets, often times writing out the same response for different customers with the same issue. Save time by adding Canned Responses to your tickets so you can quickly and easily respond to common customer issues.
Canned Responses are separated into Shared and Personal categories. Shared Canned Responses can be viewed and used in tickets by any technician with the appropriate permissions, and Personal Canned Responses are unique to each user.
Configure permissions for Canned Responses
Before getting started, make sure technicians who communicate with customers have the appropriate permissions configured. MSP Manager
- Navigate to Settings > Users & Permissions > Roles.
- Click
 next to the Role you would like to edit.
 - Select the MSP Company Management section to expand and view it's options.
- Select the Configure Shared Canned Responses option to add it to the role.
- Click Save Role.
Create Shared Canned Responses
Each Canned Response that you create must be assigned to a Canned Group. Follow these steps to create a Canned Group and start adding Canned Responses to it.
- Navigate to Settings > Tickets & Workflows > Canned Responses.
- Select Add Group.
- Enter the Group name and click Save.
- Select Add Response.
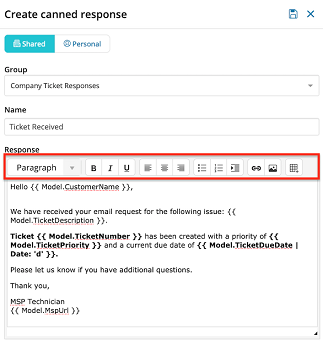
- Choose a Group and enter a Name for the Canned Response.
- In the Response section, enter the text for the Canned Response that your customers will see.
- Use the All Variables chart to the right of the response editor to search for and include keywords in your canned response templates that will auto-populate based on the information within the ticket. For instance, click Ticket Number to add
{{Model.TicketNumber}}to the response, which is replaced with the specific ticket's number after the response is sent.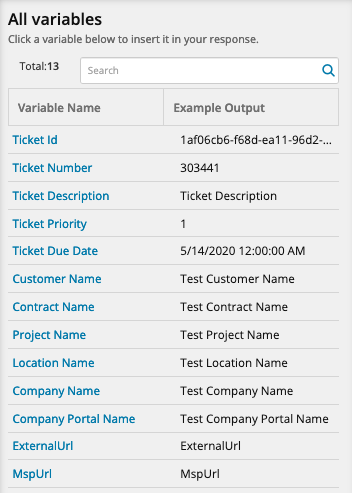
- At the top of the Response Editor, use the links to add rich text and numbered lists, or insert hyperlinks, images or tables into the response.
- Click Save to add the response to the group and make it available to use in ticket responses.
Use images and hyperlinks in your responses to create customized signatures for technicians that include your company logo.
Create Personal Canned Responses
- Navigate to your User Icon
 in the top right corner of your MSP Manager account.
 - Select My Account to open the User Menu.
- Select the Canned Responses tab.
- Click Add Response in the top right corner of the page and follow steps 5 - 8 above to add Personal Canned Responses.
After saving the canned response, it is available to add to tickets.
Add Canned Responses to a ticket
- Navigate to a ticket from the Ticket List in a Workspace page or a customer's ticketing section.
- Scroll down in the ticket editor and select Add Response.
- Click Canned Responses in the top right of the Response Editor to open and view a list of responses organized by Group. Start typing to search for a specific response.
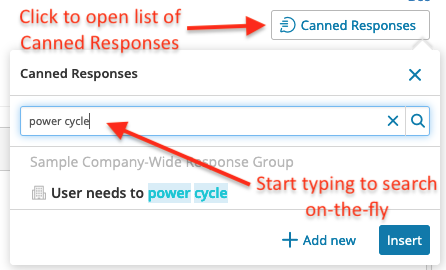
- Similar to the template editor, you can use the All Variables chart to the right of the response editor to search for and include keywords in the response.
- Select a Response from the list and click to open and edit the response before adding it to the ticket or
- Click Insert to add the response to the ticket.
Double-click a response in the list to quickly add it to the ticket or use the Add new button to create new responses.
What would you like to do?