Passportal Integration Configuration
Through the Passportal and N-sight integration you can map your N-sight Clients to the corresponding entry in Passportal or create new Passportal Clients where these do not exist.
Visit N-sight Integration Features for information on the available functionality.
Integration Prerequisites
- N-sight URL.
- N-sight API Key.
- At least two Clients setup in N-sight.
Generate your N-sight API Key
The API Key is used to authenticate against the Public API. If you regenerate a new key, anything that uses the existing key to authenticate against the Public API will stop working. If you already have an API Key, we recommend you use it.
- Log in to N-sight RMM as a Superuser or (non-Classic) Administrator level access, or using a login with the required General permissions enabled, or using the Agent Key (if enabled).
- In the All Devices view, go to Settings > General Settings > API.
- Select Generate (or Regenerate when you are creating a new API Key) and record the API Key for future use.
You can generate the API Key as often as required. Each regeneration overwrites the existing key.
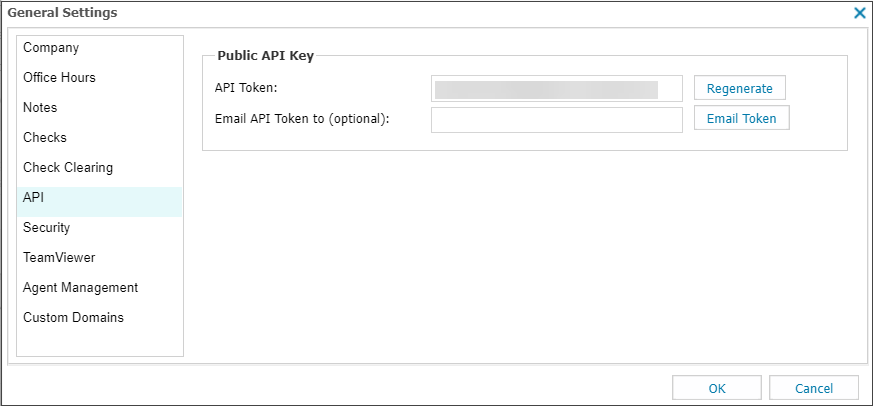
- Enter the recipient email address in the Email API Token to (optional) field and click Email Token (Optional).
The sent email includes the API Key and the server URL to query.
- Select OK to apply.
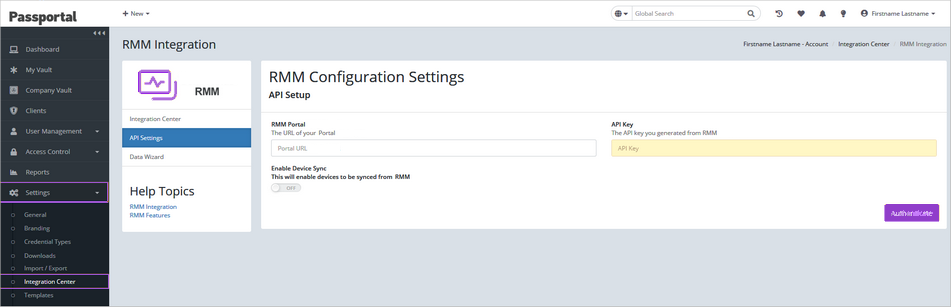
Enable the N-sight RMM Integration
- Log into Passportal.
- Choose Settings in the sidebar, then navigate to the Integration Center tab.
- Select N-able RMM in the Integration Center page.
Enter your N-sight RMM API Details
- Under API Settings enter your N-able RMM Portal URL and API key (both are contained in the N-sight RMM API email sent in the above Generate an N-sight RMM API Key > Step 4).
- Select Enable Device Sync to allow your N-sight RMM devices to synchronize as assets in Passportal.
- Choose Authenticate to proceed.
Select the Clients to Synchronize
The next step is the Data Wizard section, this allows you to choose the Clients to synchronize between Passportal and N-sight RMM.
- Select Auto-Match All to match any Passportal and N-sight RMM Clients with identical names. Using this option ensures duplicates Clients are not created.
- To manually match Clients, choose Match and the select the corresponding Client from the drop-down.
- For those Clients that do not exist in Passportal, select Create or Exclude buttons beside their names.
- If you have a large list, exclude the Clients you do not want to map then select the Create Unmatched button to create the remaining clients.
- If you excluded a Client that you would like to later add, simply select the Excluded Records tab and select Create, Match or Exclude.
Setup Completion
- Select Next once you have finished creating your Clients.
- This displays an overview of created, matched, or excluded Clients.
- Select Finish.
- All imported devices will appear in their respective clients under Assets.
After you have completed the process, it may take some time to allow the initial synchronization of assets to occur. Depending on the number of devices, this can take several hours.
New devices are currently synchronized once per day during the evening.
Edit N-sight RMM Integration
Once setup, you may find it necessary to change your integration settings to enter a new API key or add new Clients in Passportal.
- Log into Passportal.
- Choose Settings in the sidebar, then navigate to the Integration Center tab.
- Select N-able RMM in the Integration Center page.
- Make the required changes then Save to apply.
If making any changes to the API Settings page, you must re-enter your N-sight RMM API Key (found in the All Devices view Settings > General Settings > API). Even where this change is to the Enable Device Sync setting.
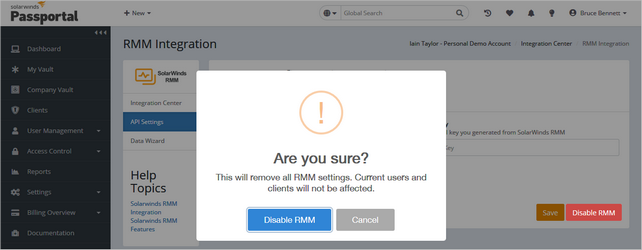
Disable N-sight RMM Integration
Where you no longer require the N-sight RMM integration, it is disabled from Passportal.
- Log into Passportal.
- Choose Settings in the sidebar, then navigate to the Integration Center tab.
- Select N-able RMM in the Integration Center page.
- Go to the API Settings section.
- Select Disable RMM then confirm.