
Script Check
You can monitor Windows servers and workstations by adding user-defined or default Script Checks. When you add a Script Check, configure the required parameter values.
Before adding a script check to a device, upload the script to the All Devices view. For upload instructions, see Upload user-defined scripts.
You can suppress alerts until the number of consecutive check failures reaches the configured threshold. For details, see Configure alert thresholds to suppress alerts.
Check configuration
Add a script check to a device
- In the All Devices view, select the device in the North-pane.
- In the South-pane, go to the Checks tab.
- Select Add Check, choose the check frequency, then select Script Check.
-
Choose a script, then select Next.
Scripts are grouped by default script categories (if applicable). On Linux, only user-defined scripts are supported.
- Configure script parameters, including the Command Line for custom scripts (if required).
To prevent the removal of a leading zero in command-line arguments, any part of the command that begins with 0 is wrapped in \ so the full argument is preserved during execution or processing.
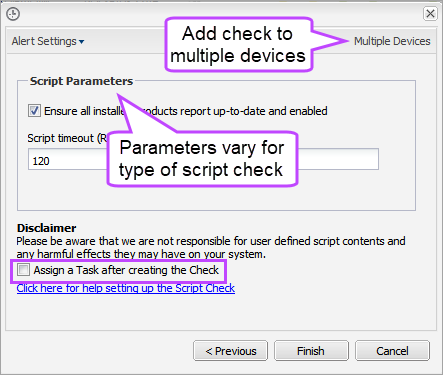
To add the check to multiple devices, select Multiple Devices.
- To run an automated task when the check fails, select Assign a Task after creating the Check.
- Select Finish to save and apply the check.
If you selected Assign a Task:
- Choose the Automated Task script.
- Select Next to configure parameters.
- Enter any required Command Line or Script parameters.
- (Optional) Set maximum permitted execution time for the script.
- Select Finish to save and apply the task.
Edit
Script Check - Endpoint Detection and Response (EDR) settings can't be edited. To remove them, you must uninstall EDR from the device.
- In the All Devices view North-pane, select the device.
- Go to the Checks tab in the South-pane.
- Right-click the check and choose Edit Check.
- Edit the script details and parameters.
- Select OK to save and apply.
Delete
- In the All Devices view North-pane, select a device.
- In the South-pane, go to the Checks tab.
- Right-click the check and choose Delete Check.
- Review the summary and select OK to confirm removal.
Script argument handling (Windows)
For the Windows Agent, script arguments entered in the Script Parameters, Command Line field of the custom Script Check and Automated Task dialog are passed to the script exactly as they would be if entered directly on the device itself.
You can run user-defined scripts, but N-able does not manage or validate them. N-able is not liable for system, hardware, or data loss. Customers or developers must confirm the integrity and impact of any custom scripts.
Test the check on the Windows Agent
After a check is synchronized, go to the Script Check tab under the 24x7 section. Highlight the required script and select Test Check.
The Agent includes details about the Script Check, such as the script description, test parameter arguments, the script language, and time out period.
What do you want to do?
- Read about Script Manager
- Review the list of Default Script Checks
- Configure alert thresholds to suppress alerts