
Recovery Console
If Backup and Recovery options do not appear in N-sight RMM, use Cove instead.
To start a 30-day free trial of Cove:
- Open the app switcher in the Product Bar.
- Select Cove Data Protection (Cove).
The Recovery Console is a multi-instance recovery tool that enables system administrators and service providers to setup proactive data recovery from servers or workstations at any location.
The following data sources are supported by the Recovery Console:
- Files and Folders
- System State (Virtual Disaster Recovery)
- Microsoft Exchange
- Hyper-V
- Microsoft SQL
- VMware
The Recovery Console is a multi-instance recovery tool that enables system administrators and service providers to setup proactive data recovery from servers or workstations at any location.
Download and install the Recovery Console
The Recovery Console is available from the Dashboard:
- Backup & Recovery > Download
- Select the version that corresponds to the architecture of the device the Recovery Console is to be deployed on:
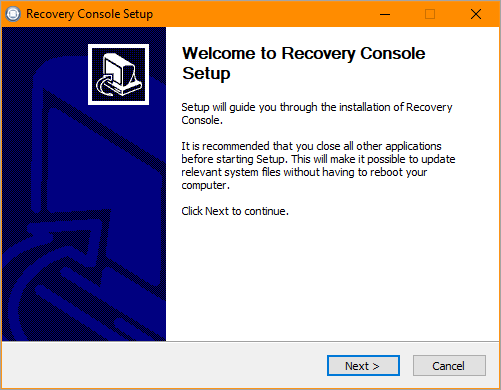
- Navigate to the download location when complete and run the executable to start the setup wizard
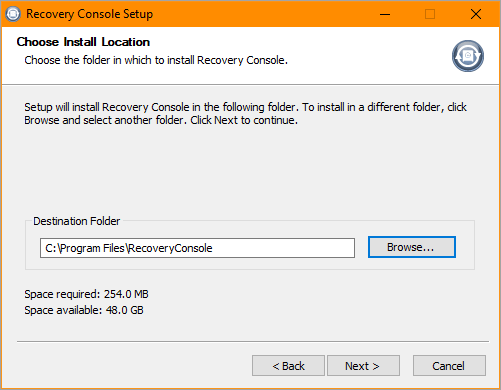
- Choose Install Location, if different to the default
- Click Install to begin the installation process
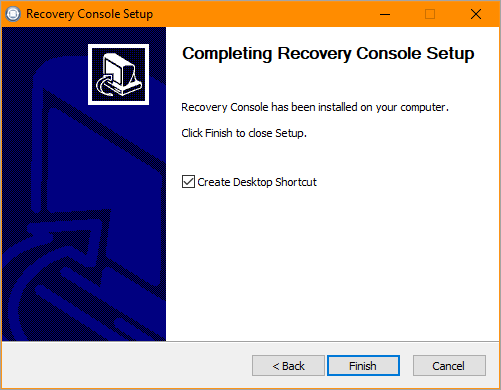
- Select whether to Create Desktop Shortcut or not
- Click Finish to close the wizard
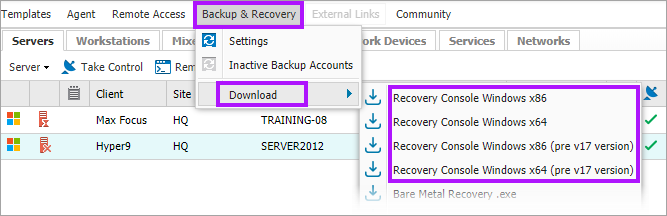
| Architecture | Recovery Console Version |
|---|---|
| 32-bit systems | Recovery Console Windows x86 |
| 64-bit systems | Recovery Console Windows x64 |
The latest versions of these files is also available from the Backup & Recovery Tools page
Access the Recovery Console
The Recovery Console is accessed from the Windows Start menu or by clicking on the desktop icon where available.
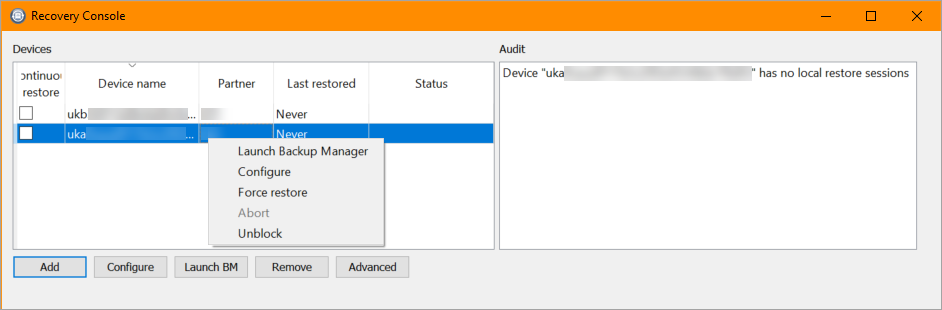
Once launched, you will see two panes - Devices and Audit:
| Pane | Description |
|---|---|
| Devices | Lists all of the devices including the Device name, Partner it is registered under, when it was Last restored and current restore Status |
| Audit | Contains restore statistics on the selected device, or all device where no selection is made. This includes the date and time, device name along with the start and end date of the restore including the data source |
The task bar at the bottom of the Recovery Console provides the following functions:
| Function | Description |
|---|---|
| Add | Add a new device to the Recovery Console. Enter the Device name, Password and Security code (Encryption Key) contained in the Backup Account Info section under the monitoring Dashboard's Request Encryption Key option. This process is covered in the Enabling recovery for a device section. |
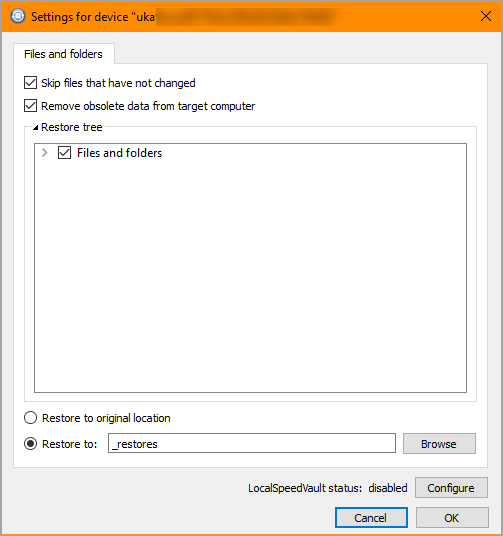
| Configure | Edit the settings for the selected device |
| Launch BM | Open the restore only Backup Manager for the selected device in a browser |
| Remove | Remove the selected device from the Recovery Console |
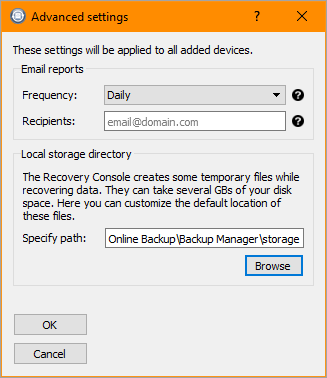
| Advanced | Edit common settings for all devices:
|
Right-clicking on a device in the Devices pane displays a context menu with the following options:
| Option | Description |
|---|---|
| Launch Backup Manager | Open the restore only Backup Manager for the selected device in a browser |
| Configure | Edit the settings for the selected device |
| Force restore | Starts the data recovery for the selected device immediately without waiting for a new backup session. This option is unavailable where there is no data available for recovery |
| Abort | Terminates all active recovery sessions related to the device. This option is unavailable where there are no active recovery sessions |
To shut the Recovery Console and minimize to the task bar notification area click on the exit button (X). Please be aware that all active recovery sessions will continue to run.
Enabling recovery for a device
Before enabling data recovery there are a number of pointers that should be taken into consideration:
- Devices are added one at a time
- There is no limit on the number of devices that can be added, however please take into account the available resources on the system running the Recovery Console.
- The devices added to the Recovery Console should not be installed on the same computer as this can potentially result in conflicts.
- Only those devices that are accessible may be added, full access details are required.
- To enable data recovery for a backup device, you should add it to the Recovery Console and specify settings for it.
To enable data recovery for a device Backup & Recovery is running on:
- Click the Add button on the Recover Console
- In the Add Device dialog enter the Device Name, Password and Security Code (Encryption Key)
- OK to proceed
- Select the data source to enable recovery for in Data sources to track
- After the required data sources are selected click Next to configure the first data source
- Click Next to proceed to the subsequent data sources until all are setup
- After all of the data sources are configured click OK to finish and apply the settings
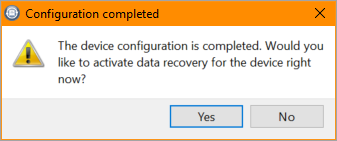
- If all of the settings were successfully setup a Configuration completed message is displayed with the option to activate data recovery for the device right now. Click Yes to enable the continuous recovery or No if there is not a requirement to start the recovery immediately
- Once successfully added the machine will now appear in the Devices pane of the Recovery Console. Use the Continuous Restorecheckbox against the Device name to enable and disable its continuous data recovery
These are contained in the Backup Account Info section under the All Devices view's Request Encryption Key option

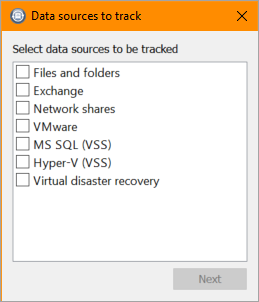
The list may contain up to five data sources with the selection dependent upon the products settings. Please note that the data source selection may be edited later via the Configure option on the Recovery Console toolbar.
Note: for the Recovery Console to function it must either be open or minimized. If there are active devices please do not shut down the Recover Console or power down the computer it is running on
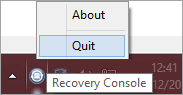
Exit the Recovery Console
Clicking the Close button minimizes the Recovery Console to the notification area, with all active recovery sessions continuing to run.
To exit out of the application, and stop all active recovery sessions:
- Go to the task bar notification area and right-click on the Recovery Console icon to display the context menu.
- Click Quit and confirm when prompted.
Using the Recovery Console to restore devices is covered in the Virtual Disaster Recovery section Recovery Console topic