
Virtual Disaster Recovery
If Backup and Recovery options do not appear in N-sight RMM, use Cove instead.
To start a 30-day free trial of Cove:
- Open the app switcher in the Product Bar.
- Select Cove Data Protection (Cove).
Virtual Disaster Recovery, included from Backup & Recovery 2014, is a fast and efficient tool which automatically restores a machine's System State and file level backups to a virtual environment to create a working mirror of the source computer along with all of the necessary data.
As such Virtual Disaster Recovery can be used in the following situations:
- Provide remote assistance to perform a Virtual Recovery at the end-customers location using the end-customer's' VMware or Hyper-V environment
- Perform a Virtual Recovery to an ESX server. The recovered server becomes available to the clients for a short period of time
- Perform a Virtual Recovery to a *.VMDK file and ship it on a physical media to a customer
- Stage a Virtual Recovery to an ESX server and then perform daily incremental restores to keep a near-line copy for rapid Disaster Recovery purposes
- Perform regular, non-disruptive DR testing without a significant hardware or time investment
| Virtual Disaster Recovery can recover to the following targets: |
|---|
| VMware vSphere/VMware ESXi (all paid 64-bit versions are supported: 5.1, 5.5, 6.0 and 6.5) |
| Hyper-V (versions 2 and 3) |
| Microsoft Azure Cloud |
Requirements
Supported platforms
The range of recovery platforms depends on the selected recovery target:
| Recovery Target | Win 7 | Win 8 / 8.1 | Win 10 | Server 2008 | Server 2008 R2 | Server 2012 R2 | Server 2016 |
|---|---|---|---|---|---|---|---|
| VMware | Yes | Yes | Yes | Yes | Yes | Yes | Yes |
| Hyper-V | No | Yes | Yes | Yes | Yes | Yes | Yes |
| Azure Cloud | No | No | Yes* | No | No | No | Yes* |
| * Azure Cloud restore requires nested Virtualization (allows you to run Hyper-V inside of a Hyper-V virtual machine) which is only available when creating Windows Server 2016 Datacenter or Windows 10 Pro virtual machines as restoration targets | |||||||
Backup selection requirements
To start using the Virtual Disaster Recovery feature, backup the following data sources:
- The system state of the computer (the System State data source).
- The whole system disk C:\ or any other depending on the configuration of the computer (the whole Files and Folders data source).
- Any other important data; supported data sources: Files and Folders, MS Exchange, and MS SQL.
If in doubt about the file selection, please perform a test restore
Recoverable Operating systems
Data recovery can be initiated from the following versions of Windows:
- Windows 7
- Windows 8
- Windows 8.1
- Windows 10
- Windows Server 2008
- Windows Server 2008 R2
- Windows Server 2012
- Windows Server 2012 R2
- Windows Server 2016
The source system the virtual disaster recovery is performed form must have the Virtual Disaster Recovery feature enabled and should not be older than the target system the restore is performed to. For example, when restoring a Windows 8 source, the target should only be Windows 8 or newer.
Software options
Virtual disaster recovery can be performed using either of these tools:
- Backup Manager recover data from one device.
- Recovery Console recover data from multiple devices simultaneously.
Both of the tools support one-time restores and continuous restores. In the Backup Manager, continuous restores are possible while a device is in the restore-only mode.
The following sections cover the available recovery options:
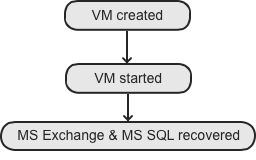
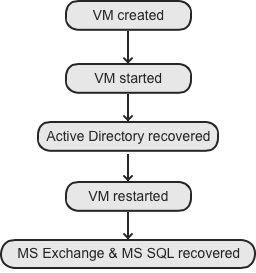
MS Exchange and MS SQL Recovery
Where MS Exchange or MS SQL was included for Virtual Disaster Recovery, the recovery of the data sources is automatically completed after the new virtual machine is launched. Please be aware that where MS Active Directory is detected there will be an additional system restart.
See the below diagrams for how MS Exchange and MS SQL data source are recovered during Virtual Disaster Recovery:
| Virtual Machine without Active Directory | Virtual Machine with Active Directory |
|---|---|
|
|
Virtual Machine Start Information
- VMware machines are started automatically on remote ESX servers
- Hyper-V machines should be started manually (open the Hyper-V Manager, right click on the target machine and choose Start from the context menu)
- Azure and Amazon machines can be started manually or automatically
To enable automatic starting, enter the VdrStartCloudVmAfterRestore=1 parameter in the [General] section of the config.ini file.
Backup Manager users should enter access details to the config.ini file found in the Backup Manager installation folder, for example C:\Program Files\Backup Manager
- Start the Services Console (services.msc).
- Right-click the Backup Service Controller service and choose Stop.
- Open config.ini, and then specify the name of the Azure virtual machine and the Cloud service it is powered by (the [General] section of the file). For example:
- When finished, save the changes and start the Backup Service Controller service
[General]
...
VdrStartCloudVmAfterRestore=1
Recovery Console users should create the config.ini file manually and place it in the Recovery Console installation folder for example C:\Program Files\RecoveryConsole\