
Backup Manager
If Backup and Recovery options do not appear in N-sight RMM, use Cove instead.
To start a 30-day free trial of Cove:
- Open the app switcher in the Product Bar.
- Select Cove Data Protection (Cove).
Virtual Disaster Recovery
Does not support GPT Partitions
Does not address Physical Server or Dissimilar Hardware Recovery
Does not provide Failover / High Availability / Business Continuity
The Backup Manager may be used to recover data from one device.
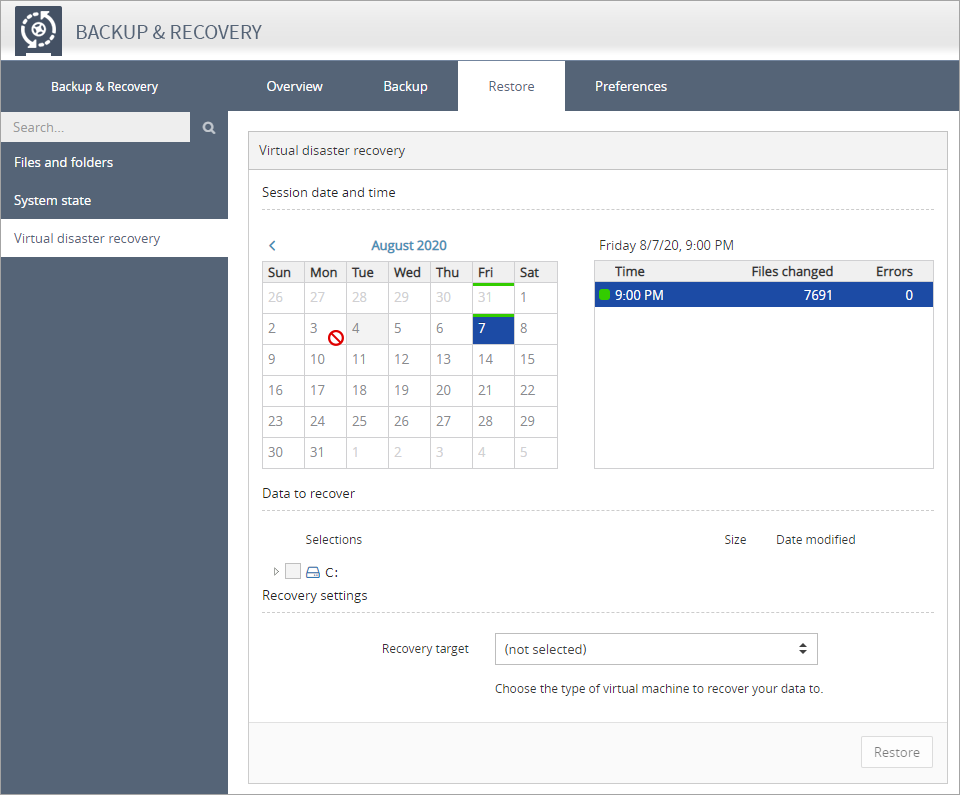
Virtual Disaster Recovery:
- Open the Backup Manager
- Select Restore
- Click Virtual Disaster Recovery.
- Select the backup Session date and time
- Expand the drive node and choose the required files to restore
Restore to local directory
- In the Recovery settings section
- set Recovery target to Local VHD files or VMware VMDK
- enable or disable the following as is required for your restore;
- Use restore-only mode on target machine: Keep this setting on to prevent unwanted backups from running on the recovered virtual machine
- Skip files that have not changed: This setting helps optimize data recovery operations and increases recovery speed (applies to subsequent restores)
- Create only volumes that are selected for restore: See Common Options for details of this option
- Repair files replication service: See Common Options for details of this option
- enter a Machine name for the virtual machine
- enter a Restore to path using the Browse button
- In the Virtual machine properties (optional) section you can enable Set boot disk size to n GB: enable this setting to customize the size to the system disk created on the virtual machine (by default, the new disk is the same size as the original)
- Once satisfied with the settings click Restore to create the Virtual Machine
Restore to Virtual Machine (ESX Server)
ESXi has a 15 Drive Limitation, *.VMDK has no Drive Limitation
The virtual disaster recovery feature lets you create a virtual machine on a remote vSphere/ESXi server and recover your system there. You can launch the virtual machine using vSphere Client or vSphere Web Client.
You can set the Recovery target as VMware ESX or VMware VMDK - if selecting VMware VMDK, please follow the directions above for Restore to local directory.
- In the Recovery settings section
- set Recovery target VMware ESX
- enable or disable the following as is required for your restore;
- Use restore-only mode on target machine: Keep this setting on to prevent unwanted backups from running on the recovered virtual machine
- Skip files that have not changed: This setting helps optimize data recovery operations and increases recovery speed (applies to subsequent restores)
- Create only volumes that are selected for restore: See Common Options for details of this option
- Repair files replication service: See Common Options for details of this option
- Start the virtual machine after restore and take screenshot: See Common Options for details of this option
- In the Access to virtual machine section;
- enter the Machine name
- use the drop-down's to select a suitable option for each of the settings (retrieved automatically after a connection to the server is established);
- Data center
- Host
- Storage
- Resource pool
- In the Virtual machine properties (optional) section you can set;
- IP address: assign a custom IP address to the virtual machine
- Subnet mask: assign a custom subnet mask to the virtual machine
- Gateway: assign a custom gateway to the virtual machine
- DNS servers: assign the list of custom DNS servers, separated by comma
- Set boot disk size to: enable this setting to customize the size to the system disk created on the virtual machine (by default, the new disk is the same size as the original)
Single example Multiple example 10.16.10.510.16.10.5,8.8.8.8 - Once satisfied with the settings click Restore to create the Virtual Machine
Unless specified, the created Virtual Machine uses the default memory and CPU properties. These settings are configurable once the restore successfully completes.
Restore to Virtual Machine (Hyper-V Server)
Please note: Hyper-V backup and restores are only available on devices running Hyper-V
- In the Recovery settings section
- set Recovery target to Hyper-V
- enable or disable the following as is required for your restore;
- Use restore-only mode on target machine: Keep this setting on to prevent unwanted backups from running on the recovered virtual machine
- Skip files that have not changed: This setting helps optimize data recovery operations and increases recovery speed (applies to subsequent restores)
- Create only volumes that are selected for restore: See Common Options for details of this option
- Repair files replication service: See Common Options for details of this option
- Start the virtual machine after restore and take screenshot: See Common Options for details of this option
- enter a Machine name for the virtual machine
- enter a Restore to path using the Browse button
- In the Virtual machine properties (optional) section you can set advanced parameters for the new virtual machine if required;
- Virtual switch: (automatically detects available switches): Select the Hyper-V network adaptor used by the new virtual machine
- IP address: assign a custom IP address to the virtual machine
- Subnet mask: assign a custom subnet mask to the virtual machine
- Gateway: assign a custom gateway to the virtual machine
- DNS servers: assign the list of custom DNS servers, separated by comma
- Set boot disk size to: enable this setting to customize the size to the system disk created on the virtual machine (by default, the new disk is the same size as the original)
- Once satisfied with the settings click Restore to create the Virtual Machine
Single example Multiple example 10.16.10.510.16.10.5,8.8.8.8
Unless specified, the created Virtual Machine uses the default memory and CPU properties. These settings are configurable once the restore successfully completes.
To start the virtual machine:
- Open the Hyper-V Manager
- Right-click on the target computer
- Choose Start from the context menu
Common Options
Option - Create only volumes that are selected for restore
- If the setting is enabled, the target virtual machine will contain only those disks that have data selected for recovery.
- If the setting is disabled and no data from a disk is selected for recovery, the virtual disk is created without any data.
Option - Repair files replication service
If you are restoring Active Directory with multiple domain controllers, you should change the FRS and DFSR services to authoritative in the domain controller that will be started in the first place. Avoid marking several FRS/DFSR services as authoritative in the production environment as it can result in data loss. When the feature is on, the FRS and DFSR services are started on the target VM in the authoritative mode. The NETLOGON and SYSVOL shares become available, so the Active Directory and DNS services become functional again.
More information about FRS/DFSR is available in the Microsoft Knowledge Base. Article IDs: KB2218556, kbinfo KB290762.
Option - Start the virtual machine after restore and take screenshot
If the option is enabled, the new virtual machine is booted up after recovery and a confirmation screenshot is created. The results of virtual disaster recovery sessions together with screenshots of the booted systems come in email notifications (a special notification rule has to be activated by the service provider or system administrator).
The screenshots are also available in the Backup & Recovery Console (see the "Virtual Disaster Recovery data session verification details (restore)" column in the Device Management module).