
Add devices

N-sight RMM Trials are limited to 10 device installations. To install more devices or extend your trial, please contact us.
To quickly add a device to N-sight RMM, use Add Device to create and download a Remote Worker installer package for a specified client and site.
End users can run the install package on their devices, or you can use a script to run it on multiple devices. After installation, the devices display in the N-sight RMM interface.
For Windows devices, you can also deploy the Windows Agent over an Active Directory network using the Group Policy Site installation package. For details, see Install the Group Policy Site Installation Package over a network.
1. Download the installer package
Your user role must include the Site Installation Package permission.
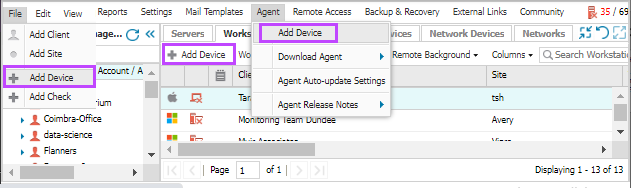
- In the All Devices view, select Add Device.
Add Device is also available in the File and Agent menus
- Select a Client and Site. If needed, you can add new clients and sites.
- Select the Device OS for the installer package.
- (Optional) For Windows, you can select Network uses Proxy Server and enter the details.
- Select Next to download the Agent.
After the installer package .zip file downloads, copy it and run the .executable file on as many devices as needed. After deployment, the device automatically appears in the N-sight RMM interface within a few moments.
- Select Finish.
If the username or password used to create the installer package changes, generate and a new package using the updated credentials to avoid authentication issues.
2. Deploy the installer package
After you download the installer package, deploy it to your devices. Follow the instructions for each operating system:
Windows
- Distribute the installer package to users.
- The user saves and unpacks the compressed file on their device.
- The user double-clicks Agent_<xxxxxx_vx.x.x>_RW.EXE to start the installation.
macOS
- Distribute the installer package to users.
- The user double-clicks install.pkg to start the installation.
- The user navigates through these sections:
- Introduction
- Destination Selection: Install the Agent for all users or only the current user. Select the Installation disk (optional).
- Installation Type: Review the Destination Selection, then select Install or Change Install Location.
- Installation: View progress. The user is prompted to enter their device password to authorize the installation.
- Summary: Displays the Agent install status.
- Select Close to exit the Agent dialog.
If a device is not enrolled in Device Management for Apple , make sure to Enable Privacy & Security settings for rmmagent for that device.
Linux
- Distribute the installer package to users.
- The user unpacks the compressed file.
- Run the installation script as root or with sudo. For example:
Using root shell:
# cd Download/
# unzip LINUX_AGENT_CLIENT_SITE_V8_0_0_RW.ZIP
# ./install_agent.shUsing sudo
$ cd Download/
$ unzip LINUX_AGENT_CLIENT_SITE_V8_0_0_RW.ZIP
$ sudo ./install_agent.shIf the script does not execute, run:
# /bin/bash ./install_agent.sh
or
$ sudo /bin/bash ./install_agent.sh
After deployment, the devices automatically appear in the N-sight RMM interface under the client and site associated with the installer package.