
Create custom ticket statuses
If you need additional or more specific ticket statuses, customize your MSP Manager account to support your ticket workflow. Use custom statuses to keep tickets organized and aligned with your business practices.
For example, you may want to:
- Create multiple Reviewed status types for different departments to verify tickets before billing customers.
- Create multiple Assigned status types to route tickets to the appropriate department or technician.
Ticket status categories
Custom ticket statuses are added under the following ticket status categories:
- New: The ticket is created but not assigned to a technician.
- Assigned: The ticket is created and assigned to a technician. Removing the assigned user does not automatically change the status back to New.
- In Progress: Work is underway. Statuses in the category can be set automatically when you start a timer or manually add a time entry.
- On Hold: The ticket is paused and does not count against any active SLAs.
- Complete: Work is finished and ticket is marked as complete.
- Reviewed: The ticket is complete and under review before billing.
- Billed: The ticket is attached to an invoice that has completed the billing process.
How custom statuses inherit default behavior
When you create a custom ticket status, you assign it as a subset of one of the default ticket status types. Default statuses are hierarchical, meaning some actions automatically update the ticket status.
For example, assigning a ticket to a technician changes the status to Assigned, which supersedes New. Adding a time entry or starting a timer updates the status to In Progress, which supersedes both New and Assigned.
If you create a custom status such as Waiting on Customer, add it under the On Hold default status type. Tickets with this custom status then behave like On Hold, including pausing SLA rules while the ticket is waiting for a response.
Assign permissions to create ticket statuses
Make sure users' roles have permission to create custom ticket statuses.
- Go to Settings > Users & Permissions > Roles.
- Select
 the edit icon for the role that needs permission to create custom ticket statuses.
 - Expand MSP Company Management.
- Select Configure Ticket Custom Statuses and then save the role.
Add or edit a custom ticket status
- Go to Settings > Tickets & Workflows > Ticket Statuses.
- In the Status Editor, review the list of ticket categories and their statuses. A default status appears under each status category. You cannot delete these default statuses, but you can edit them. Renaming a default status does not change its behavior. It continues to inherit the behavior of its parent status category.
- To add a custom status, locate the row for a ticket category and select Add new. In the example image, a custom status is added to the On Hold status type.
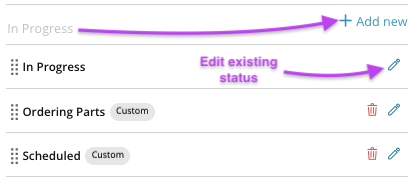
- To edit an existing status, select the Edit
 pencil icon.
 - Enter a name and description for the status.
- Select a status color, then select Save.
The new custom status is available in the Status section within the ticket editor.
Use Ticket Filters in the Helpdesk or in a customer's ticketing page to sort and view tickets by status. You can also run a ticket report to list all tickets with custom statuses.
Combine custom ticket statuses with ticket queues to stay organized and make sure issues are assigned to the appropriate department or technician.
What would you like to do?