Create customized statuses for tickets
Customize your MSP Manager account by creating unique statuses for your ticket work flow. Keep your tickets organized with custom statuses that reflect your exact business practices. Custom ticket statuses are added as a subset to the standard, hard coded statuses (New, Assigned, In Progress, On Hold, Complete, Reviewed, Billed) and selected from within the ticket editor.
Create multiple Reviewed statuses for different departments to double check tickets before billing your customers, or multiple Assigned statuses depending what department or technician is best suited to handle the issue. Make sure you understand the functionality of each hard coded default ticket status before getting started.
Default Ticket Statuses
| Ticket Status | Definition |
|---|---|
| New | Ticket has been created but is not assigned to a technician |
| Assigned |
Ticket has been created and assigned to a technician Removing an assigned user does not automatically set the ticket's status back to 'New' |
| In Progress | The ticket is being worked on - this can be automatically triggered by starting a timer or manually adding a time entry |
| On Hold | Ticket is paused and will not count against any SLAs in place |
| Complete | Work is finished and ticket has been marked as completed |
| Reviewed | Ticket is marked complete and being reviewed before it is sent to billing |
| Billed | The ticket is attached to an invoice that has been run through the billing process |
Ticket permissions
Before beginning to create custom statuses for your tickets, make sure users have the correct permissions.
- Navigate to Settings > Users & Permissions > Roles.
- Select
 to edit the role of the user that requires permissions for creating custom ticket statuses.
 - Select the MSP Company Management section to expand it's options.
- Select the Configure Ticket Custom Statuses option, and click Save Role when finished.
Create Custom Ticket Statuses
When creating custom ticket statuses, it is important to realize that each custom status is a subset of one of the default ticket statuses listed in the table above. Each default status is also hierarchical, which means assigning a ticket to a technician changes the status to Assigned, which supersedes New, and adding time entries or starting a ticket timer results in the ticket's status being updated to In Progress, which supersedes New and Assigned ticket statuses.
As an example, adding a custom status for 'Waiting on Customer' should be added to the On Hold default status section, so that tickets with the custom status of 'Waiting on Customer' will behave just like the default On Hold status and pause SLA rules for any tickets with that status.
- Navigate to Settings > Tickets & Workflows > Ticket Statuses.
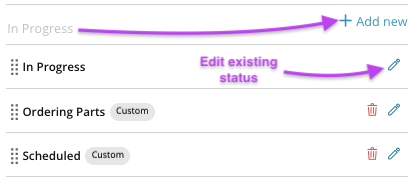
- Select Add new next to a default ticket status to add an additional custom status within that default status or click the pencil icon
 to edit an existing custom status. In this example, a custom status will be added to the In Progress Default status.
- Enter a name and description for the new status and click Save.
The Status Editor contains a list of all default ticket statuses with automatically generated custom statuses listed underneath. These can not be deleted, only edited. To change the name of an auto generated custom status, click edit and enter the new name for the custom status. It will still behave in the same way as the default status to which it belongs.
Continue to add custom statuses to each Default Status category as needed for your business' ticketing practices. The new custom statuses are available to add to tickets from within the Status section of the ticket editor.
Use Ticket Filters in the Helpdesk or in a customer's ticketing page to sort and view tickets by their specific status. You can also run a Ticket Report to list all tickets with custom statuses.
Combine custom ticket statuses with ticket queues to stay organized and make sure all issues are assigned to and fixed by the appropriate department or technician.
What would you like to do?
