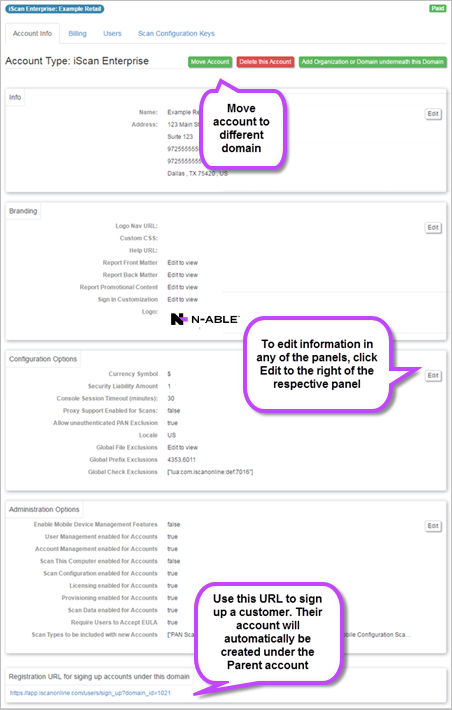
Account Info Tab

Use the Account Info tab to manage and configure account details.

The information and options on the Account Info tab are dependent on the organization type and your user role.

The account type displays at the top of the tab, and the following options may be available:

  • Move Account - Moves account to different domain id. See Move Account to Different Domain.
  • Delete this Account - Deletes the account even if there are sub-organizations underneath the account. See Delete Account.

    iScan Partner, iScan Enterprise, Partner, Enterprise and Domain account types cannot be deleted from this page - they can only be deleted from the Domains page. If an organization has its own domain you must delete the domain first before you can delete the organization. See Manage Domains.

  • Add Organization or Domain underneath this Domain - Enables you to add an Organization or Domain underneath this domain using the Add customer wizard.

The following sections are displayed:

Section Description
Info View/edit the name and address of account
Branding View/edit the following:
  • Logo Nav URL - The URL attached to the company logo displayed at the top left of the application pages and Scan Results Reports. See Customize Logo on Scan Results Reports.
  • Org Logo - The logo displayed at the top left of the application pages and on the Scan Results reports for this organization (recommended image size: 180x60 pixels, format: png, jpg). Customize Logo on Scan Results Reports.
  • Custom CSS - Enter URL of custom CSS file you want to use. The CSS file you provide will be applied to the Scanner Page and the Scan Reports. See Use Custom CSS to Define Colors and Styles of Report Output.

    This CSS file is applied last in the list of CSS files for the pages, which provides a broad range of flexibility for customization. We recommend you use a CSS style inspector tool such as those built into the major web browsers to determine what CSS classes/styles you should override.

  • Help URL - The URL entered here is added as a link to the top of the scan results reports and is titled 'Help with Report'. This allows companies to control where the help link points.
  • Report Front Matter - Content placed above the general content of the report.
  • Report Back Matter - Content placed below the general content of the report.
  • Report Promotional Content - Content placed after the Summary.

Configuration Options

  • Currency Symbol - Choose from $, £, €, Kr (Swedish Krona) or R (South African Rand). This is the symbol used in the Dashboard widgets and Reports (e.g. potential liability amount) for that organization . It also filters down to any sub-organizations unless the sub-organization has selected its own currency symbol.
  • Security Liability Amount - This is the amount assigned to each violation so that the system can work out the organization's Potential Liability. Each time a security violation is found, it is given the value shown here. As a result, if you have the default amount of 201 and your system finds 1000 violations, your organization's Potential Liability amount will be 201,000.00 in the chosen currency.

    The default Security Liability Amount is 201 (based on external research), but you can edit if required (max 999).

  • Console Session Timeout (minutes) - The maximum time a user can be idle in the console before their session is invalidated.
  • Proxy Support Enabled for Scans - Allows scans initiated via the web browser to inherit the browser's proxy settings.
  • Allow unauthenticated PAN Exclusion - When a user runs a scan and isn’t logged in, this flag determines whether or not they can exclude findings from the scan reports.
  • Locale - US or UK – this only affects language (US or UK English) in the scans initiated via the web browser.
  • Global File Exclusions - This feature allows users to globally exclude certain findings based on file paths e.g. Exclude Files Globally from Data Scans.
  • Global Prefix Exclusions - This feature allows users to globally exclude certain card numbers based on first digits.
  • Global Check Exclusions - This feature allows users to globally exclude check ids from being reported as failures.

Administration Options

  • User Management enabled for Accounts - Enable/disable user management through the UI. For example, some partners use our API to configure users and don’t want their downstream customers to be able to add user access.
  • Account Management enabled for Accounts - Enable/disable account management through the UI. For example, some partners use our API to configure accounts and don’t want their downstream customers to be able to remove/edit accounts.
  • Scan this Computer enabled for Accounts - Enable/disable the menu item for “Scan This Computer”. This should be disabled always unless it is an older account that is grandfathered.
  • Scan Configuration enabled for Accounts - Enable/disable editing/creation of Scan Configurations.
  • Licensing enabled for Accounts - Enable/disable license management capabilities through the UI. For example, some partners use our API to configure licenses and don’t want their downstream partners to be able to remove/edit licenses.
  • Provisioning enabled for Accounts - Enable/disable account creation through the UI. For example, some partners use our API to configure accounts and don’t want their downstream customers to be able to add accounts.
  • Scan Data enabled for Accounts - Enable/disable viewing of scan data through the UI.
  • Require Users to Accept EULA - Bypass the typically required EULA that is presented to users when scanning.
  • Scan Types to be included with new Accounts - A list of the default scan types generated when new accounts are added under this account.