
Enable the System Tray Application

When you enable the System Tray Application, you choose how it looks and which menu options your end users can access.
You can enable the System Tray Application on a single device or across multiple devices.
Changes to the System Application Tray take effect after the end user signs out and then signs back in to the device. To ensure a smooth experience, select the icon and set the tooltip before enabling the application.
Enable the System Tray Application for multiple devices
- In the All Devices view, go to Settings > System Tray Application > Settings.
- Select Expand All, then choose the entity type: all servers, all workstations, or specific clients and sites.
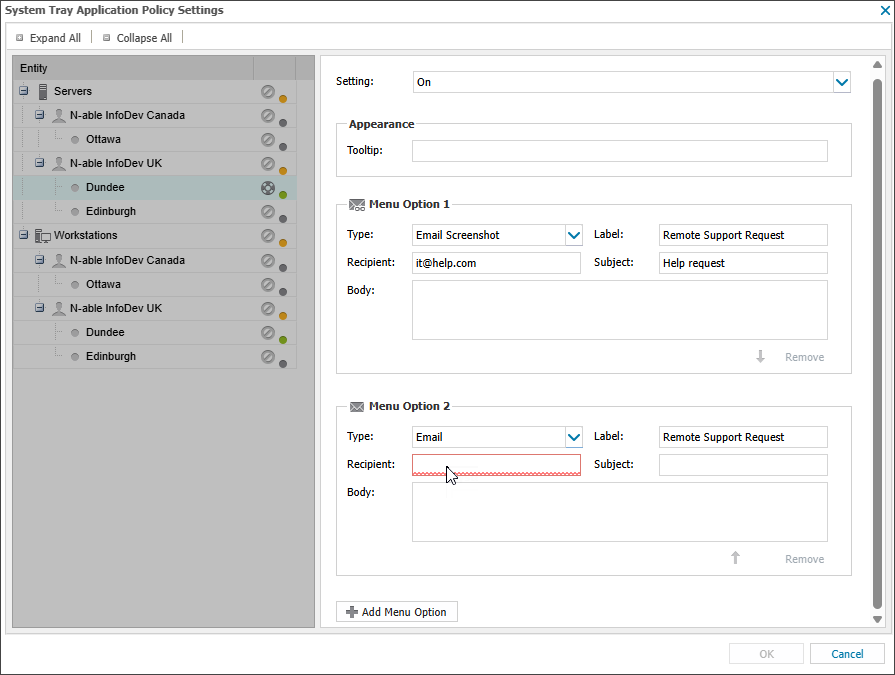
- In the Setting dropdown list, select On. For clients and sites, you can select Use Parent to inherit the settings from a parent node.
- Enter the Tooltip text that appears when users hover over the system tray icon.
- Configure the first menu option to include in the user system tray. For details, see System tray menu options.
- Select Add Menu Option to continue adding options for the user system tray. The System Tray application supports up to thirty menu options.
- To reorder your menu items in the system tray list, use the arrow keys in the Menu Option boxes to move them up or down.
- Select OK to save and apply your changes.
To turn off the System Tray Application, choose Off from the Setting dropdown list.
After you disable the application, it remains visible to the end user until they log out and log back in to the device.
Enable the System Tray Application for a single device
- In the All Devices view North-pane, right-click the device and select Edit Server or Edit Workstation.
- Choose System Tray.
- In the Setting dropdown list, select On.
- Enter the Tooltip text that appears when users hover over the system tray icon.
- Configure the first menu option to include in the user system tray. For details, see System tray menu options.
- Select Add Menu Option to continue adding options for the user system tray. The System Tray application supports up to thirty menu options.
- Select OK to save and apply your changes.
Device-level settings override policy-level settings. To return the device to policy control, select Use Policy Settings.
System tray menu options
Enabling the System Tray Application lets you configure which menu options are available to users. Menu changes take effect after the settings are downloaded to the device.
Selecting the email option in the System Tray opens a new message in the default email client. The user can add details or send the message to the configured recipient.
You configure the following default settings:
- Label : Display name in the System Tray menu (required)
- Recipient: Email destination (required)
- Subject line: Up to 255 characters (optional)
- Body: Up to 1000 characters, include spaces (optional)
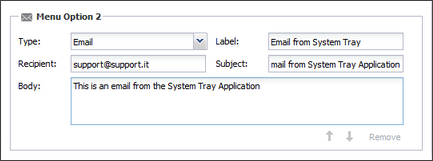
The Subject and Body fields support the use of substitution strings, which automatically insert values in place of wildcards. This helps personalize emails without manual entry.
A supported email client must be installed and configured on the device.
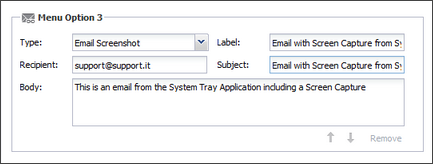
Email screenshot
Selecting the email screenshot option in the System Tray creates a new email in the default email client, with a screenshot of the device’s screen attached.
You configure this option using the same settings as the email option.
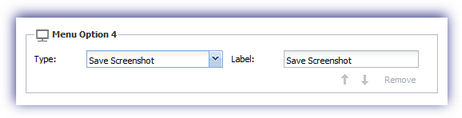
Save screenshot
Selecting the save screenshot option captures the current screen and prompts the user to save the image locally.
You configure the System Tray label (display name) for this option.
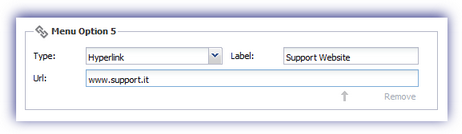
Hyperlinks
Selecting the hyperlinks option opens the specified webpage in the device’s default web browser.
You can use substitution strings in the hyperlink to automatically replace wildcards with values from the system. This allows you to personalize links without manually entering client-specific details.
- Label: Display name in the System Tray menu (required)
- URL: Web address to open when the link is selected (required)
The hyperlink dialog does not support special characters in the URL field. If an unsupported character is entered, the settings cannot be saved, and the problematic field is highlighted.
To resolve this, replace special characters with their URL-encoded equivalents. For example, use %40 instead of @ in:
https://www.example.com/calendar/user@example.com → https://www.example.com/calendar/user%40example.com
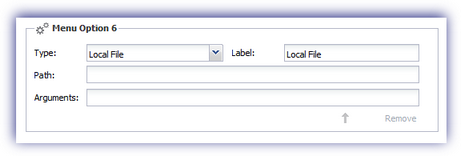
Local File
Selecting the local file option runs the specified file on the user's device. This can be used to guide users through support or troubleshooting steps.
- Label: Display name in the System Tray menu (required)
- Path: File path to run. Supports environmental variable replacement. For example, instead of entering C:\WINDOWS\system32\notepad.exe, you can enter notepad.exe. If the file doesn’t run as expected, enter the full path.
- Arguments: Optional command-line arguments to pass when running the file.
Example: To run a netstat command that lists all active TCP connections and their associated processes, and save the output to a file on the desktop
- Path: cmd.exe
- Arguments: c netstat -ab > "%USERPROFILE%\Desktop\netstat.txt
This file can then be sent to support using the Email menu option.
Separator
Use the separator option to add a divider between menu options.
Text
Use the text option to display an informational message in the System Tray application. This can be used to separate menu sections or provide contact details. The message appears in gray text to distinguish it from actionable menu items.
- Label: Text shown to the user in the System Tray (up to 50 characters, required)
MSP Manager
Selecting this option opens the MSP Manager login page in the device’s default web browser. If the user has access, they can sign in, view their N-sight RMM interface, and submit a new ticket.
This option is only available when MSP Manager is enabled for the account.
- Label: Display name in the System Tray menu (required)

Related topics