HaloPSA integration: N-sight RMM configuration
Generate the API Token
The API Key is used to authenticate against the Public API. If you regenerate a new key, anything that uses the existing key to authenticate against the Public API will stop working. If you already have an API Key, we recommend you use it.
- Log in to N-sight RMM as a Superuser or (non-Classic) Administrator level access, or using a login with the required General permissions enabled, or using the Agent Key (if enabled).
- In the All Devices view, go to Settings > General Settings > API.
- Select Generate (or Regenerate when you are creating a new API Key) and record the API Key for future use.
You can generate the API Key as often as required. Each regeneration overwrites the existing key.
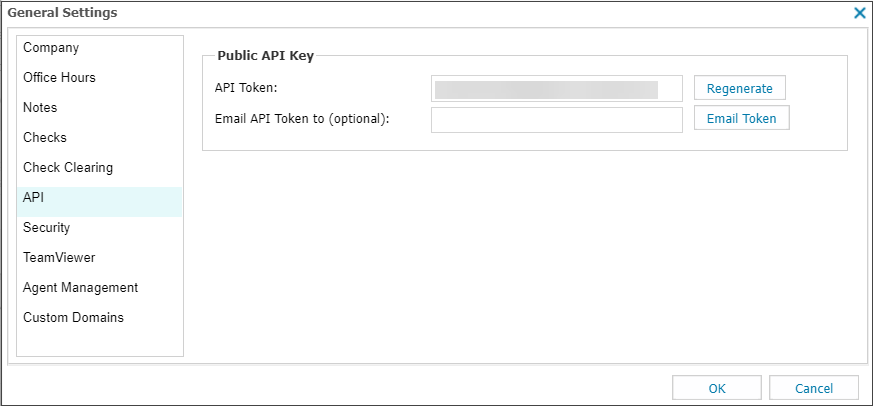
- Enter the recipient email address in the Email API Token to (optional) field and click Email Token (Optional).
The sent email includes the API Key and the server URL to query.
- Select OK to apply.
Configure the Alert Recipient
HaloPSA uses the N-sight RMM generated Alert and Recovery emails to open and automatically close a ticket within their system.
To configure the recipient address, as well as ensure the unique identifiers are included for these emails.
- In the All Devices view, go to Settings > Alerts > Settings.
- In the Alert Routing Settings section edit the recipient to an email address polled by HaloPSA.
- To include the unique identifiers in the email notifications (required), select Include Check ID's under the Email Headers section.
Where this option is enabled, the N-sight RMM generated emails contain the following non-editable identifiers:
X-SYSTEMMONITOR-CHECKIDS: 123456
X-SYSTEMMONITOR- DEVICEID: 98765432
X-SYSTEMMONITOR-SITEID: 78909 - Select OK to save changes.

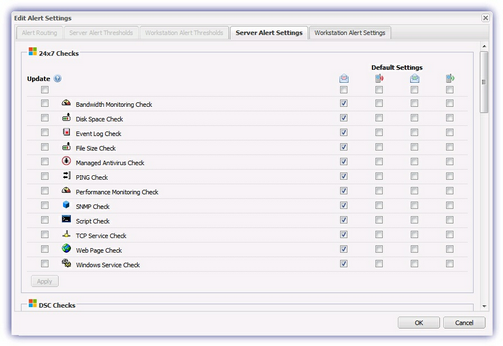
Select the Alert generating checks
The next step is to choose the checks that will generate an Alert and subsequent ticket in HaloPSA.
- In the Edit Alert Settings dialog, go to the Server Alert Settings and / or Workstation Alert Settings.
- Select the required checks under the Update column to change the Alerting behavior on all existing devices.
- Select Apply to save.
You can also edit the Default Settings from this dialog, with these applied to any newly installed devices.
You can edit the alert settings on an individual device by selecting the device on the All Devices view. Click show Alert Options (where not already displayed) and enable or disable the Alerting options under the relevant column, as required. Click on Save Changes to apply.
In addition to checks, server overdue notifications can be configured on the All Devices view from the Columns menu above the North-pane, Email Alerts and / or SMS Alerts as required. Select to display and amend the settings in the North-pane. Then, deselect once complete to hide the alerting columns.