Add Custom SNMP Checks (Device)
Network Device Monitoring supports a wide variety of vendors, devices and indicators. For in-depth monitoring of devices not supported by our vendor specific Checks, you can create your own custom SNMP Checks.
- Create a query with the OID for a table index. Create separate queries for each individual index entry or add all monitorable entries in the table index.
- Setup variables based on OID values then decide on how to use them. These range from displaying information on the index object (for example its name). To failing the Check based on specific returned values or calculation results.
- View the Alert recipients if the Check fails. Use the defaults or change the notification method.
We suggest using an SNMP Walk tool, such as N-able SNMP Walk or iReasoning's MIB Browser, to query a network device and retrieve its OIDs.
Add Custom SNMP Check
- Select the target Network Device in the Network Devices North-pane.
- Go to the South-pane Checks tab.
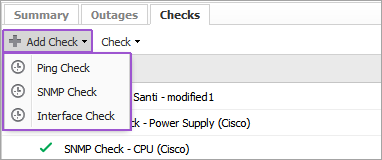
- Click Add Check > SNMP Check to open the configuration wizard.
- Choose whether to Use an existing SNMP Check from the library or Create a new SNMP check.
Use an existing SNMP Check from the library
- Choose the required check from the Select SNMP check library drop-down.
- Click Next to go to the Queries section of the Create SNMP Check wizard (covered below) to amend the Check settings (if required). Then proceed through the wizard to review the Alerts and Summary information then Save and Apply.
Create a new SNMP Check
Setup
- Enter the SNMP check name for identification.
- Select the associated Device vendor name and Product type from the drop-downs.
-
Choose whether to Save check to custom checks library for use on other devices.
Select Unknown for generic or non-vendor specific Checks.
Queries
- On the Queries tab, click Add Query and enter a Query Name
- Populate the Variable name and OID value for each Variable to use. Click Add OID to enter multiple variables
- Specify the SNMP Index to use:
- All variables contain the SNMP index in the OID field. Use where the entered OID contains the specific table index value. For example, it is a scalar object (OID ending in .0)
- Let RMM determine the SNMP index by looking it up. All monitorable entries in a table’s index are added from the Variables to use OIDs
- Click Save
Suggestion: use the OID name from the MIB to ensure naming consistency between the Check and MIB.
Tip: if the OID must start with a period, end with a number and can only contain numbers and periods message appears when adding an OID, but the OID looks okay. Check the entered OID to ensure it does not contain any free space. Especially before the first period.
Metrics
- Click Add metric and enter a name for the first Metric
- Create the metric using the previously entered Variables to use names:
- Pick from an existing variable and select the variable name from the drop-down
- Create a custom calculation and enter the custom calculation
-
Select the Units type from the drop-down.
- Configure Thresholds, choose the Operator or select Metric is for information only
- Select the Units that apply to this variable or calculation
- Enter the Thresholds that define Normal and Failed states for this metric
- Enter the values that define Normal and Failed states for this metric
- Click Save
- Repeat the above steps to configure further metrics
- Next to continue
Operators
Between
Equals
You must use each variable in at least one calculation.
The Metric is for information only setting requires at least one of the other metrics to have thresholds configured. Otherwise the Variables missing metrics message is returned when attempting to go from the Queries to Alerts section.
The Create a custom calculation field is case sensitive. The variable case must match the case used in the Variables to use section. Otherwise the variable is not recognized.
The custom calculation is a simple arithmetic operation with variables. Enter the variable name as it appears in the Variable to use section. The calculation only supports + - * /
Alerts
The Alerts tab pre-populates with the device defaults. To change these settings:
- Choose the Alert type and available delivery methods
- Review the contact and when they will receive alerts. During or outside of office hours
- Change the default recipient and time period in Settings > Alerts > Settings > Network Devices
- Next to continue
Summary
- On the Summary tab, review the entered check information.
- After reviewing the Check information:
- Click Back to return to a previous section and make changes
- Save and Apply to add the Check to the device. It will run during the next Check cycle
Hover over a calculation variable name to view its settings

What do you want to do?
- Learn about SNMP
- Retrieve SNMP Information from a Device using a MIB browser
- Identify the Interface OIDs
- Review the OID information to use in the Check
- Walk through the creation of a custom SNMP Check
