Protection Policy: Quick Scan and Deep Scan
Managed Antivirus provides real-time protection through Protection Policy: Active Protection scanning files as they are opened, copied and downloaded. You can also run and schedule scans to detect and remove malware from the device.
Two scan types are available:
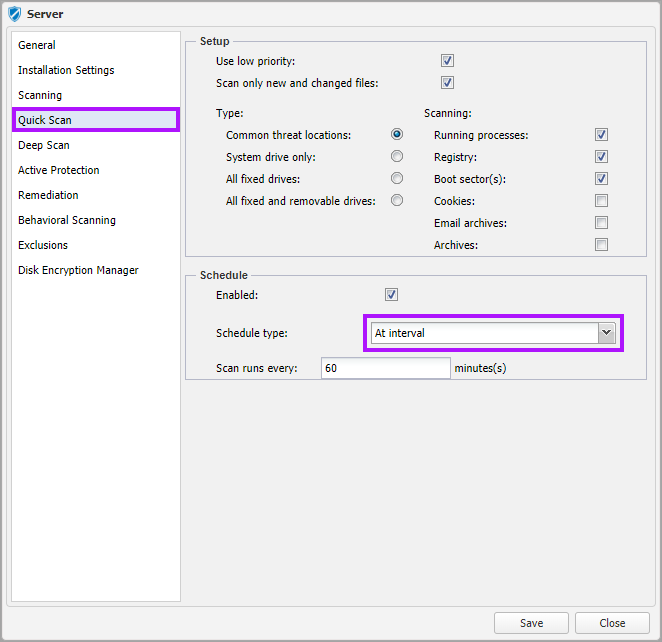
- Quick Scan – A lightweight scan that (by default) scans critical system locations, running processes and new files for threats. Running a Quick Scan usually takes less than a minute and uses a fraction of the system resources needed by a regular virus scan.
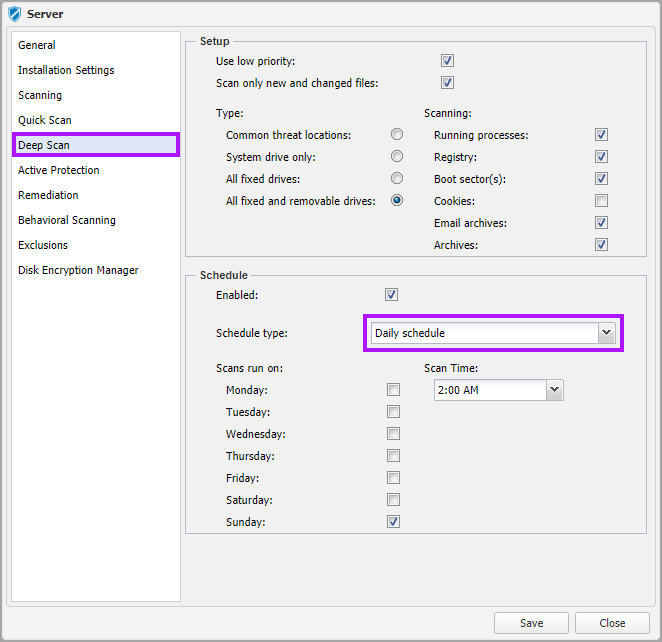
- Deep Scan – Scans the entire computer for all types of malware threats including viruses, spyware, adware, rootkits and others. As the Deep Scan scans the entire computer it can take some time to complete. We recommend running this scan when the computer is not in use. Deep Scan scans all options minus cookies by default.
Where a Quick or Deep scan discovers malware or rootkits, Bitdefender automatically begins the disinfection process. If disinfection is not possible, Bitdefender moves the files to the quarantine where it cannot do any harm.
The Protection Policy's Exclusions are applied to both Quick and Deep Scans.
As the dialogs for both the Quick and Deep Scan dialog contain common elements, the following section covers both scan types.
Setup
Scan locations, types of item to scan, scan priority and other configurable options.
Use low priority – Minimizes the impact of the scan on the computer.
Scan only new and changed files – Scanning only new and changed files can greatly improve overall system responsiveness. With a minimum trade-off in security. The first scan queries the files to determine a base level. Bitdefender's Smart Scan cache stores details of each clean file on the local machine. Any changes to a stored file result in its removal from the cache and subsequent rescan.
Indefinitely storing files in the cache without further scanning may itself pose a security threat. To counter this threat, Bitdefender scans cached files where no change has taken place over a random period of time. Their scan's algorithm determines this random period.
Type – Covers the location(s) scan look for malware. ![]() marks the policy defaults.
marks the policy defaults.
| Type (defaults) | Quick | Deep |
|---|---|---|
|
Common threat locations |
|
|
|
System drive only |
|
|
|
All fixed drives |
||
|
All fixed and removable drives |
|
Scanning – Select the areas of the device to scan. ![]() marks the policy defaults.
marks the policy defaults.
| Scanning (defaults) | Quick | Deep |
|---|---|---|
|
Running processes Select this option to scan programs running in the system’s memory. |
|
|
|
Registry Windows Registry is a database that stores configuration settings and options for the Windows operating system components, as well as for installed applications. |
|
|
|
Boot sector(s) This sector of the hard disk contains the necessary computer code to start the boot process. When a virus infects the boot sector, the drive may become inaccessible and the user may not be able to start their system and access data. |
|
|
|
Cookies Select this option to scan the cookies stored by browsers on the computer. |
|
|
|
Email archives Select this option if you want to enable scanning of email message files and email databases, including file formats such as .eml, .msg, .pst, .dbx, .mbx, .tbb, etc. |
|
|
|
Archives - Archives containing infected files are not an immediate threat to the security of your system. The malware can affect your system only if the infected file is extracted from the archive and executed without having real-time Active Protection enabled. However, it is recommended to use this option in order to detect and remove any potential threat, even if it is not an immediate threat. Note: Scanning archived files increases the overall scanning time and requires more system resources. Archives are scanned to a depth of 3 levels only. This prevents 'Archive Bombs' (an archive within an archive within another and so on to ) from causing scans to get stuck trying to scan ever deeper - meaning it cannot tackle a different threat. |
|
Packed Executables are compressed or encrypted executable programs and although there are legitimate uses for this file type, they can sometimes contain threats.
Altering the scan setup configuration settings can affect the length of time taken for the scan to complete.
Schedule
Enable - select whether this type of scan will run as part of the policy.
Schedule type: once enabled, set the scan frequency:
- Daily Schedule - choose the day(s) the Scans run on and specify the Scan Time from the drop-down.
- At interval - enter the number of Minutes the Scans run every
Managed Antivirus Scans run based on the local time of the computer that Managed Antivirus is installed on.
Quick Scan set to At interval

Deep Scan set to Daily Schedule.

What do you want to do?
- Review the Managed Antivirus Quick Start Guide
- View Managed Antivirus URLs
- Enable Managed Antivirus on individual servers and workstations or on all servers and workstations at a client or site
