Computicate PSA
Adding Professional Services automation to your RMM platform, can greatly benefit the way you deliver services as an MSP. It automates back-office and operations, which make you more efficient. This allow you to optimize profits and grow.
However, the complexity and costs associated with the integration, implementation and use of PSA is often high. Computicate PSA has changed all this, by offering a next generation platform, which is out of the box, easy to use and affordable.
Computicate PSA is a great way to experience the benefits of PSA, for any MSP, whether it is the first time you are adding PSA to the mix, or as an alternative for existing tools, that are complex and expensive.
Computicate PSA's functionality includes:
- CRM
- Dashboard, with key performance metrics
- Product, contract & services catalog
- Automatic billing, with integrated payment options (Stripe, PayPal)
- Automatic Time allocation
- Service desk
- Reporting
- Integrations with Accounting, RMM, Backup and payment providers
- Documentation
- Projects
- Adding features continuously, with 2 week release cycles
Integration Summary
- Computicate PSA synchronizes sites and connected configuration items from N-sight RMM.
- Configuration items are identified by the unique, machine name allocated from N-sight RMM.
- The synchronization runs every 15 minutes.
The integration:
- Allows managed devices to be allocated to services and contracts defined in Computicate PSA.
- Allow you to automatically allocate devices to existing contracts and / or services, based on machine types. For example, server to Managed Server contract.
- Computicate PSA Autosync provides the option to allocate new devices directly to services / contracts. For example, a new Windows workstation is added, this will be allocated as service "managed workstation" and added to the monthly bill.
For additional information on Computicate PSA please visit their website: https://www.computicatepsa.com/
Integration Setup
Configuration of the Computicate PSA integration is a two-step process. First the N-sight RMM API Token is generated, then these details are entered into Computicate PSA.
Step 1: Generate the N-sight RMM API authentication token
To create the N-sight RMM API Token used by Computicate PSA for communication:
The API Key is used to authenticate against the Public API. If you regenerate a new key, anything that uses the existing key to authenticate against the Public API will stop working. If you already have an API Key, we recommend you use it.
- Log in to N-sight RMM as a Superuser or (non-Classic) Administrator level access, or using a login with the required General permissions enabled, or using the Agent Key (if enabled).
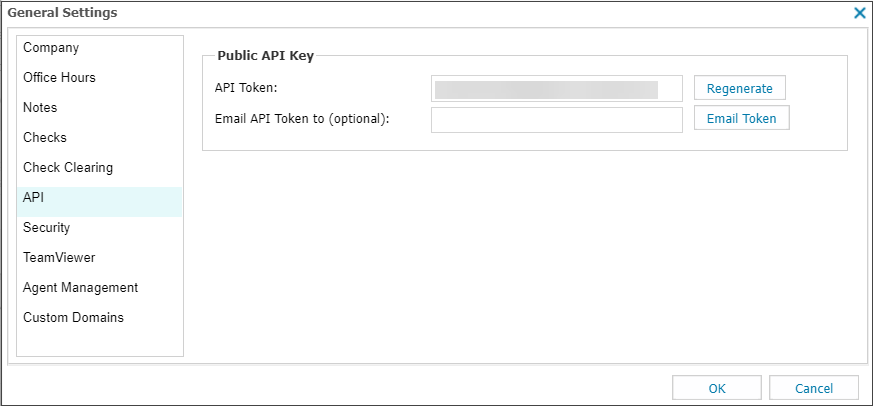
- In the All Devices view, go to Settings > General Settings > API.
- Select Generate (or Regenerate when you are creating a new API Key) and record the API Key for future use.
You can generate the API Key as often as required. Each regeneration overwrites the existing key.
- Enter the recipient email address in the Email API Token to (optional) field and click Email Token (Optional).
The sent email includes the API Key and the server URL to query.
- Select OK to apply.
The database server to query is dependent on the territory your account is registered under. The current territories and their URLs are:
| Territory | URL |
|---|---|
| Americas | https://www.am.remote.management/ |
| Asia | https://wwwasia.system-monitor.com/ |
| Australia | https://www.system-monitor.com/ |
| Europe | https://wwweurope1.systemmonitor.eu.com/ |
| France (FR) | https://wwwfrance.systemmonitor.eu.com/ |
| France1 | https://wwwfrance1.systemmonitor.eu.com/ |
| Germany | https://wwwgermany1.systemmonitor.eu.com/ |
| Ireland | https://wwwireland.systemmonitor.eu.com/ |
| Poland | https://wwwpoland1.systemmonitor.eu.com/ |
| United Kingdom | https://www.systemmonitor.co.uk/ |
| United States | https://www.systemmonitor.us/ |
For example, a user in the United Kingdom uses the server URL: https://www.systemmonitor.co.uk/
Determine API Server URL from N-sight RMM URL
If you are unsure of your N-sight RMM account territory:
- Look at the URL you use to access N-sight RMM as it may include a region reference, or
- If the URL does not mention a region, for example a custom domain, append /dashboard to one of above URLs and attempt login to your N-sight RMM at the prompt. Based on the United Kingdom this would look like: https://www.systemmonitor.co.uk/dashboard
- If you cannot determine the region from a custom N-sight RMM URL. Open a command prompt or terminal on the device and perform an nslookup on the custom N-sight RMM URL:
nslookup dashboard.custom.domain
...
Non-authoritative answer:
Name:    dashboard.systemmonitor.co.uk
...
Step 2: Enter the N-sight RMM API connection data into Computicate PSA
Login to the Computicate PSA using an Admin level account then go to:
- Click Settings in the left menu

- Go to Integrations
- Select N-able RMM connection from the available integrations
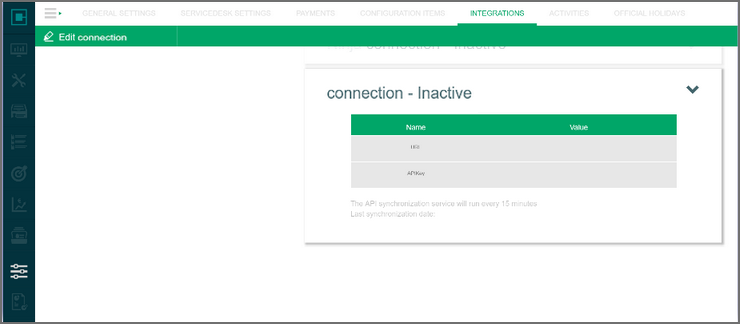
- Click the Edit N-able RMM connection button in the top left and complete the following:
- URL: enter the connection URL for your N-sight RMM territory. Note that this URL is dependent on the territory your account is registered under.
- For example,
https://www.systemmonitor.us if registered in the US,https://www.systemmonitor.co.uk for the UK etc. - API Key: enter your N-sight RMM API Token
- Set the connection switch to Active
- Use Test Connection to ensure Computicate PSA can communicate with N-sight RMM. If this test fails, please check the entered N-sight RMM dashboard URL and API Token information then retest.
The above API Token and N-sight RMM URL information is contained in the Email Token email
After communication is established with N-sight RMM, Computicate PSA begins synchronizing your sites and endpoints. The process takes approximately twenty minutes to complete.

This N-sight RMM integration was created and is maintained by Computicate PSA . We recommend you contact Computicate PSA directly in the event of any problems either in its initial implementation or subsequent usage.

