
Oracle databases
If Backup and Recovery options do not appear in N-sight RMM, use Cove instead.
To start a 30-day free trial of Cove:
- Open the app switcher in the Product Bar.
- Select Cove Data Protection (Cove).
Oracle Databases can be backed up and restored from Advanced Monitoring Agent 8.15 onwards.
The Oracle Backup plugin (data source) utilizes RMAN (Recovery Manager) and in order for RMAN to backup the Oracle database correctly it is necessary to enable archiving which is covered here.
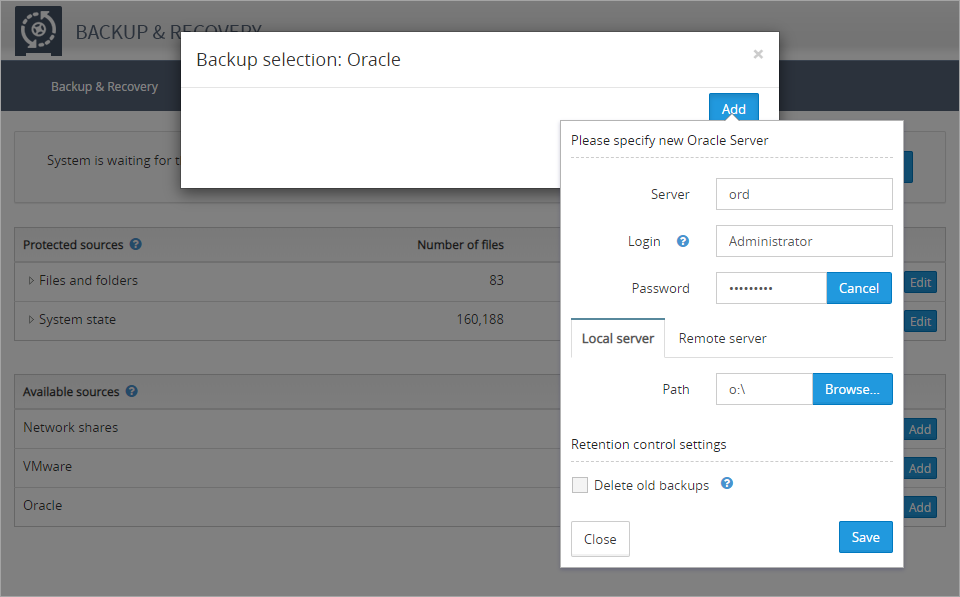
- Open the Backup Manager
- Navigate to the Backup tab
- Click Add against Oracle
- In the Selection Oracle dialog click Add
- Enter the Server, Administrator Login, Password and Path
- Save to apply
- The Backup Manager will connect to the Oracle server to verify the credentials; where successfully go to the Backup tab and in the Oracle section expand the Oracle databases node and select the databases to backup
- Configure the Oracle databases Schedule
- Finally, amend the Backup & Recovery Check to take account of the increased backup jobs
| Field | Description |
|---|---|
| Server | The TNS alias specified in tnsnames.ora |
| Administrator Login | An Oracle account name with SYSDBA permissions |
| Password | The password associated with the above Administrative Login account |
| Path (to the local backup folder) | The Backup Manager records backups in C:\EXPORT\HOME\APP\ORACLE\BACKUP.As such it is necessary to create this folder then enter C:\EXPORT\HOME\APP\ORACLE\BACKUP in the Path to the local backup folder |
In Backup & Recovery 2014 it may be necessary to click the Oracle database name to display the node structure.
To amend the selected data sources:
- Open the Backup Manager
- Go to the Backup tab
- Click Edit and expand the node and change the selection as required
Create Administrator Login User
Rather than enter the sysdba details in the Backup Manager, you can create another user and use these credentials instead.
To create a new user:
- From the command prompt enter:
- Then connect as sysdba:
- From here the new user can be generated using:
- Once created it can be given full permissions:
sqlplus /nolog
SQL> connect / as sysdba
SQL> create user USERNAME identified by PASSWORD;
SQL> grant all privileges to USERNAME;
Troubleshooting - Insufficient Privileges
Where the error ORA-01031: insufficient privileges is returned when attempting to log in with sysdba:
- Log on with the command:
- When prompted enter the password created when setting up the database during installation
sqlplus sys as sysdba