
Custom SNMP Check Library
Rather than create Network Device Monitoring SNMP Checks on a device-by-device basis, you can add Checks to the Network Device SNMP Library (feature available from N-sight RMM console v2019.09.16). then quickly and easily roll them out to supported devices. From N-sight RMM consoe v2019.11.06 you can opt to import community SNMP Checks into your library as well as share your own SNMP Checks with the community.
Library Checks are selectable when manually adding a Check, with the option to tweak the settings if required, or where the Auto-Apply option is selected, the Check is automatically applied when a supported device is added to monitoring.
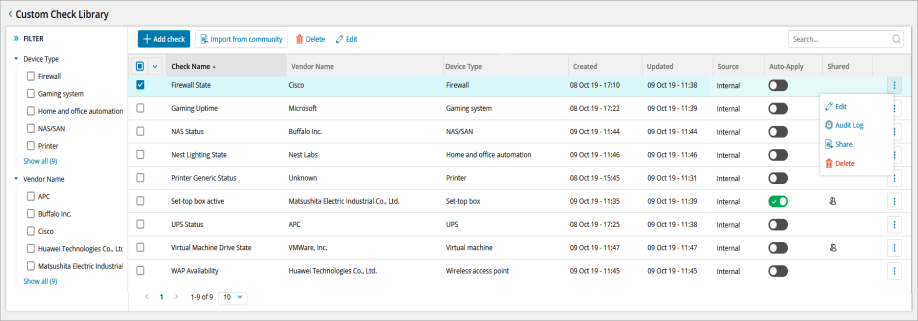
The Custom Check Library lists all of its SNMP Checks, including the vendor, creation and last update information. From here you can add a new Check, edit or delete existing Checks and choose the Auto-Apply option.
- Log into N-sight RMM.
- In the All Devices view, go to Settings > SNMP Checks > Network Devices.
Add
- Click Add Check.
- Populate the Check name and selection the Device vendor name and Product type from the dropdowns.
-
We suggest the use of unique names for each Check.
- Choose whether to Auto-apply check to devices.
- Proceed through the wizard to configure the Queries (including Metrics) and choose the Alerts settings.
- Review the Summary then click Save and Apply.
Import Community SNMP Check into your library
- Click Import from community.
- Use Filter and Search to view the available SNMP Checks. Click on
 in the Check's Details column to display information on its configuration.
 -
Click on the Import column’s transfer button
 to add the Check to your library.
- Once added to the Custom Check Library use the Edit the Check to match your precise requirements.
Edit
- Enable the tick box against the target Check.
- Click Edit in the top bar. Edit is also available from the Check’s action button (three dots).
- Where required, amend the Setup (including the Auto-Apply settings), Queries (including Metrics) and Alerts settings.
- Review the Summary then click Save and Apply. The save action automatically applies the updated setting to all Checks added to devices from the library.
- Where the library Check is already in use on one or more devices the Confirm update action dialog appears. Tick the Update devices box to apply the new Check configuration to these devices then Confirm to apply.
Visit Add Custom SNMP Checks for configuration information on the Summary, Queries and Alerts sections. Go to Create a Custom SNMP Check Walkthrough for an example of populating these fields.
Share an SNMP Check with the Community
- Click on the action button (three dots) for the Check you want to share with the community.
- Select Share to add this Check to the community library.
Checks shared with the community display an icon in their Shared column.
Delete (Single Check)
- Enable the tick box against the target Check.
- Click Delete in the top bar. Delete is also available from the Check’s action button (three dots).
- When prompted, Confirm deletion.
Delete (Multiple Checks)
- Enable the tick box against the target Checks or tick the box in the header to Select all items on this page (untick to Unselect all items).
- Click Delete in the top bar.
- When prompted, Confirm deletion.
The Delete action immediately removes the SNMP Check(s) from the library and deletes existing instances Check (where it was added to Devices from the library).
Once deleted, Checks are no longer available for manual selection and are not automatically applied when adding a supported device (where they previously had Auto-Apply selected).
Auto-Apply
You can choose the auto-apply setting when adding or editing a check, or from the Auto-Apply column in the Custom Check Library.
- Move the slider to the right to enable auto-apply for a Check (tick and green background).
- Move the slider to the left to disable auto-apply for a Check (gray background).
Where enabled for a Check, this setting automatically applies the selected SNMP Check to any devices found to support the OIDs specified in the Check.
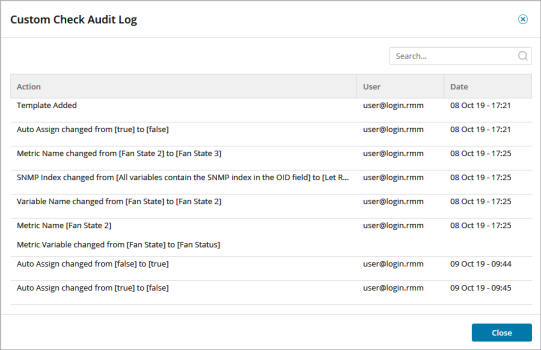
Audit Log
Each Check (template) has its own searchable Audit Log containing user, date and action information. Including the Check (template) creation date and any subsequent changes. To open a Check's Audit Log, click the Check’s action button (three dots) in the main Custom Check Library window and select Audit Log to view.
Filter the Custom Check Library dialog
The west panel Filter may be used to display targeted information in the Custom Check Library dialog. Filter by Device Type or Vendor Name.