
Add an Apple Push Certificate
Before you can enroll and manage Apple devices, you must add Push Notification Certificates to Device Management for Apple. You can add push certificates for your own account and for your clients(customers).
To simplify the enrollment process for new clients, we recommend you add their push certificate before you onboard their Apple devices.
After you add a Push Notification Certificate for your account or for a Client, all devices included in that account or for that Client expect to enroll in Device Management for Apple, and have a status of Awaiting Approval. The devices stay in the Awaiting Approval state until the Enrollment Helper is turned on and end users enroll their devices.
Certificates are available from the Apple Push Certificates portal and are valid for one year. To maintain service continuity, the certificate must be renewed before the expiration date.
f your Push Notification Certificate expires and you add a new one instead of renewing, Apple requires you to re-enroll your devices in Device Management for Apple.
To add an Apple Push Notification Certificate, follow these steps:
Certificate setup
-
- Select Push Certificates.
- Select Add certificates.
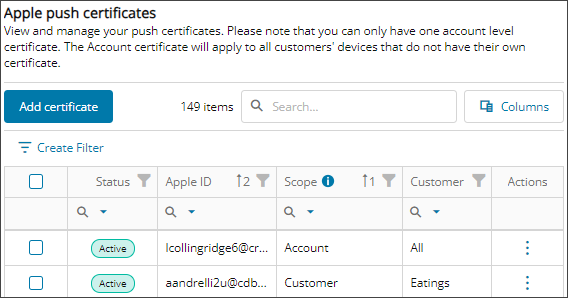
The Certificate setup dialog displays.
-
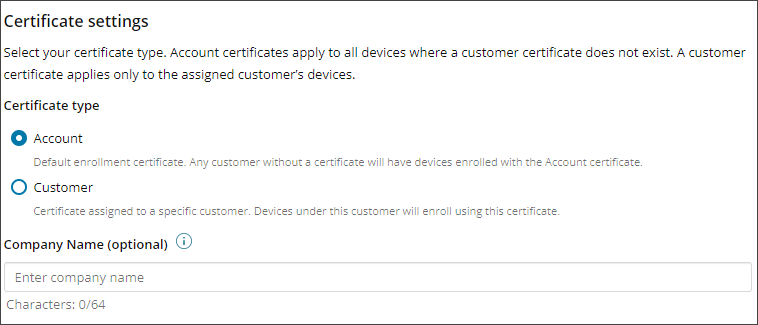
Select the certificate type.
Certificate type Action Select Account. This option is only available if an account-level certificate does not exist.
Optionally, enter a Company Name to automatically populate and replace the default MSP name when enrolling devices. Select Customer. - Select a client from the Customer drop-down menu.
- Optionally, enter a Company Name to automatically populate and replace the default MSP name when enrolling devices.
- Select Next.
The Download CSR dialog displays.
Download CSR
- Enter the Apple ID you will use to login to the Apple Push Certificates Portal.
The Apple ID email address you enter receives certificate expiry alerts. We recommend you use an active, generic email address to ensure renewal notifications have multiple recipients within your organization. Do not use a personal Apple ID (for example, one that's already associated with the App Store).
- Select Download CSR to store the .csr file locally and select Next.
The Enrollment Settings dialog displays.
Enrollment Setting
The Enrollment Helper prompts end users to enroll their macOS devices in Device Management for Apple. You can turn the Enrollment Helper on for the account or customer now, or leave it off by default so you control when the Enrollment Helper launches.
We recommend you leave the Enrollment Helper off until you are ready to enroll your devices. You can change your Enrollment Helper selection after this initial push certificate upload using Turn on/off the Enrollment Helper, Enroll macOS devices, or the automated task, Relaunch Device Management for Apple enrollment guide.
- In the Enrollment setting dialog, select the option to turn the Enrollment Helper on or off.

- Select Next.
The Create certificate dialog displays.
Create Certificate
- Select the Apple Push Certificates Portal link to create a certificate:

- Sign in to the Apple portal with the Apple ID used when the CSR was downloaded (if required).
Account: sign in using your Apple ID
Customer: sign in using your customer’s Apple ID
When you renew this certificate, you must log into the Apple Push Certificates Portal with this same Apple ID. We recommend you record the Apple ID used for future reference.
- In the Get Started section, click Create a Certificate and accept Apple’s Terms of Use (where satisfactory).
- Under Create a New Push Certificate, click Choose file to navigate to the location of the .csr file and click Open.
- Enter any relevant information in the Notes field and select Upload.
The Confirmation screen provides information on the Service, Vendor, and the certificate's Expiration Date.
- Click Download to retrieve a copy of the certificate (.pem file).
- Sign in to the Apple portal with the Apple ID used when the CSR was downloaded (if required).
- Return to Device Management for Apple and click Next.
The Upload certificate dialog displays.
Upload Certificate
- Drag and drop the Apple Push Notification certificate (.pem) file into the main window or use browse to navigate to the file and select it.
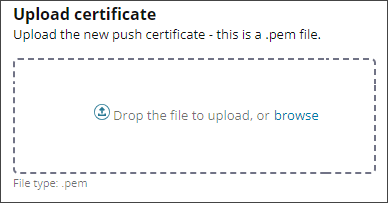
- Select Finish.
Information about the certificate including its expiration date and number of days to renewal is displayed.
Devices require re-enrollment if they are moved between clients with different Push Notification Certificates, or when you add a customer push certificate for a client and their devices were previously registered under your account certificate.
Related articles
- Access the push certificates dialog
- Renew Apple Push Notification Certificate
- Automated Device Enrollment
- Manual device enrollment
Updated: Jun 17, 2026