
Configure IP address settings
To configure the IP address settings in N-sight RMM, you must sign in with an account with General permissions.
Access the IP address settings
- In the All Devices view, go to Settings > General Settings > Security.
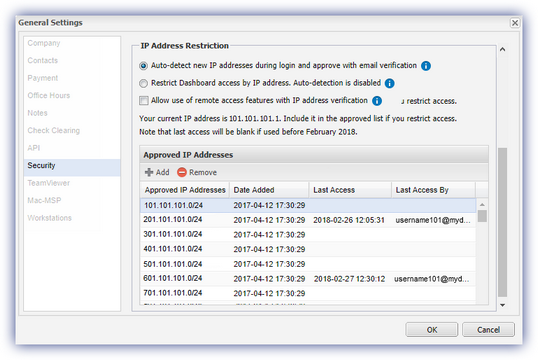
- In the IP Address Restriction section, choose one of the following options:
Option 1: Auto-detect new IP addresses during login and approve with email verification
- When a user logs in from an unrecognized IP address, N-sight RMM sends a verification email to their registered email address.
- The user must verify their identity by selecting the link in the email.
- Once verified, the IP address range (e.g., 1.2.3.0/254) is automatically added to the Approved IP Addresses list.
- Future logins from that range do not require re-verification.
The verification link expires after 2 hours. If it expires, the user must attempt to log in again to receive a new email.
Option 2: Restrict dashboard access by IP address. Auto-detection is disabled
- Only users connecting from IP addresses listed in the Approved IP Addresses list (allowlist) can access N-sight RMM.
- Each approved IP address entry includes:
- The date and time it was added.
- The date and time it was last accessed.
- The username of the last user to access it.
- Use this information to monitor usage and remove outdated entries.
Add IP addresses to the allowlist
N-sight RMM supports session continuity when a user’s IP address changes during a session. This prevents unnecessary logouts and supports a smoother user experience, especially for users who frequently change networks.
To enable this, ensure that all potential IP addresses a user may switch to are approved and added to the allowlist.
- In the All Devices view, go to Settings > General Settings > Security.
- Under Approved IP Addresses, select Add.
- Enter the IP Address and select the Subnet Mask.
- Select Add to apply the entry.
- Repeat as needed to add multiple addresses.
- Select OK to save and apply your changes.
Be sure to add your current IP address to avoid being locked out.
Remove IP addresses from the allowlist
- In the All Devices view, go to Settings > General Settings > Security.
- In the Approved IP Addresses list, select the IP address you want to remove.
- Select Remove.
- Click OK to save and apply your changes.
Optional: Allow Remote Access features with IP verification
If a user logs in from a verified IP address and Two-Factor Authentication (2FA) is enabled, you can allow them to use Take Control and Remote Background Management without entering a security code.
To enable this option:
- Go to Settings > General Settings > Security.
- Select Allow use of remote access features with IP address verification.
Related articles