Drive Space Change Check
Where the data on the disk increases by a significant amount it may be an indication of something going amiss on the device.
The Drive Space Change Check generates a failure when the data consumed on the disk matches or exceeds the configurable threshold value during the previous twenty four hours.
Check configuration
Add
- In the All Devices view North-pane, select the device.
- Go to the Checks tab.
- Click Add Check.
- Choose Add DSC > Drive Space Change Check.
- Select the Disk from the drop-down and enter the percentage Threshold value.
- To run an Automated Task when the Check fails choose Assign a Task after creating the Check
- Select OK to save and apply.
If you selected Assign a Task:
- Choose the Automated Task script.
- Select Next to configure parameters.
- Enter any required Command Line or Script parameters.
- (Optional) Set maximum permitted execution time for the script.
- Select Finish to save and apply the task.
Edit
- In the All Devices view North-pane, select the device.
- Go to the Checks tab.
- Right-click the target Drive Space Change Check and select Edit Check.
- Configure the settings.
- Click OK to save and apply.
Delete
- In the All Devices view North-pane, select the device.
- Go to the Checks tab.
- Right-click the target Drive Space Change Check and select Delete Check.
- Review the summary and select OK to confirm removal.
More information
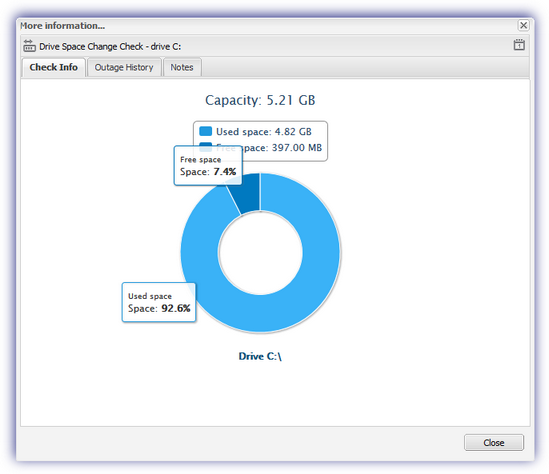
Once uploaded to the N-sight RMM user interface, the More Information column containing the Total and Free space values along with the percentage Change reported by the Check, whilst clicking on this link opens the More Information... dialog.
This dialog includes the overall file system Capacity, the Used space and Free space values along with a graphical representation of this information; the Space percentage is displayed when hovering over the Free space or Used space portion of the graph.

Access Denied
An access denied message may be returned where the account the Agent service is running under does not have sufficient permissions to query the selected drive and to resolve this either change the Agent service account or change the permissions of the account the Agent service runs under to allow access to the drive.
Local Disks
Only those logical drives identified by the computer as Local (DriveType 3) or Compact Disc (DriveType 5) are selectable in this Check. This Check does not support any other drive types included Network (DriveType 4) or Removable (DriveType 2).
The connected drives and their Windows assigned DriveType may be viewed on the device using Powershell:
- Log on to the target device.
- Open the Run dialog (Windows button +R).
- Type: powershell then click OK.
- Type Get-WmiObject Win32_LogicalDisk and then press enter on your keyboard.
- For each drive the DeviceID, DriveType along with additional information is returned.
Example output fromGet-WmiObject Win32_LogicalDisk command
PS C:\Users\User101\Desktop> Get-WmiObject Win32_LogicalDisk
DeviceID : C:
DriveType : 3
ProviderName :
FreeSpace : 40908886016
Size : 241741852672
VolumeName : OS
DeviceID : H:
DriveType : 2
ProviderName :
FreeSpace :
Size :
VolumeName :
DeviceID : Z:
DriveType : 4
ProviderName : \\100.200.300.401\shares
FreeSpace : 18536964096
Size : 1798648623104
VolumeName : Data
To format this information as a table: Get-WmiObject Win32_LogicalDisk | Format-Table -auto
To format this information as a table and output to a text file: Get-WmiObject Win32_LogicalDisk | Format-Table -auto | Out-File filename.txt -width 120
For additional details on this class, including the numeric value that corresponds to the logical disk (DriveType) please refer to the Microsoft article: Win32_LogicalDisk Class
Please note that we are not responsible for the content of external sites.
