
Backup Manager offers a backup and recovery service for MySQL databases on all the supported operating systems.
It is possible to add multiple MySQL instances to your backup selection (if they are installed on the same machine).
Requirements
- Backup Manager must be installed on the MySQL server that you want to back up
- The MySQL service must be started at the time a backup session starts
- MySQL backups depend on VSS Snapshots, so VSS must be available on the system
- Full permissions (with all privileges) are required to a MySQL database to backup the MySQL data source
- On Linux, glibc 2.5 or higher is required
- The Percona version must be the same as the MySQL server you are trying to backup
Operating Systems and MySQL versions:
- Windows & Linux - Backup Manager handles MySQL versions:
- 5.0.22
- 5.1
- 5.5
- 5.6
- 5.7
- 8 and all its minor releases
- macOS - Backup Manager handles MySQL versions:
- 5.0.22
- 5.1
- 5.5
Types of backups
Documents has 3 types of MySQL backups:
- Cold backups - the MySQL server is stopped for some time while the backup session runs; it is necessary that no third-party applications should be keeping the database forcibly open at that time
- Warm Backups - the MySQL server is locked for write operations for some time while the backup session runs, but is still accessible for read operations
- Hot backups - the MySQL server keeps functioning while a backup session is running
The type of backup is MySQL version dependent:
| MySQL version | Windows | Linux | Mac |
|---|---|---|---|
| MySQL 5.0.22 | Warm backups |
|
|
| MySQL 5.1 | |||
| MySQL 5.5 | |||
| MySQL 5.6 | Currently unsupported | ||
| MySQL 5.7 | Currently unsupported | ||
| MySQL 8 and all its minor releases | Currently unsupported |
Backup through the Backup Manager
Enabling schedule-based backups
First enable schedule-based backups on the backup device by:
- Configuring the backup selection to include MySQL
- Create the backup schedule to run automated backups
Configure backup selection
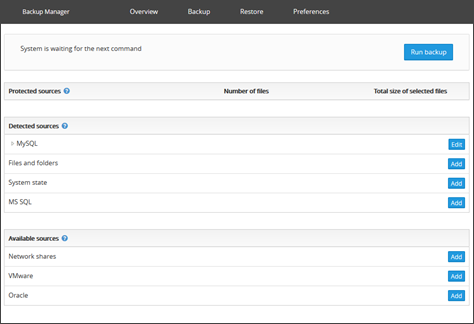
- Launch the Backup Manager for the device
- Open the Backup tab in the Backup Manager
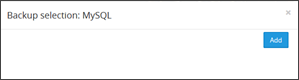
- Click Add next to the MySQL data source
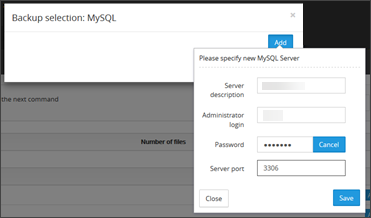
- Enter the details for an administrator login for the MySQL server
- Click Save
- Make the selection for backing up the MySQL databases
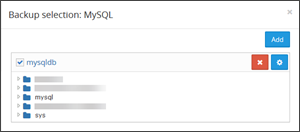
- Once the selection is complete, the MySQL datasource will now show as added and editable. You can click on the name of the data source at any time to be sure all necessary data has been included in the backup selection
If you clear your backup selection after at least one backup has been completed, you will be offered to remove all backup copies of these files from the Cloud. The action is irreversible.
Create backup schedule
The most convenient method of configuring backups is to set up a backup schedule which will automatically run the backups without requiring you to intervene.
You can create multiple schedules for each device, for example if you want Files and Folders to run at 9am but you want Files and Folders, System State and MySQL to run at 9pm.
To create a backup schedule:
- Launch the Backup Manager for the device
- Open the Preferences tab
- Click Schedule
- Select Add Schedule
- Give the schedule a name - make this something relevant to the backup configured such as "FS, SS & MyS 9pm"
- Optional - If you have created any scripts, these can be selected to run before the backup (Pre-backup) or after the backup (Post-backup) by selecting them from the given dropdowns.
- Set the time for the backup to run
- Choose the days on which you want the backup to run
- Select the data sources to backup
- Click Save

If you want to back up a data source regularly, it must be configured for backup as well as selected in a schedule or a profile. This can be done by following the MySQL backup steps above.
If you have multiple schedules listed in this page, you can enable or disable them by ticking the check box beside the name of the schedule. Disabling a schedule does not delete it, but will stop it from running until you manually enable it again.
To edit a schedule, you just need to expand the schedule in question, make the necessary changes and click Save.
To delete a schedule, click the X to the right of the schedule name, you will be prompted to confirm deletion of the schedule - click Yes.
Please note, once a schedule has been deleted, it cannot be undeleted and would have to be recreated manually.
If you have not configured the backup selection, the schedule will run, but as no data source configuration exists, nothing will be backed up.
Start a one-time backup
You can initialize a backup manually at any time.
- Launch the Backup Manager for the device
- Open the Backup tab
- Click Run backup
The length of the backup depends on the size of your backup selection, the data transfer speed and performance of your computer.
The Run backup button will be unavailable until at least one data source is configured for backup. This can be done by following the MySQL backup steps above.
Backup through the command line
You can back up and restore data not just using the web interface but through the command line as well. This is done using the Client Tool, an executable file included into all Backup Manager installations (view primary Client Tool instruction).
Below is a sample instruction for MySQL, based on a Linux case.
The same work flow can be used on Windows, however, changes will be required for the Windows command line versus the below for a Linux terminal, for example, file locations.
- Start your terminal emulator
- Navigate to the Backup Manager installation directory (this is where ClientTool is located)
cd /opt/MXB/bin
- Configure access to the MySQL server that you want to back up
./ClientTool control.mysqldb.add -name mysqldb -user root -password **pass** -server-port 3306
Where the parameter values (in italics above) are replaced with the values required:
-name– assign a name to the MySQL server as it will appear in the Client Tool and Backup Manager. Latin letters and most punctuation marks are supported, but we cannot support slashes-user– the Administrator username for access to the MySQL server (we recommend using the root)-password– the Administrator password for access to the MySQL server corresponding to the user-server-port– the port number of the MySQL server. If in doubt, check the option file on your machine (my.cnf)
- Add the MySQL server to your backup selection
./ClientTool control.selection.modify -datasource MySql -include mysqldb
You can make sure the MySQL server has been included into the backup selection using the
control.selection.listcommand. - Create a schedule for the MySQL data source, for example:
./ClientTool control.schedule.add -name MySQL_Daily -active 1 -datasources MySql -days All -time 20:00
- Start the backup of the MySQL data source
./ClientTool control.backup.start -datasource MySql
You can check the current status of the backup session using the control.session.list command.