
Two types of backups are available:
- Schedule-based backups (run on a certain day/time basis)
- Frequency-based backups (run at a specified interval)
Requirements
The computer must be online (turned on and must not enter the sleep mode) during backups. If a machine is offline, it will cause the backup to fail to start and will not begin until the machine is turned on or woken up.
If a backup is already running when the machine is turned off, the backup will be aborted. If the machine enters sleep mode while a backup is in progress, the backup will pause until the machine is woken up.
Be aware that in order to successfully restore using the Virtual Disaster Recovery or Bare Metal Recovery methods, you must back up the full Files and Folders data source (the whole system disk C:\ or any other depending on the configuration of your computer)
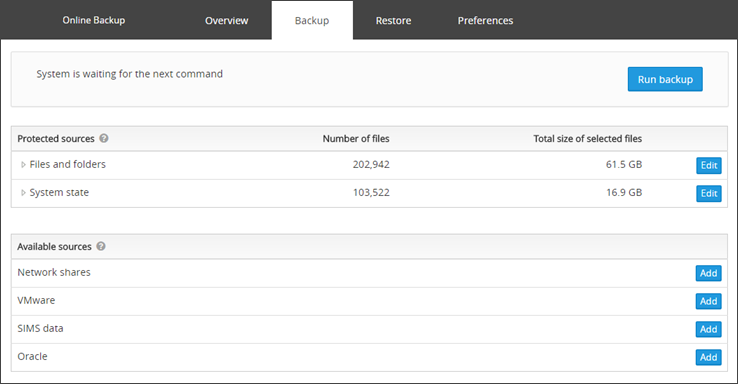
Configure backup selection
- Launch the Backup Manager for the device
- Open the Backup tab
- Click Add next to the data sources you want to back up
- Select the files, folders, components (such as data bases, virtual disks, etc.) to back up. You can let the Backup Manager help you choose data for backup using the Automatic File Selection feature
- Click Save
The below steps detail adding Files and Folders for selection, but the process is similar for most data sources. Sources such as Network Shares and VMware require you to supply additional information, such as server details, paths, usernames and passwords.
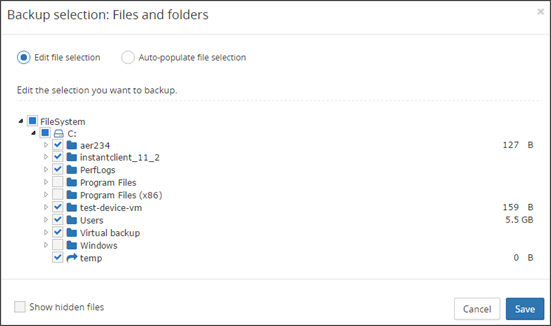
To make sure all necessary data has been included into your backup selection, click on the name of the data source. This will provide a list of the selection made.
Seeing a green tick followed by "\" means the whole data source is selected for backup.

If you clear your backup selection after at least one backup has been completed, you will be offered to remove all backup copies of these files from the Cloud. This means the entire backup history of this data source will be deleted. This action is irreversible.
If you have selected only part of the disk, you have an option to set the priority of the files in the backup selection.

To do this:
- Click on the name of the data source
- Click the arrow to the right of the selection to choose the priority:
- Click once to get a red up arrow - This indicates a high priority and will be backed up first
- Click twice to get a green down arrow - This indicates a low priority and will be backed up last
- Do not click or click to remove a priority to get a grey double-sided arrow - This indicates no priority set and will be backed up between the high and low priority jobs
Data of the same priority will be completed in alphabetical order.
Starting a Backup
Start a one-time backup
You can initialize a backup manually at any time.
- Launch the Backup Manager for the device
- Open the Backup tab
- Click Run backup
The length of the backup depends on the size of your backup selection, the data transfer speed and performance of your computer.
The Run backup button will be unavailable until at least one data source is configured for backup. This can be done by following the Configure backup selection steps above.
Configure schedule-based backups
The most convenient method of configuring backups is to set up a backup schedule which will automatically run the backups without requiring you to intervene.
You can create multiple schedules for each device, for example if you want Files and Folders to run at 9am but you want Files and Folders, System State and MySQL to run at 9pm.
To create a backup schedule:
- Launch the Backup Manager for the device
- Open the Preferences tab
- Click Schedule
- Select Add Schedule
- Give the schedule a name - make this something relevant to the backup configured such as "FS, SS & MyS 9pm"
- Optional - If you have created any scripts, these can be selected to run before the backup (Pre-backup) or after the backup (Post-backup) by selecting them from the given dropdowns.
- Set the time for the backup to run
- Choose the days on which you want the backup to run
- Select the data sources to backup
- Click Save

If you want to back up a data source regularly, it must be configured for backup as well as selected in a schedule or a profile. This can be done by following the Configure backup selection steps above.
If you have multiple schedules listed in this page, you can enable or disable them by ticking the check box beside the name of the schedule. Disabling a schedule does not delete it, but will stop it from running until you manually enable it again.
To edit a schedule, you just need to expand the schedule in question, make the necessary changes and click Save.
To delete a schedule, click the X to the right of the schedule name, you will be prompted to confirm deletion of the schedule - click Yes.
Please note, once a schedule has been deleted, it cannot be undeleted and would have to be recreated manually.
If you have not configured the backup selection, the schedule will run, but as no data source configuration exists, nothing will be backed up.
Configure frequency-based backups
To enable frequency-based backups on a device, you need to create a backup profile with the required backup settings and apply the profile to the device.
See
After the profile has been applied to the device, the new backup settings will be displayed under Preferences > Schedule in the Backup Manager. However, all editing is done through the profiles in the Management Console.