
Create new views in the Cove Data Protection (Cove) Management Console devices Dashboard by basing these on existing views:
- Apply any view to the dashboard
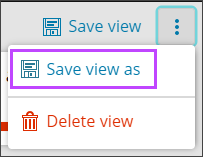
- From the top of the page, select the three vertical dots to open the view action menu
- Select Save view as
- Specify the name for the view
- Customize the view as needed
- Click Save view once complete
Please be aware, column codes have now changed to a new notation. Existing views that were built using old notation will still function, but we would recommend all new views are built using the new advanced filter expressions, found here.
Customize View
You can customize the view by using:
- Filters
- Widgets
- Basic or Advanced searches
- Selecting or deselecting columns to display
- Re-arranging the columns
- This can be done by dragging and dropping columns into a different order
- Changing the width of columns
- Changing the sorting method (for example, by Customer in alphabetical order A-Z)
You can clear individual filters by clicking the x beside each one from the banner above the toolbar or clear all filters by clicking the Clear all filters button, or selecting it from the action menu by clicking the three vertical dots in the filter menu.
![]()
If changes have been made to a view that need to be undone, this can be done by using the Reset View option.

This can only be done if the view has not been saved since the changes were made.