
Manage mailbox delegation
Cloud Commander will be decommissioned and stop functioning on May 13, 2026. You can use the product until that date.
Review and update workflows to remove any dependencies before the product is decommissioned.
Support, bug fixes, and security patches will be available until April 13, 2026.
For Exchange Online, you can use Cloud Commander to assign permissions to a mailbox or group so that other users can access the mailbox (the Full Access permission) or send email messages that appear to come from the mailbox or group (the Send as or Send on behalf permissions). In Exchange Online, the users that are assigned these permissions on other mailboxes or groups are called delegates.
In Cloud Commander users and groups are called members. You can assign members as mailbox delegates, edit member delegation roles, and unassign members from a delegated mailbox.
Assign or remove the following mailbox delegation permissions to Cloud Commander members:
- Full access: Allows the delegate to open the mailbox, and view, add and remove the contents of the mailbox. It doesn't allow the delegate to send messages from the mailbox.
- Send as: Allows the delegate to send messages as if they came directly from the mailbox. There's no indication that the message was sent by the delegate.
- Send on behalf of: Allows the delegate to send email on behalf of the mailbox. The From address of these messages clearly shows that the message was sent by the delegate.
If a user has both Send as and Send on behalf permissions for a mailbox, the Send as permission is always used.
Prerequisites
- You must be assigned the Microsoft Exchange Online Writer role scoped to the tenants you want to manage.
Assign a member to a mailbox
- In the , select
 Solutions > Exchange Online.
 - Use the customer selector to choose the customers you want to view data for.
- Filter or search to find the mailbox you want to delegate, then select the name to view the details.
- Go to the Members tab and select Assign to mailbox.
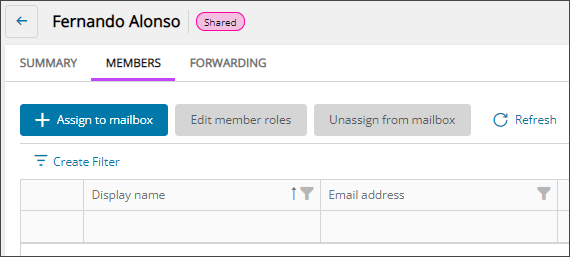
A list of eligible members displays.
- For each member you want to assign delegation permissions, select the checkboxes for the permissions you want to assign and select Assign members.
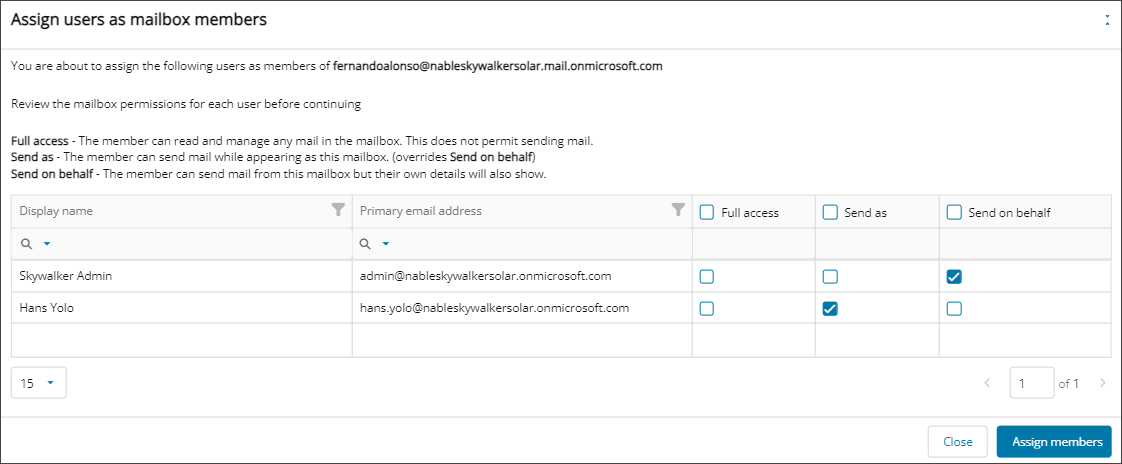
If you assign a delegated permission for a mailbox that is hidden from the address lists, the delegate won't be able to use that permission for the mailbox.
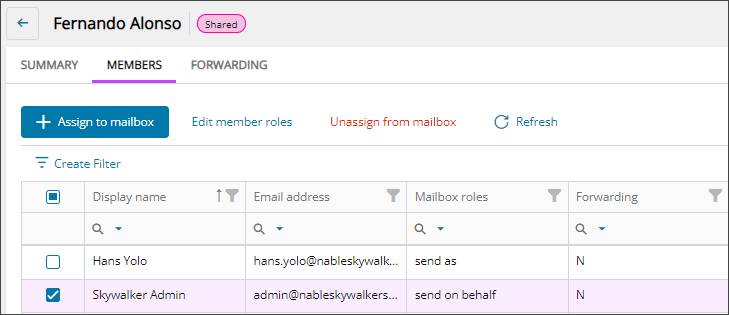
The delegated members display in the Members tab with their assigned permissions shown.
Edit member roles for a delegated mailbox
- In the , select Solutions > Exchange Online.
- Use the customer selector to choose the customers you want to view data for.
- Filter or search to find the delegated mailbox you want to edit members for, then select the name to view the details.
- Go to the Members tab.
- Select the checkbox for each member you want to edit and select Edit member roles.
- On the list of current delegated members, select and clear the checkboxes to change the permissions as needed and select Apply mailbox roles.
Your changes to the delegated members show in the Members tab.
Unassign a member from a delegated mailbox
- In the , select Solutions > Exchange Online.
- Use the customer selector to choose the customers you want to view data for.
- Filter or search to find the delegated mailbox you want to edit members for, then select the name to view the details.
- Go to the Members tab.
- Select the checkbox for each member you want to unassign and select Unassign from mailbox.
- Review your unassign selection and select Unassign members.
The member is removed from the Members tab for that mailbox.
Related articles
Updated: Jan 09, 2026