
Integrate MSP Manager with Xero and export your invoices
Follow the steps below to set up the integration between your Xero Accounting and MSP Manager accounts.
Disable the pop-up blocker in your browser before getting started.
With the latest update to MSP Manager's Xero accounting integration, you will need to log in to your Xero account prior to exporting invoices to get a token. That token is stored in the MSP Manager database and is valid for the next 100 days. After that time, will require you to log in to Xero again.
Configure the Xero integration with MSP Manager
- Navigate to Settings > Company Settings > Integrations, and select Configure Xero.
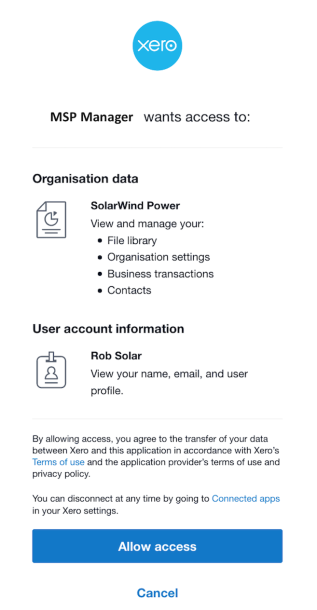
- Confirm you have disabled your pop-up blocker and click Connect to Xero.
- Click Allow access from the Xero User Consent window and the status message at the bottom of the screen in your account shows a count of customers, services and accounts that were successfully synced.
Open an additional tab in your browser and log into your Xero account. This will allow MSP Manager to easily communicate with Xero.
If you do not have Xero open in your browser, log in with your Xero account credentials in the pop-up window. However, if Xero is open in your browser, the pop-up window displays your Xero organization and user information.
-
In the Default Mapping tab, select a default item for each category. When you export invoices to Xero, each line item is mapped to the specified defaults. You can override these defaults for any service.
-
Navigate to the Services tab and use the filters on the left to view specific Item Types (Service Plans, Service Items, Rate Templates or Rates). You can also filter the list of services by Customer or Template, Xero Item code or Mapping Status.
-
Hover your cursor over an item in the Accounting Service column, click the edit
 button and select an item from the list to map to each Accounting Service in the list. This overrides any previously configured default mappings and allows a specific rate or rate template to be mapped directly to an item in Xero.
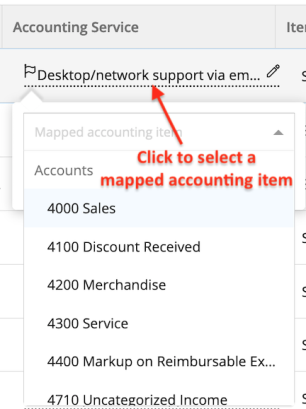
-
Some Rates and Rate Templates in the list may need to be edited in order to select a mapped item. Click the
 button to the right of each item in the list and select Edit to view and edit that item. Use the Mapped Item field at the bottom of the Service Item/Rate editor window to select a Xero Item. This allows you to map a specific service plan, service item, or individual rates to a specific Xero accounting item.
 -
Select an item from the Accounting Service column to map to each MSPM Item in the list. This overrides any default mapping previously configured and allows a specific rate or rate template, for instance, to be mapped directly to an item in Xero.
-
Use the Mapping Status filter to view inactive Xero items, or items that are missing a mapped accounting item or that have been successfully mapped. You can use the additional filters to view only Item types or Customers. Select one or more Service Plans from the Template filter to populate the main list with results.
-
When all items in are successfully mapped to the appropriate accounting items in Xero, navigate to the Default Mapping tab and click Save.
Export invoices to Xero
- Navigate to Billing, and click Add Billing Batch to run a billing batch.
- Select Xero Online from the Export Format list, and optionally select an Invoice Date and Invoice Due Date.
- Click Export Invoices.
Your invoices are available instantly in Xero after the export is complete.
What do you want to do?