
Create Workflow Rules
When adding rules to a specific Workflow Category, its important to understand how the Priority of Rules is applied: Rules are validated from the bottom of the list to the top, they are not applied cumulatively. The highest priority rule whose criteria is most accurately matched on is the rule whose actions are applied.
If you are adding rules to a Workflow category and Event Type for the first time, you must have a Workflow Access Group configured for that specific Event Type in order for ticket routing to work correctly.
- Click Settings > Tickets & Workflows > Workflow & Rules.
- Select Add Rule. If you are editing an existing rule, click anywhere on the rule to expand and view it's options.
- Choose from the five Workflow Categories and Triggers (Event Types):
- Incoming Email - an email sent by a customer for a specific issue. MSP Manager.
- Ticket Response - a customer adds a response to a ticket.
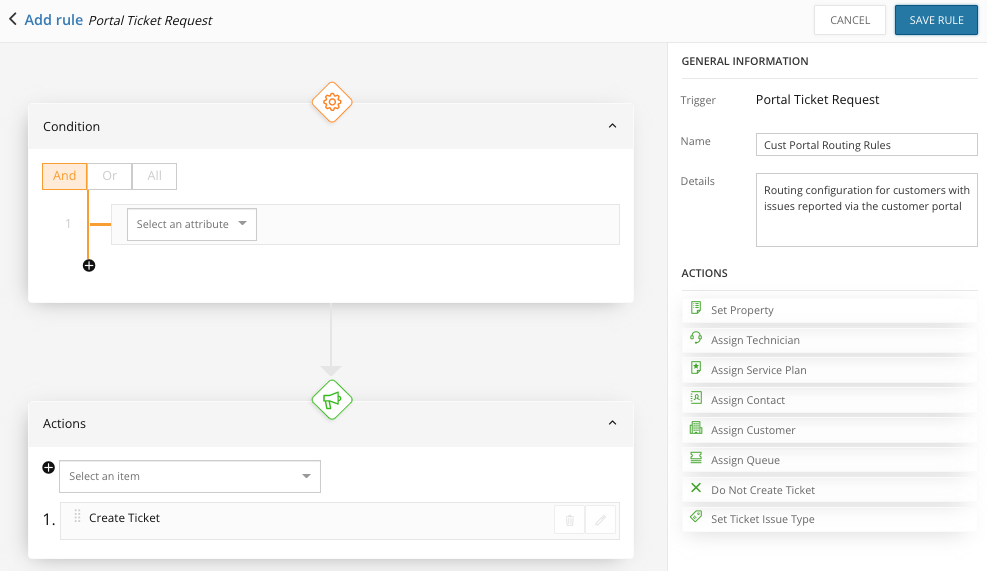
- Portal Ticket Request - a customer reported issue sent from the customer portal.
- Easy Ticket Request - a customer reported issue sent using the Create Easy Ticket Request button without logging into the portal.
- RMM Outage - an outage for a specific asset from your N-sight account. This option is only visible if your MSP Manager account has an active integration with N-sight.
- Enter the name and details of the Workflow Rule.
After choosing a workflow category and providing the name and details of the workflow rule, you are ready to add conditions to it.
Add Conditions and Actions to your Workflow Rules
- Click And/Or/All, and choose an Attribute. Attributes differ depending on the type of workflow. Outage Workflows contain attribute options for asset or outage details, Ticket Workflows contain attribute options for customer and email subject/body information, Portal and Easy Ticket request contains options for the contact email, ticket category, details or title, and Ticket Response contains options for completed date, ticket status and ticket priority.
- Select a Condition Operator (equals, not equal (!=), contains, includes, starts with).
- Enter a Value. This value is directly related to the Condition Attribute that is selected – a specific email address, customer name or asset status, for instance.
- Click
 to add more conditions or condition blocks to the rule.
Do not use 'Equals' (=) or 'Starts with' when creating workflow rules for Email Subject or Email Body. Both fields contain HTML that can interfere with the condition. Instead, use the 'Contains' Condition Operator.
Creating a condition block adds a new set of brackets to your rule using OR instead of AND.
Example: [Condition 1 AND Condition 2] OR [Condition 3 AND Condition 4]
In this example, Condition 1 and 2 are in the same Condition block, Condition 3 and 4 are in a different block, and they are separated by the OR Condition.
Add Actions to your Workflow Rules
- Add Actions to your Workflow Rules.
- Click Actions and select an action from the list. You can also drag an item from the Actions list into the Actions section of the Workflow editor.
-
Click
to confirm the addition of the Action to the rule. - Click
 next to the Action to edit and view it's additional criteria. For example, editing the Assign Technician action allows you to assign the technician based on Customer or Location Assigned Users, User Skills, or you can select specific users. Edit each Action to view and configure it's additional options.
 - Continue to add rules to your workflow to cover additional scenarios, and save the rule when it is complete.
Create Ticket and Do Not Create Ticket are not editable actions.
All actions and updates applied to tickets must be set explicitly: 1 action = 1 task. If there needs to be additional tasks (i.e. assigning a technician to a ticket AND setting TicketStatus to 'Assigned') then additional actions are required.
Actions are executed when a trigger event occurs that meets the listed conditions.
What would you like to do?