
Create custom notification templates
Create custom notification templates to notify customers or technicians about ticket updates or changes to knowledge and service items. Choose HTML or plain text to keep customers informed whenever information is added to a ticket. Use the Data Model to understand how each variable works in the template.
Administrator permissions are required to configure notifications.
Edit a notification template
- Go to Settings > Notifications > Notification Templates.
-
Select a template from the list to view its options.
- Choose the External tab to configure notifications or the Internal tab technician notifications.
- Select a language and format.
- In a Delivery Method row, select
 Edit.
Edit. - To view available variables, select
 Show Variables in the top right corner.
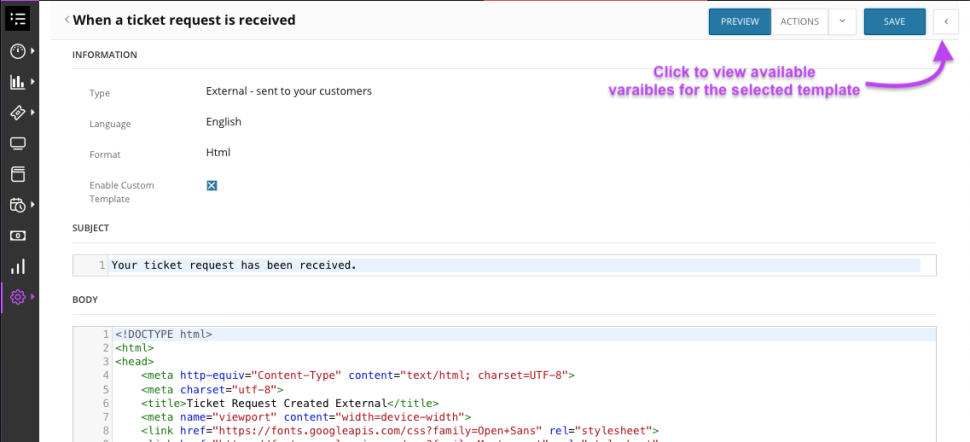
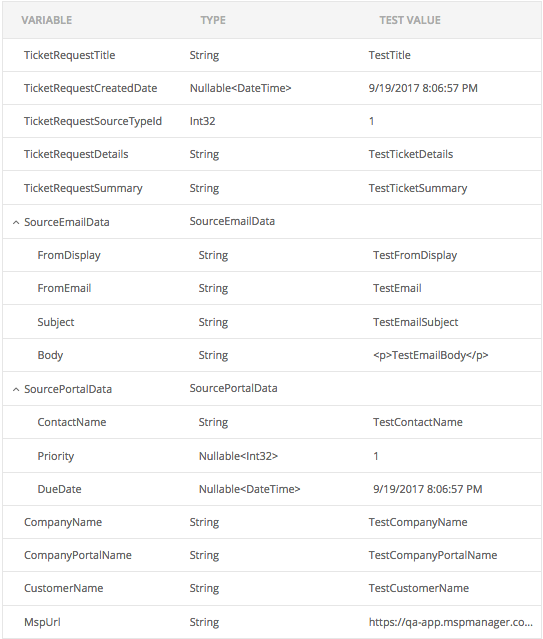
- The Data Model displays information for the selected template. In this example, the notification is for When a ticket request is received, so the variables displayed are related to tickets and ticket requests.
- Update the HTML or Plain Text body as needed.
Response trimming requirements
Response trimming is only supported in two templates
- When a technician adds a response to the customer within a ticket
- When a customer adds response to an existing ticket
To enable response trimming in these templates, include this snippet in your custom HTML notification:
<div id="mspmNotificationMarker">
See a default notification template for the correct placement in the body.
- Select Actions > Validate to check your changes or Preview to see the notification.
- Select Enable Custom Template to activate the template. Changes are saved as a draft until enabled.
- Select Save.
<span height="1" width="1" style="visibility:hidden; display:inline-block; color: #fff;" id="TicketID">TicketId[{{ Model.TicketId }}]</span>Configure notification settings
After saving and enabling the template, set up your notification rules to define when type is sent and who receives it.
To send the following notifications to external contacts or internal users, select a user or contact in the Optionally Notify Users field when adding the expense or time entry. These notifications aren’t sent unless a user or contact is selected.
- When an expense gets added to a ticket
- When a time entry gets added to a ticket
Add your company logo
- Use a Base64 image encoder to convert your logo to an HTML string.
- Copy the generated HTML code and paste it into the template editor.
- Select Preview to check the logo placement.
- Adjust the HTML image in the editor to change the logo position.
- Enable and save the template.
What do you want to do?
- Refresh your HTML Knowledge Base
- Learn more about Liquid template language used for HTML notifications.
- Read this tutorial on cascading style sheets (CSS).
- Learn more about Liquid template language used for HTML notifications.
- Set up company notifications
- Create custom notification templates