
Create a Patch and Vulnerability Report
- Navigate to Reports in the left Navigation panel:
- Click on Create New Report at the bottom of the page. The Create Report wizard is displayed.
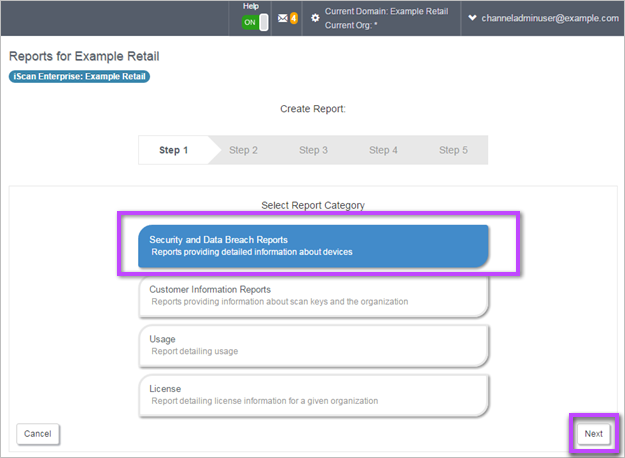
- In Step 1 - Select Report Category, click on Security and Data Breach Reports and click Next:
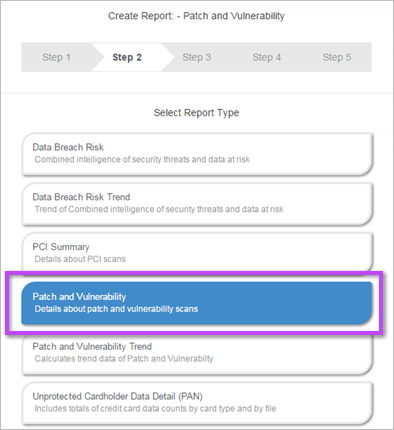
- Step 2 - Select Report Type of the wizard is displayed, listing all reports of the type Security and Data Breach. Click on Patch and Vulnerability and click on Next:
-
Step 3 - Select Report Options is displayed. Choose your report name, any email recipients of the report and any automatic scheduling of the report.
To attach the CSV file to the emailed report, select the Attach CSV to emailed report option.
The system will add the CSV file to the emailed report in one of the following ways:
- 0-5MB - If the file is between 0-5MB, the file is attached to the email
- 5-10MB - If the file is between 5-10MB, the file is zipped and attached to the email
- 10MB+ - If the file is over 10MB, a link to the file is added to the email to the email
If you want the system to automatically generate a shared URL for the report, select the Automatically Generate Shared URL for Report option.
- In Step 4 - Customize Report View, you can choose which columns to display in the report and filter data displayed using conditions and condition groups (see Specify Report Conditions). When you've done this, click Next.
- Step 5 - Report Review displays a summary of the report criteria. If you want to change anything, go back to the relevant step using the Back button and make the necessary changes. If you're happy with the report, click on Save.
The report is added to the Reports list.
Now you can generate the report and view the results - see Run Report.