
Whitelist
Web Protection is now disabled by default for:
- New customer accounts.
- Existing customers who have not previously enabled Web Protection.
See Web Protection for details.
Use the Web Protection Policy whitelist to allow access to the specific URLs or IP Addresses, regardless of their categorization. You can add items in the Web Protection Policy or from the Web tab in the South-pane.
To allow URLs or IP Addresses using the Web Protection Policy:
- In the whitelist section, select Add.
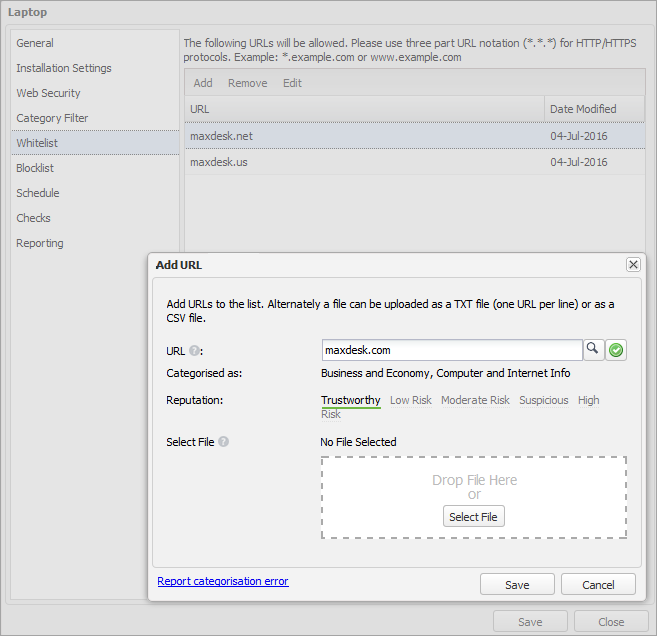
- Add a single URL or IP address:
- Enter the URL or IP address in the URL field.
- (Optional) Select the search icon to view the categorization and reputation.
- If the categorization is incorrect, report the error.
- Select the confirm icon to add the entry. The system clears the field so you can add another entry.
- Repeat as needed.
You must use the Supported URL and IP address formats.
- Add multiple URLs or IP addresses:
- Create a CSV file or a TXT file with one URL or IP address per line.
- Choose Select File and browse to the file, or drag the file into the upload area.
- Select Save.
- Verify that the new entries appear in the list.
To manage existing entries:
- Select an item in the list.
- Select Edit to update it, or Remove to delete it.
Supported URL and IP address formats
Use the following formats when you enter URLs or IP addresses:
URL format
- Use a three-part domain format (for example, www.name.com) for HTTP or HTTPS URLs.
- Use an asterisk wildcard only at the start of the URL string (for example, *.name.com).
IP address format
- Use a four-part format (for example, 57.73.181.555).
- To specify a range of IP address, use one of the following methods:
- CIDR notation (Classless Inter-Domain Routing) (for example, 141.138.130.12/24)
- Two IP addresses separated by a hyphen (for example, 192.168.0.0-192.168.255.255)
For more information about mapping behavior, see Web Protection character and address mapping.
Report a categorization or reputation error
If you think the URL or IP address is categorized incorrectly or has an incorrect reputation, select the option to submit a change request. This opens the Change Request page, where you can enter your request.
Before you submit a request, double-check the URL or IP address you entered. Use the following best practices when entering a URL:
- Do not include a leading http://.
- Do not include a leading www.
- Check for typos. For example, http::/yoursite.com may trigger a review, but the system will not process the request correctly.
- Remove any leading spaces or tabs. For example, " yoursite.com".
- Enter only one generic version of the URL. You do not need to include all versions.
Processing time may vary. After you submit a request, it can take up to 48 hours for Web Protection to apply the updated categorization.