
Virtual Drive
If Backup and Recovery options do not appear in N-sight RMM, use Cove instead.
To start a 30-day free trial of Cove:
- Open the app switcher in the Product Bar.
- Select Cove Data Protection (Cove).
It can be time-consuming to perform a full restoration when only a few files are required from the backup set. Rather than go through this process, the Virtual Drive utility mounts a read-only virtual drive on the target machine allowing access to all of the device’s backup contents from the online storage or LocalSpeedVault (where configured) through a file browser, acting like a physical drive on the local computer.
Install the Virtual Drive
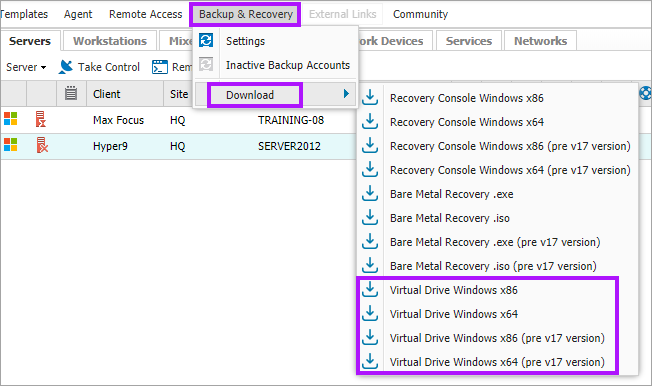
The Virtual Drive is deployed on the device the files are to be recovered from and is downloaded from the dashboard.
To download Virtual Drive:
- Use the Backup & Recovery menu in the dashboard
- Click the Download menu entry
- Select the version that corresponds to the architecture of the device the Virtual Drive is to be deployed on:
| Architecture | Version |
|---|---|
| 32-bit systems | Virtual Drive Windows x86 |
| 64-bit systems | Virtual Drive Windows x64 |
The latest versions of these files is also available from Backup & Recovery Tools.
Manual Install
- Navigate to the location of the Virtual Drive installer and double click the executable to run the setup wizard
- Change the Destination Folder if required
- Follow the on screen prompts to complete the installation process
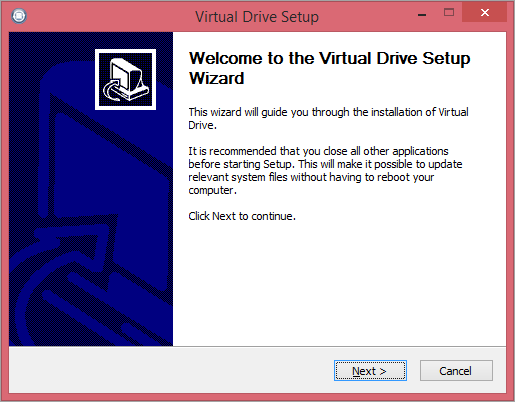
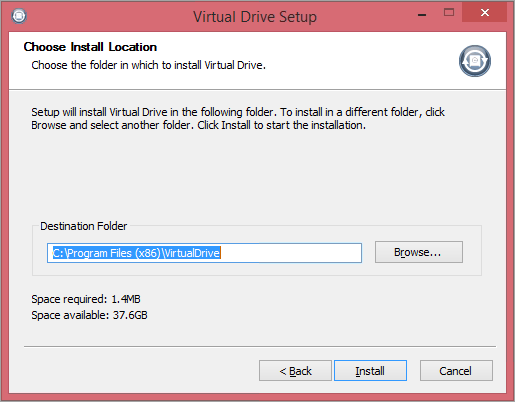
Please note that depending on the system a reboot may be required
Silent Install
In addition to manual installs, the Virtual Drive may be deployed silently using the following command:
executable_file_name /S /D=install_location
x86 (32-bit) example:
backup-and-recovery-vd-windows-x86.exe /S /D=C:\Program Files\VD
x64 (64-bit) example:
backup-and-recovery-vd-windows-x64.exe /S /D=C:\Program Files\VD
Please note that depending on the system a reboot may be required
| Command switch | Description |
|---|---|
executable_file_name
|
Filename of the Virtual Drive installer executable |
/S
|
Silent Install mode |
/D=install_location
|
Directory in which to install Virtual Drive |
Virtual Drive Usage
Virtual Drive Letter
Regardless of the deployment method, once the installation is complete a new local drive appears in the system, by default the Virtual Drive is named B: unless this drive letter is already taken, in which case another drive letter is assigned.
Virtual Drive Structure
For ease of navigation the Virtual Drive retains the directory structure from Backup Manager, with the contents of the sessions including the date, time and restore tree maintained.
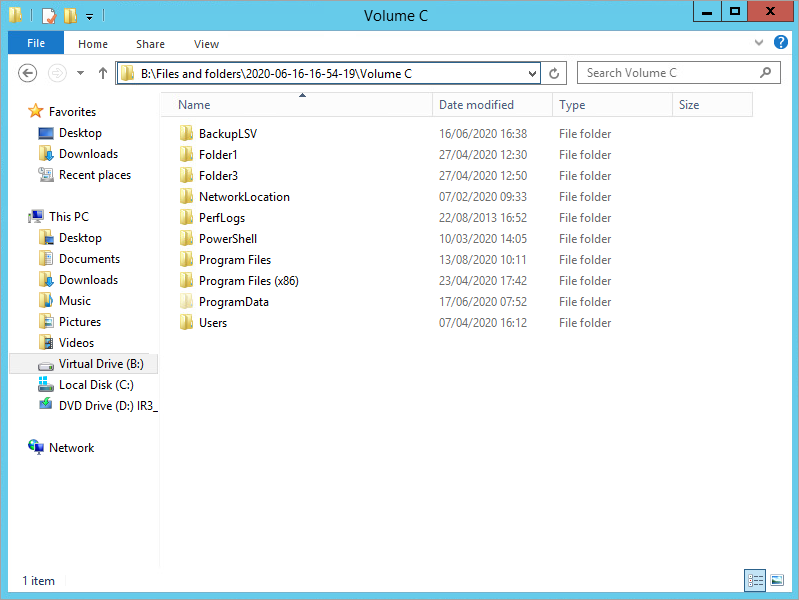
Virtual Drive Access
To recover a file simply go to the required file in the Virtual Drive then move it to the target location, for example using cut & paste or drag & drop.
The file can also be opened directly from within the Virtual Drive, just select the file and open with the relevant program, for example view images in Windows Picture and Fax Viewer or run video clips in Windows Media Player all with the usual options.
Virtual Drive Technology
Virtual Drive incorporates Delta Restore and Restore on Demand technology which performs recoveries at the brick level and minimizes the amount of data transferred. By transmitting only necessary data, greater network efficiency and maximized file transfer speeds are assured.
Configure Virtual Drive (Advanced Settings)
In the majority of cases the Virtual Drive is used with the default settings, however we have included the ability for advanced users to manage these settings (if required) through the Backup Manager's config.ini file found in the Backup Manager installation folder on the target device, for example: C:\Program Files\Backup Manager.
- Open the config.ini file
- Add a
[VirtualDrive]section - Enter the required settings (as detailed below) and save once complete to apply
The first setting (ShowLatestAvailableFiles) was introduced in version 13.6, with the additional options included from 14.2 onwards.
Enableable Settings
The below options may be enabled or disabled as required by changing their settings to either 0 (disabled) or 1 (enabled).
Please note that the following settings are disabled (0) by default:
| Setting | Description |
|---|---|
ShowLatestAvailableFiles
|
Provides access to files that were removed or excluded from the backup selection |
ShowAllSessions
|
Provides access to failed backup sessions (on condition that at least some valid data was successfully backed up) |
ExtendedVirtualDriveLogging
|
Initiates extended logging with the information written to the BackupFP log file. Please be aware that as this enhanced logging writes additional data to the log file it may take a considerable amount of storage space on the device |
The following setting is enabled by default (1):
| Setting | Description |
|---|---|
VirtualDriveRestoreCacheEnabled
|
Enables Virtual Drive caching which improves performance by increasing the speed of viewing and writing large data sets |
Configurable Settings
The below options may be configured as required by entering the target value:
VirtualDriveRestoreCacheType
|
Select a storage type for the Virtual Drive cache. Supported values: | |
| memory | The cache files are kept in the operation memory to help improve performance (default) | |
| FS | The cache is saved to the file system (hard disk). This may lower overall performance, but allows the allocation of more space for the cache | |
VirtualDriveRestoreCacheLocation
|
Specifies the directory the cache is written to where VirtualDriveRestoreCacheType=FS. This defaults to the temporary folder, but another location may be specified, for example: C:\VDCACHE |
|
VirtualDriveRestoreCacheSizeLimitInMb
|
Define the maximum memory or disk size (set to 256 MB by default) | |
Config.ini example:
[VirtualDrive]
VirtualDriveRestoreCacheEnabled=1
VirtualDriveRestoreCacheType=FS
VirtualDriveRestoreCacheLocation=C:\VDCACHE\
VirtualDriveRestoreCacheSizeLimitInMb=102400