TCP Service Check
The TCP Service Check can alert on security risks and malfunctioning TCP/IP Services/applications by monitoring a specified port on an IP address or hostname on the LAN, WAN or internet every five or fifteen minutes, configured to alert if it either open or closed. As such the Check can be used to promptly identify network problems before they become big disasters.
The TCP Service Check supports devices running in server or workstation mode.
Our users use this to...
- Manage Security Risks on the Network for example that specific ports - like 25 (SMTP), 80 (HTTP), 3389 (RDP), 1723 (PPTP) - are open when they shouldn't be
- Receive an alert where critical systems, for example mail servers, web-servers or database servers are not accepting connections over the specified port(s) or when VPN services are no longer available. For example the following Ports used by Microsoft SQL may be monitored: 1433 (Microsoft SQL Server) and 1434 (Microsoft SQL Monitor).
- Ensure Network Services DNS, DHCP, Wins etc are up
- Monitor ports on non-Windows Operating Systems or devices (for example Linux, iOS, printers, routers etc) to determine whether they are or are not accepting connections
Check configuration
Add
- In the All Devices view North-pane, select the device
- Go to the Checks tab
- Click Add Check
- Choose Add 247 > TCP Service Check
-
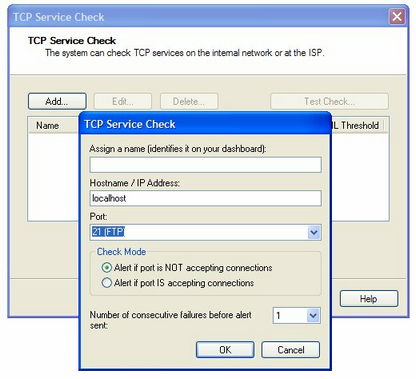
Assign a name to the check
-
Enter the IP Address/Hostname to query
- Select the Port from the drop-down or where the required port is not on the preconfigured list simply enter the port number
-
In the Check Mode enter the Alert criteria, Alert if port is NOT accepting connections or Alert if port is IS accepting connections.
- To adjust the sensitivity of the Alert generation use Only FAIL after (1 - 5) consecutive failures so minor connectivity blips do not cause a distraction. Once set the Check fails where the number of consecutive failures exceeds this threshold.
- To run an Automated Task when the Check fails choose Assign a Task after creating the Check
- OK to save and apply
- Where Assign a Task after creating the Check is selected:
- Select the script
- Click Next to configure
- Enter the Command Line parameters (if required)
- Set a Script timeout in the range 1 - 3600 seconds (default 120 seconds)
- Click Finish to save and apply
Edit
- In the All Devices view North-pane, select the device
- Go to the Checks tab
- Select the target TCP Service Check
- From the Check drop-down
- Click Edit Check (also available from the Check's right-click menu)
- Configure the settings
- Click OK to save and apply
Delete
- In the All Devices view North-pane, select the device
- Go to the Checks tab
- Select the target TCP Service Check
- From the Check drop-down
- Click Delete Check (also available from the Check's right-click menu)
- Review the summary and select OK to confirm removal