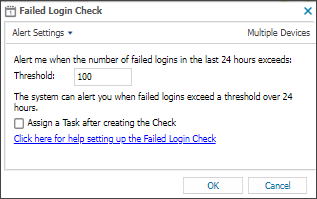
Failed Login Check
On macOS devices, the Failed Login Check queries the secure.log file to identify the total number of unsuccessful login attempts on the monitored device over the past 24 hours. If the number of discovered Events exceeds the configured threshold, the Check fails.
When you add or edit a check, the Agent downloads the new settings the next time it communicates with the N-sight RMM user interface. The Agent applies the settings the next time the check runs.
The Failed Login Check results are available in the South-pane Checks tab. The More Information column displays the total number of Failed Logins recorded over the last 24 hours.
Check configuration
Add
- In the All Devices view North-pane, select the device
- In the South-pane Checks tab, click Add Check
- Select Add DSC > Failed Login Check
- Enter the Threshold

When you set the threshold for the Failed Login Check, we recommend you decide how many failed attempts constitutes an abnormal amount.
Work with your customer to determine a suitable number of failed logins as a baseline, and configure the threshold such that if the baseline is exceeded, the check fails and sends an alert. - To run an Automated Task when the Check fails, choose Assign a Task after creating the Check
- Click OK to save and apply
If you selected Assign a Task:
- Choose the Automated Task script.
- Select Next to configure parameters.
- Enter any required Command Line or Script parameters.
- (Optional) Set maximum permitted execution time for the script.
- Select Finish to save and apply the task.
Edit
- In the All Devices view North-pane, select the device
- Go to the Checks tab
- Right-click the target Failed Login Check and select Edit Check
- Edit the settings
- Click OK to save and apply
Delete
- In the All Devices view North-pane, select the device
- Go to the Checks tab
- Right-click the target Failed Login Check and select Delete Check
- Review the summary and select OK to confirm removal

