
We strongly do not recommend downgrading Backup Manager to a lower version after installation is complete. In cases where the Backup Manager has been downgraded, we cannot guarantee the application will function correctly.
To start using the Backup Manager, using the Self-Managed Installation method (previously known as Manual Installation, or Legacy Installation) for your operating system, this wizard guides your through several steps.
If no device name is specified when adding devices to the Management Console, a single executable file supports multiple installations for the specified customer.
Self-Managed Installation is available on Windows, macOS and Linux operating systems.
Requirements
- A SuperUser account is required at the Reseller or End Customer level.
Please request assistance from your service provider if your access permissions are insufficient.
Instructions
Step 1: Add device
- Sign in to the console under a SuperUser account belonging to a Reseller or End Customer.
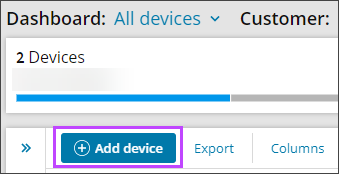
- Click Add devices, select Servers of Workstations.
- Select the Customer to install the device for, from the drop down.
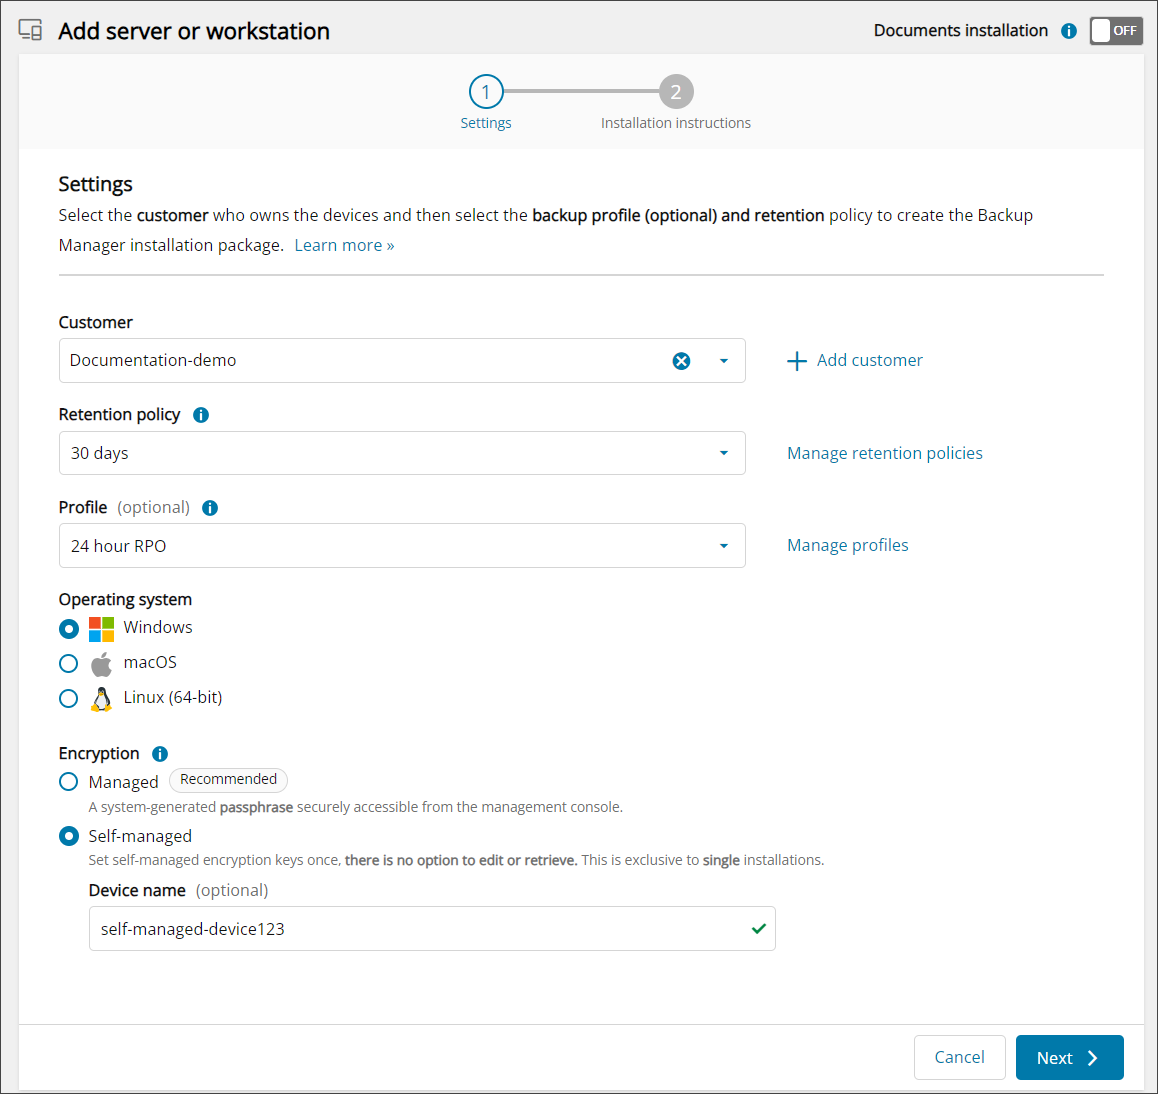
- Select a Retention Policy to apply to the device.
Classic Retention Policies (previously created Products) may also be used, though we would recommend switching to New Retention Policies at your earliest convenience. See Retention Policies for full details.
- Select a Profile to apply to the device.
This is optional. If none is selected, the default is a 24 Hour RPO.
See Profiles for full details.
- Select the Operating System from:
- Windows
- macOS
- Linux
- Choose the Self-Managed Encryption method.
- You can also set installation options in Advanced settings:
- Optionally, specify a device name. If you do, the Number of Devices field is disabled.
- To set an installation deadline, select a date in Installer Expiry Date.
- To set how widely the software is deployed, specify the Number of Devices to install the software on. You can specify up to 100 devices.
- Click Next.
- Confirm the device settings, then Download the Backup Manager installer for the device.
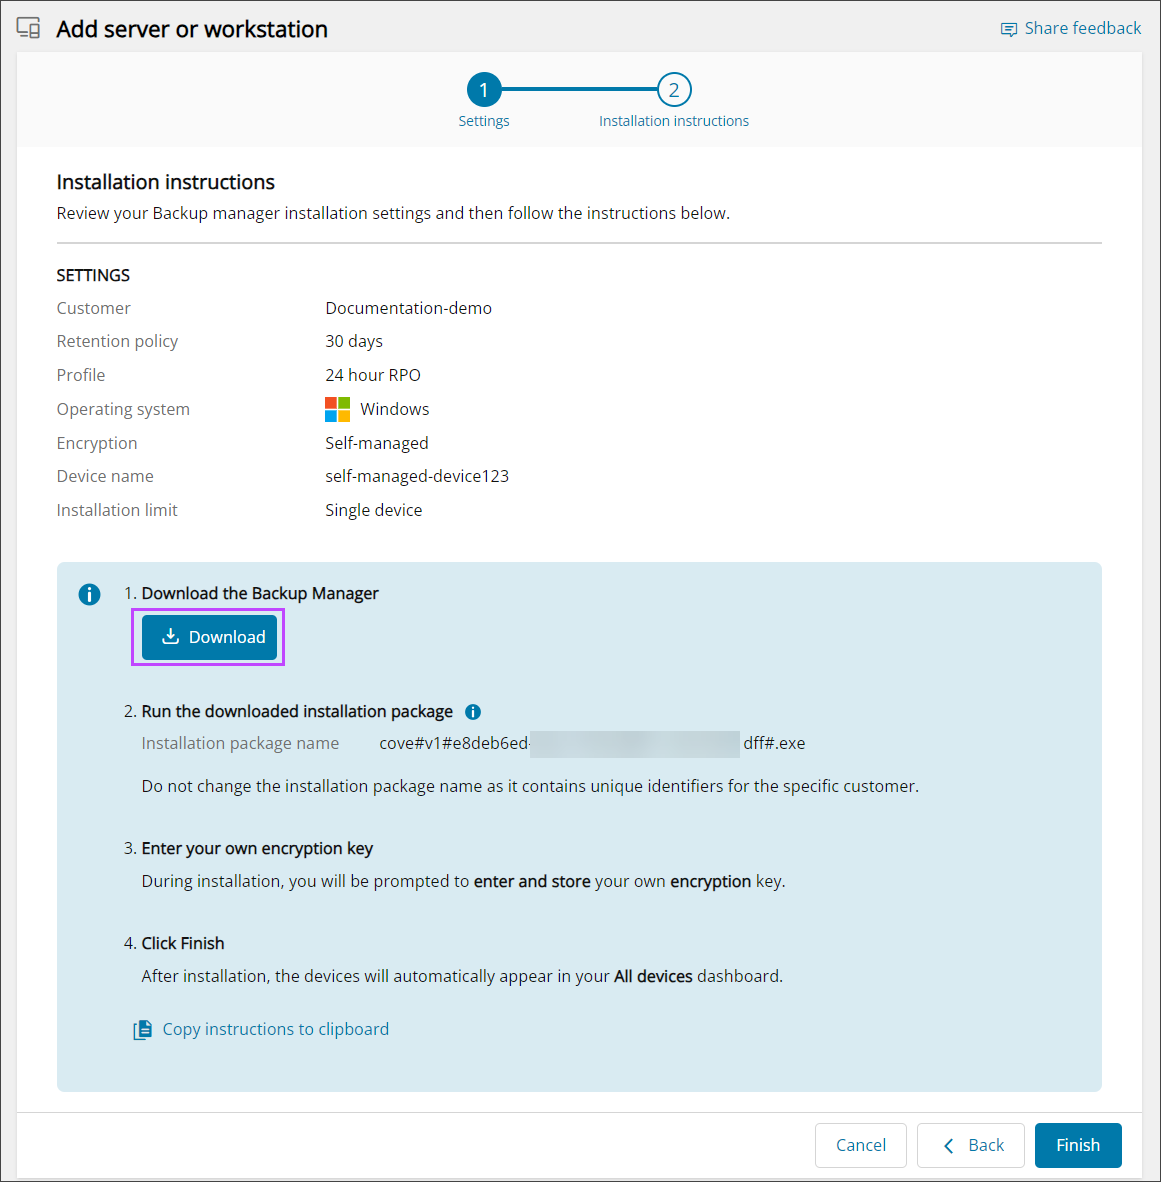
Do not change the name of the installation package. It contains unique information relating to the installation.
- Click Finish.
- Run the installer file on the device where Backup Manager should be installed.

If you don’t specify a device name when adding devices, the computer name is automatically retrieved from the machine. This allows a single executable file to support unlimited installations for the selected customer.
If the installer doesn’t run after downloading, check the file’s properties to make sure it hasn’t been blocked by your system. You can also try running it as an administrator.
During installation, you will be required to create an Encryption Key/Security Code. You must store this somewhere secure as we do not store this for devices that use self-managed encryption.
Step 2: Run the installer
To run the installation package, do one of the following:
- Double-click the installer executable.
- Enter the installer name in a command line, terminal emulator or a software distribution system. For example:
cove#24.10.102#ab1234c5-67d8-9ef0-g1h2-i34j56k789lm#.exeorcove#24.10.102#ab1234c5-67d8-9ef0-g1h2-i34j56k789lm#.run
Do not change the name of the installation package. It contains unique information relating to the installation.
Optional: Include Additional Parameters (Windows and Linux)
On Windows and Linux devices you can run the installation command with additional optional Proxy parameters if required.
Proxy Settings Parameters
| Windows Parameter | Linux Parameter | Description | Supported Values (Windows) | Supported Values (Linux) |
|---|---|---|---|---|
-encryption-key
|
--encryption-key
|
Enter an Encryption Key/Security Code that will be used to encrypt your data. You must store this somewhere secure as we do not store this for devices that use self-managed encryption. |
Text Encryption Key/Security Code must:
|
Text Encryption Key/Security Code must:
|
-use-proxy
|
--use-proxy
|
This setting prompts the Backup Manager to connect to the Internet through a proxy server. |
|
|
-proxy-type
|
--proxy-type
|
The type of the proxy server |
|
|
-proxy-address
|
--proxy-address
|
The host name or IP address of the proxy server | IP address or host name, for example 192.188.33.55 or some.server.com |
IP address or host name, for example 192.188.33.55 or some.server.com |
-proxy-port
|
--proxy-port
|
The port number of the proxy server | Number (0 by default) | Number (0 by default) |
-use-proxy-authorization
|
--use-proxy-authorization
|
Prompts the Backup Manager that the proxy requires authorization by username. |
|
|
-proxy-username
|
--proxy-username
|
A username for access to the proxy server | Text, for example domain\username or username |
Text, for example domain\username or username |
-proxy-password
|
--proxy-password
|
A password for access to the proxy server | Text | Text |
Step 3: Provide Encryption Key/Security Code
The Encryption Key/Security Code can be any word or sentence of your choice, but should be secure and not easily guessed. Using this, your files will be encrypted with a strong encryption algorithm, thus keeping your private data protected from unauthorized access.
The Encryption Key/Security Code must:
- Be between 8 and 100 characters in length
- Contain at least:
- One digit
- One uppercase letter
- One lowercase letter
- One non-alphanumeric character (special character)
- Have no white-space
Once the installer is running on the device, the installation window will open:
- Set and confirm an Encryption Key/Security Code that will be used to encrypt your data.
- Copy the Encryption Key/Security Code and store it somewhere other than this device.
- Click OK.
It is important to note that you MUST remember this Encryption Key/Security Code. We do not store this code for you.
It is not possible to restore your backed up data or re-install the current backup device without it.
What's Next?
Ensure you enable Full Disk Access for the Backup Manager before running any backups on devices using macOS 10.14 Mojave or later.
Once the installation is complete, we suggest looking at:
- Language - If not set as part of the Profile, you may configure the language of the Backup Manager client if the default of English is not suitable.
- Backup Selection - If not set as part of the Profile, make the backup selection so that Backup Manager knows what to back up.
- Automatic File Selection - (Windows Only) If not set as part of the Profile, you can populate your backup selection with documents, images and videos detected on your computer. This can be changed as required.
- Backup Schedule - Schedule the backups so that Backup Manager knows when to run the backups.
- Report email - Add an email address to receive reports on the status of the backups and restores.
- LocalSpeedVault - Set up a LocalSpeedVault, which saves your backups remotely in the cloud or at a private data center (depending on your terms of service).