
Manage tag definitions
This article explains how to create, edit, and delete tag definitions in N-central. For an overview of tagging, see Tag Management (New).
For example, partners may tag assets as critical so N-central can treat them differently from standard assets. These assets might follow specific patching or vulnerability policies, such as more frequent scans or tighter automated remediation.
Prerequisites
To manage tag definitions, your role must have the following permissions:
- Custom Properties permissions in the Administration section
- All Devices permission in the Devices > All Devices section
Create tag definitions
-
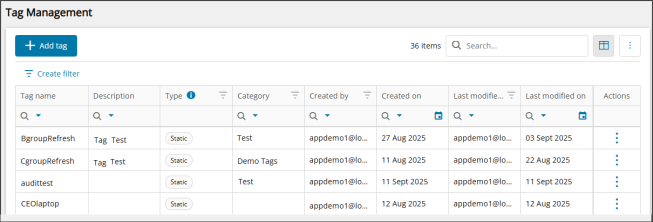
Go to Configuration> Tag Management.
-
Select Add Tag.
-
In the Tag Management wizard, choose Static tag or Dynamic tag.
-
On the Details step, enter the following:
-
Tag name: Do not include spaces between characters. The name must be unique within its scope. We recommend 64 or fewer characters.
-
Description (optional): Add a description to clarify the tag’s business purpose. This helps others understand its intent and any downstream effects.
-
Resource type: Currently limited to Assets.
-
Category (optional): Start typing to search for an existing category or create a new one to group related tags. Categories support filtering in Tag Management and the Assets view.
-
- Select Next.
-
On the Tag access step, define where tag assignment is allowed:
-
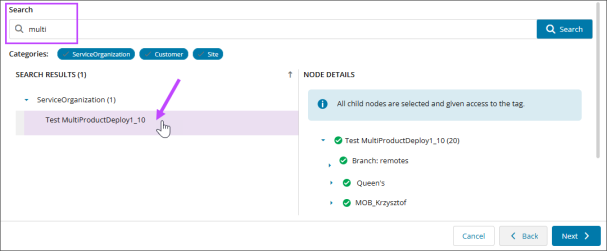
(Optional) Enter a search string to find an organization, customer, or site, then select Search.
-
(Optional) Select or clear the Categories to filter the search results.
-
From the Search results panel, select the organization, customer, or site level where users can assign the tag.
To assign a tag to assets, see Manage tags.
-
-
Select Next.
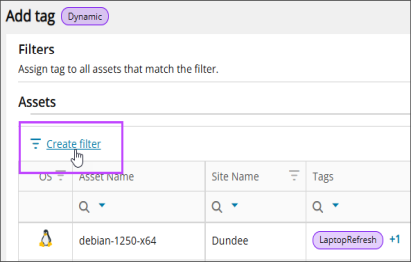
- (Dynamic tags only) On the Filters step, define the tag filters.
Select Create filter.
In the filter builder, add and configure filter conditions and groups. For instructions, see Create custom filters.
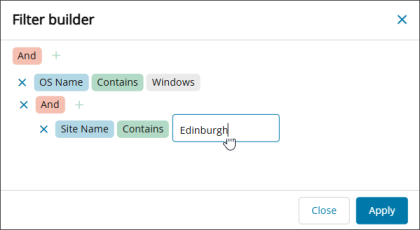
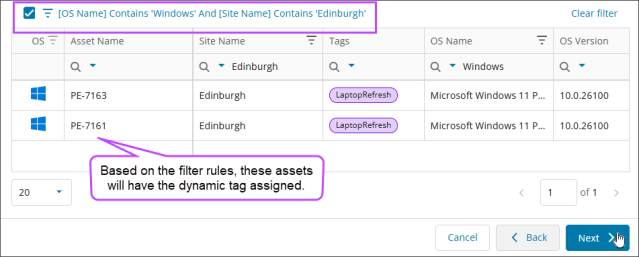
Select Apply to filter your assets according to your changes. You can also use the table columns to filter the assets.
Review the assets list to confirm that the filters return the expected assets. These assets will have the tag assigned. If the results aren’t correct, use the filter builder to adjust the conditions and groups.
Select Next.
-
On the Summary step, review your selections and select Confirm to create the tag, then select Done.
The background process to apply dynamic tags to assets begins immediately, but it may take some time to complete.
Edit tag definitions
When you edit tag definitions, the system automatically updates all assets that use the tag.
-
Go to Configuration> Tag Management.
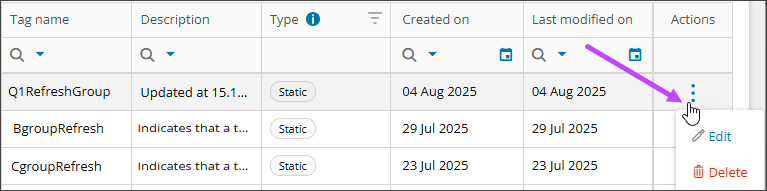
- Search for the tag you want to edit.
- From the Actions dropdown list in that row, choose Edit.
- To update the tag details:
- Under Settings, go to the Details tab and make your changes.
- To update tag access:
- Under Settings, go to Tag Access tab.
- Use search to modify where the tag can be assigned.
- (Dynamic tags only) To update the tag filters:
- Under Settings, go to the Filters tab.
Use the filter builder to update the filter conditions and groups, then select Apply. You can also use the table columns to filter the assets.
Review the assets list to confirm that the defined conditions and groups filter to the assets you expect. If not, use the filter builder again to adjust your choices.
- Select Save.
Delete tag definitions
When you delete a tag, the system deletes it and removes it from all assigned assets.
-
Go to Configuration> Tag Management.
- Search for the tag you want to delete.
- From the Actions menu in that row, choose Delete.
- Confirm the deletion.
Related topics