
Add on-the-fly filtering to your widgets
Add filters to your workspace widgets to filter data on-the-fly and in real time. Create ticket filters and view an up to date count of tickets as they are sent by your customers.
This example shows how to create ticket filter widgets and link them to a ticket list widget to monitor tickets coming into your company in real time:
Add a filter widget to your workspace and configure the filter settings
- Create a Workspace Page and add widgets to it.
- Add a filter widget to your workspace page, click the Widget Settings menu in the top right corner of the widget and select
 to open the configuration window.
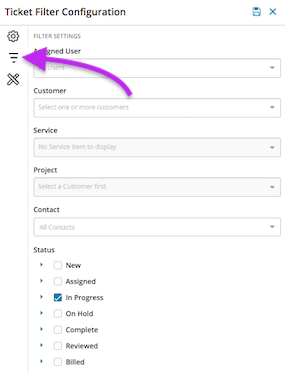
 - Select the Filter Settings option from the configuration window and choose the options according to what the filter should display (e.g. tickets for a specific customer, or all tickets with an In Progress status).
- After configuring and applying context to the filter to display the data you want to see in the widget, click
 to save the widget's filter settings.
After applying the configuration to the filter, the new filter widget displays a green dot over the filter icon . Hover your cursor over the filter to see it's additional context.
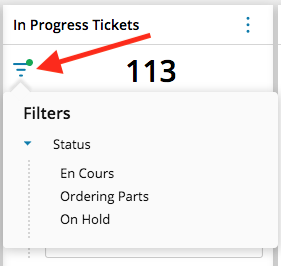
Resize filter widgets to view data in real time
The new filter widget is displayed as a small window in the workspace page. Edit and resize the widget to display additional filtering options. 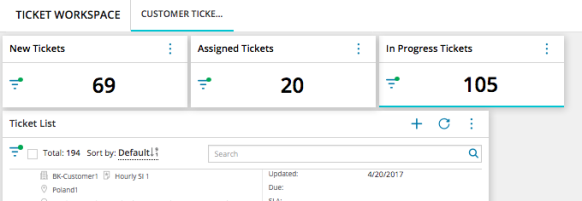
- To change the location and resize the widgets on your workspace page, click Edit Workspace.
- Drag and drop the widget to move it to a new location on the workspace page.
- Move your cursor to the side, bottom, or corner of the widget and drag your cursor to re-size the widget as needed. This displays all filter options which you can change as needed to filter data on-the-fly. Click Finish Editing when you are done resizing the widget.
- Change the filter options as needed to filter customers' tickets on the fly.
Whether customers email tickets into your ticket mailbox, or technicians create them manually, the filters are updated in real time according to the latest count of tickets in your company.
Add the ticket list widget to your Workspace and link it to the ticket filter widgets
To accurately monitor tickets using your workspace, add the Ticket List Widget to your workspace page to help monitor the flow of tickets into your company.
- In the top right corner of your workspace page, click Add > Add Widget.
- Next to the Ticket List Widget, click
 to add it to our workspace and close the Add Widget Window.
 - Adjust the size and location of the Ticket List Widget in your workspace page and click Finish Editing to save the workspace page.
- In the top right corner of the widget, click the
 button and select Configure .
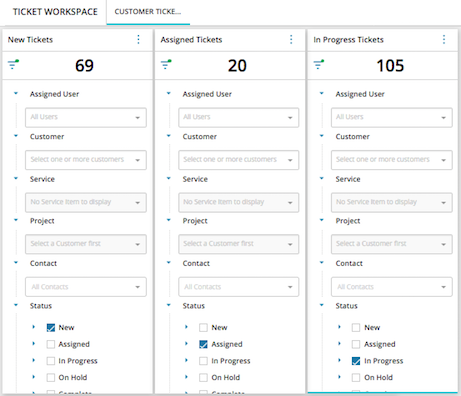
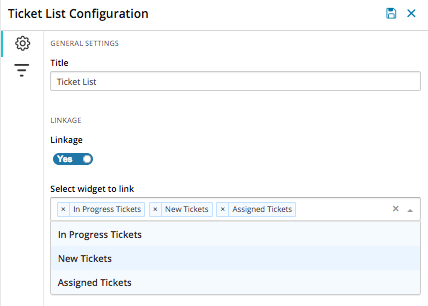
 - Click the Linkage button to activate linkage for that widget and select the available widgets to link. In this example, the New, Assigned and In Progress Ticket Filters are linked to the Ticket List widget to help monitor the flow of tickets in real time.
- Save the Ticket List widget.
The Ticket Filters combined with the Ticket List widget are linked together and configured to monitor the flow of tickets in to your company.
Add the User List widget to your Workspace and link it to the User Filter and User Statistics widgets
Add and update users in your MSP Manager account directly from your workspace page. View statistics for specific users, like the number of tickets or total hours worked for the day, week, month or year.
- In the top right corner of your workspace page, click Add > Add Widget.
- From the Add Widget page, select Users from the filter options on the left and click the plus icon next to User Filter, User List and User Statistics widgets to add them to your workspace page.
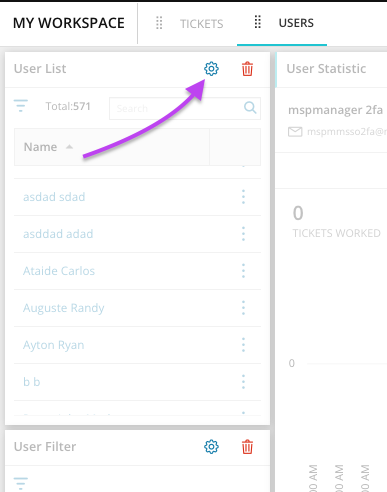
- While your workspace page is still in Edit mode, click the Configure option in the top right corner of the User List widget.
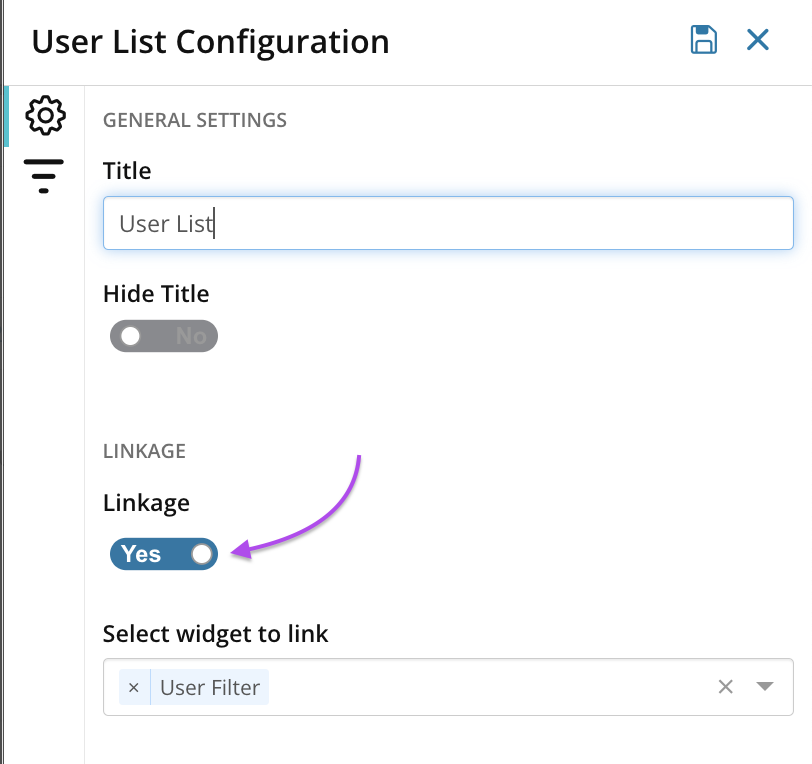
- Click the Linkage button to turn on linkage for that widget, select the User Filter from the Select widget to link drop down list and click Save
 .
. 
- Repeat the previous step for the User Statistic widget: select the User List from the Select widget to link drop down list and click Save .
- If the workspace page is still in Edit Mode, click Finish Editing in the top right corner of your workspace page.
Workspace Tips
Use the search bar in the User List to easily find a user and edit their profile or view their statistics for the day, week or month in the User Statistics widget.
Click the plus icon in the top right corner of the User List widget to add a new user to your MSP Manager account.
Select the Additional Options button  , click Configure and click the Filter option
 ![]() on the left to filter the user list by Status and only view active users for instance.
on the left to filter the user list by Status and only view active users for instance.
What do you want to do?