
Odin Automation APS 1.2 Add-on
SpamExperts no longer supports CloudBlue integration. This will be deprecated shortly.
If you are running Odin Automation (PBA/POA) and use our Local or Hosted Cloud, the following plug-in will integrate all SpamExperts services.
Features
- Allows the provider to manage the available/enabled products for a domain (Incoming, Outgoing, Archiving)
- Automatically add/remove domains to the Hosted or Local Cloud
- Configure the email address for the user
- Allow the user to login to the web interface without having to enter a username/password.
- Allows the provider to "upsell" access to the web interface, but still apply protection to the domain
System Requirements
Your server/setup needs to meet the following requirements in order to run the SpamExperts Integration add on.
- Permission to install applications (APS Packages)
- Support for APS v1.2
- 2.5MB free disk space
- Incoming Email Security Firewall Super Admin/Admin credentials
- Latest version (>=5.1.1) Parallels Automation including the "APS 1.2 DNS substitute hotfix"
- External Provisioning Server
Setup instructions
Install Add-on
Installing the add-on is done by downloading it from the APS catalog (search for "*SpamExperts*") or via the Application Manager (Service Director> Application Manager> APS Catalog).
After you downloaded the package you need to install it.
If you already have an SpamExperts Integration Application then you need to click on the application name and under Versions tab to "Import package". If you don't have any SpamExperts Integration Application you need to "Import package" directly.
If you already have an SpamExperts Integration Application and you import the package directly on the top level, you will receive an error like: “Error Application with id 22924 does not exist”. As soon as the background task has been executed, the package will be available.
You can check this task in System Director > Task Manager> Task Log. Search for your package *prospamfilter* and it will look like this:
#16494818 APS application 'prospamfilter2_pbas_1.8.app.zip', id 22901 : importing APS package 'prospamfilter2_pbas_1.8.app.zip-unknown.app.zip
Before you can use it, you need to configure it.
Configure the add on
To use the add-on, you will first need to configure it in the Provider's control panel Service Director > Application Manager > Applications > SpamExperts Integration.
An entry named "SpamExperts Integration" should exist.
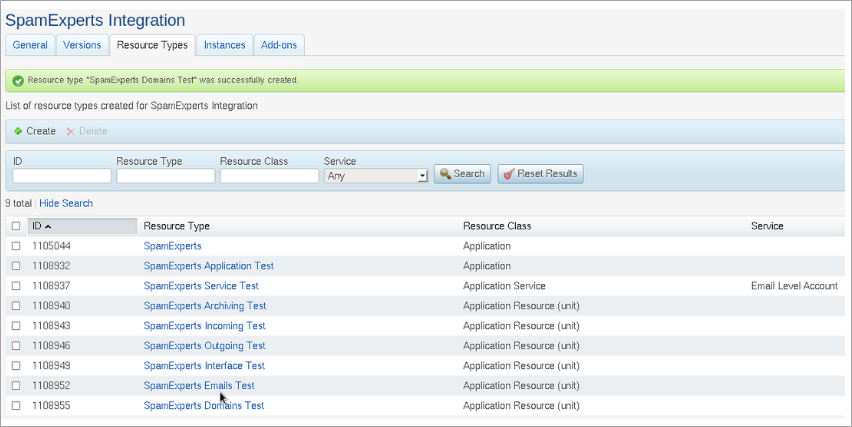
First, a resource type should be created to be able to provision accounts.
- Go to the tab Resource Types
- Click Create
- Select "Application"
- Enter a name. For instance: SpamExperts
- Click Next
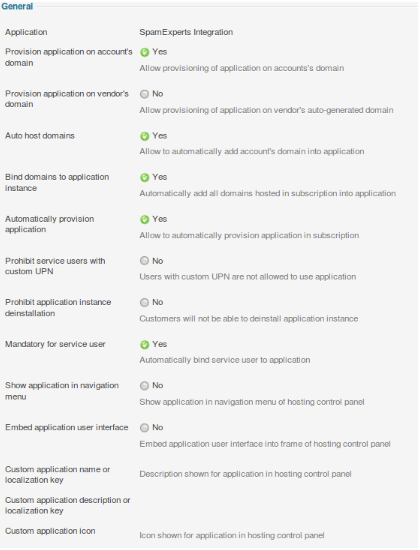
Fill in the 2 sections: Global application settings and Application service Domain Specific Settings.
The add-on Global application settings are now ready to be configured.
- Spampanel URL - Here you have to fill the URL for the SpamExperts Control Panel.
- Spampanel API hostname - This is the hostname of your primary server (without http or https, probably the same as Spampanel URL)
- Spampanel API username - The username of your Control Panel user (administrator or super admin account, do not use a Software API user)
- Spampanel API password - The password of your Control Panel user (administrator or super admin account)
- Enable SSL - Enable SSL to communicate with the API.
- Primary MX - The MX record to use for the domain. This is either the first hostname of your server or a special hostname which contains all the primary IP addresses of the servers in your cluster (recommended). Unfortunately, due to limitations in Parallels Automation only one MX record can be configured.
Regarding the SpamExperts Control Panel URL, if Parallels Automation is running in (forced) HTTPS mode, we suggest you to use a “HTTPS://” url as well as the control panel URL. If you don't do this, people will get a security warning from their browser stating it wants to download "unsecured content".
The add-on Application service Domain Specific Settings are now ready to be configured.
THESE ARE REQUIRED TO BE DEFINED IN THE TEMPLATES!
- Interface enabled - Whether people have access to the web interface. When disabled, they will receive a message to contact the administrator and have their product upgraded. (The value needs to be 0 - for disabled and 1 for enabled. Other values will be considered 0 (disabled))
- Amount of domains allowed - The number of domains allowed (set this to a high number for unlimited)
- Amount of service users allowed - The number of service users allowed (you can also change this value on Subscription settings, please see below Subscriptions details) (set this to a high number for unlimited)
- Enable incoming - Enable the incoming filtering product for the domains in this subscription. (The value needs to be 0 - for disabled and 1 for enabled. Other values will be considered 0 (disabled))
- Enable outgoing - Enable the outgoing filtering product for the domains in this subscription. (The value needs to be 0 - for disabled and 1 for enabled. Other values will be considered 0 (disabled))
- Enable archiving - Enable the archiving product for the domains in this subscription. (The value needs to be 0 - for disabled and 1 for enabled. Other values will be considered 0 (disabled))
On the "Next" page you have to tick the following boxes:
- Provision application on account's domain
- Auto host domains
- Bind domains to application instance
- Automatically provision application
- Mandatory for service user
- Embed Application User Interface (optionally)
All other options should be (left) UNCHECKED. Do NOT check the "Show Application in Navigation Menu", or else you can only access one instance of the application.
- On the next page, the attribute "External Provisioning" should be ticked.
- On the last page, you see an overview of the settings. If they are correct, finish up the installation.
To make use of the advanced functionality you'll have to create the following Application Services and/or Application Resources.
For this, you need to Create Resource Types:
Service Director > Application Manager > Applications SpamExperts Integration > Resource Types > Create:
Application Service:
Email Level Account (Application Service): To provide control panel access to email users
Application Resources (Unit):
- Interface Enabled: Allows you to upsell the interface, defaults to enabled. Set to 0 to disable or 1 to enable
- Number of domains: For statistical purposes: The number of protected domains associated with that subscription, this MUST be set to a large number to prevent hitting the limit
- Number of email users: For statistical purposes: The number of mailboxes associated with that subscription, this MUST be set to a large number to prevent hitting the limit
- Enable the incoming filtering product: Enables the Incoming product. Set to 0 to disable or 1 to enable.
- Enable the outgoing filtering product: Enables the Outgoing (product. Set to 0 to disable or 1 to enable.
- Enable the archiving product: Enables the Archiving Product. This is disabled by default. Set to 0 to disable or 1 to enable)
The add-on is now installed and configured. You can use these resource types to assign to your packages (to create Service Templates and Subscriptions).
An example of the resource types can be seen below.
Service Template:
In order to create a Service Template please go to:
Service Director > Provisioning Manager > Add New Service Template.
- Check Autoprovisioning option and select an Mail Hosting type
- At Resource Types for Main Features select Traffic as Traffic option
- Fill in the values for Basic, Mail-relay, Catch-all, Webmail parameters
- Fill in the values for Mailnames, Mailboxes, Maillists, Mail forwarding, Autoresponders parameters
- On the last page, you see an overview of the settings. If they are correct, finish up the installation.
After you finished Installation of the Service Template, before to activate it, you need to configure it.
You need to go to:
Service Director > Provisioning Manager click the new Service Template > Resources > Add resources.
Here you need to keep in mind that SpamExperts needs to have DNS and email resources (Disk Space, QMail Hosting, OpenXChange). It is also mandatory to include the Resources (Application, Application Service and Application Resources (Unit)) created before.
After you added and set up all the resources, go to your Service Template > General tab and Activate it.
The last step before you actually install the application for domain is to create a Subscription.
You can do this following the next steps:
- Go to your Service Template > Subscriptions tab > Create New Subscription
- Select the Company
- Set up the limits
- On the last step, you see an overview of the settings. If they are correct, finish up the installation.
Now you can sign in the customer account in order to install the application.
You can Login as Customer from your:
Service Template > Subscription > click on Company name > General tab > Staff members > "Login as Customer"
Before you "Login as Customer" make sure that the selected Company has some domains from your:
Service Template > Subscription > click on Company name > Resources tab
Add-on setup for domain
Installation
Before installing the application you need to do some checks on subscription, domains and users.
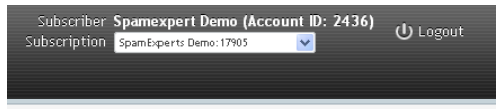
First you need to be sure that you have the right Subscription selected in the top right corner.
On domains check to have the domain hosted for that subscription: Home > Domains > Hosted Domains > domainName > Hosting Services section > Add Hosting.
If a hosting server is already set up for that domain, remove that hosting and assign a new hosting service for your subscription. Please check that both Mail Hosting and DNS Hosting are using the right Subscription and the status is ok (is green). (You need to wait a short while if you change the mail/DNS hosting)
Last step is to check users. If you don't have any users, than go to Home > Users > Add New Service User . When you create the user be sure that you checked SpamExperts Integration as Mailbox.
After clicking next, the following will happen:
- MX record of the domain is changed to the virtual MX record you've configured in the general settings.
- The domain will be added to the spam filter (The destination host/route used will be the current MX record)
- The domain services are enabled (or disabled) as they are configured in the Service Template / Subscription
- The contact address will be set (if the box is ticked)
We suggest you disable the option to change passwords for domain users in the SpamExperts Control Panel. If users can edit their passwords, this will break the integration with the One Click Login option. This permission can be turned off by disabling User's profile for Domain at the Manage Permissions page in the Control Panel.
After you install the SpamExperts application and you have multiple domains added, if you click directly on SpamExperts Integration > Entry Point Open you will open bridgelogin.php and you will need to select the domain where you want to login.

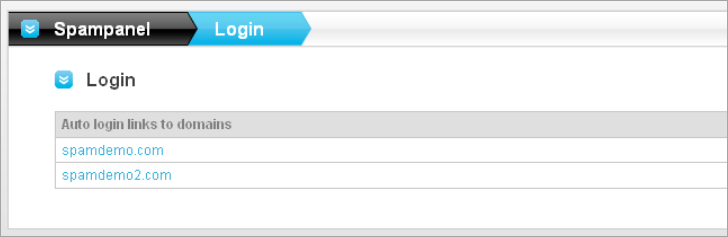
If you click on SpamExperts Integration and the Entry Point> Open for a Service User you should log in to that domain application instance.
Limiting webinterface access
Starting with version 1.5-345 and up, you have the ability to upsell control panel access to your customers. In order to do so, there are some additional steps required to block web interface access to selected subscriptions.
- In the application, assign an additional "Application Resource (unit)" and give it a name, such as "SpamExperts Control Panel Enabled"
- Create a Service Template (e.g. "SpamExperts - With control panel") with this resource added (on top of the existing ones) and its limit set to 1
- Create a Service Template (e.g. "SpamExperts - Without control panel") with this resource added (on top of the existing ones) and its limit set to 0
The limit should be set to either 0 or 1. Any other value for this resource (e.g. "unlimited") will be treated as the control panel is being enabled. If you do not apply the Resource to the service template, the web interface access will not be blocked. Only an explicitly set value of 0 will be used.
In order to disable the web interface for a specific subscription, you can apply the Service Template that includes this resource or edit the subscription's resources to change the values appropriately.
Any customer who has their web interface disabled will still have the login links in POA, but when this is clicked they will see the message:
Your account does not have access to the web interface. Please contact your provider to have your account upgraded.
Be advised that it's recommended to remove the permission to the Password reset function so this cannot be bypassed to use the control panel directly without going through the one-click login page.
Removal
Removing the add-on for this domain can be done alike. Clicking the uninstall button in Domain Specific Settings will do the following:
- Return the MX record to the previous one
- The domain will be removed from the anti-spam appliance
Please note that if you want to install it again, you have to wait before the nameserver update task is finished (or you have to force it).
Known problems / limitations
Known issues or limitations are caused by APS standard. We are constantly working on resolving them with Parallels.
Limitations:
- There can be only one MX address due to APS limitations (this is being worked on by Parallels)
- Assigning the filter to a subdomain does not work, it adds the primary domain instead (APS limitation/bug)
- Disabling Outgoing is not be possible if the domain has Outgoing users created. They should be removed first before disabling this service.
Troubleshooting
Although the add-on has been tested internally, it is possible that some features won't work as they should due to differences between your server setup and our testing setup.
Domains not being added/removed
If domains are not being added/removed, please first check if all the events have been handled properly. If this is the case you should check if the the API calls are being executed. These can be found on the primary server in:
/var/log/spamexperts/api-requests.log.
If you're unsure what to do or how to do this, please contact our support team by raising a support ticket through N-AbleMe.
Uninstall instructions
Removing the add-on is easy, just remove the application each subscription and from the provider's control panel.
Please note that this will automatically de-provision all the domains.
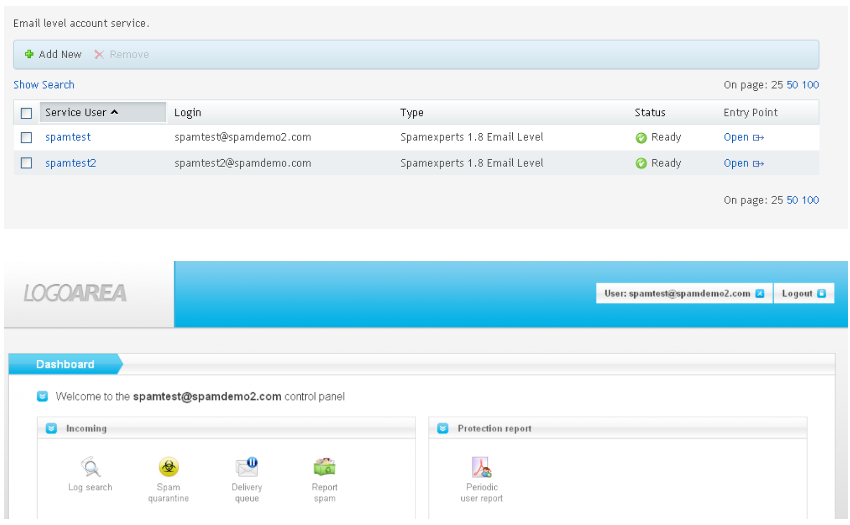
Screenshots
Provider Admin
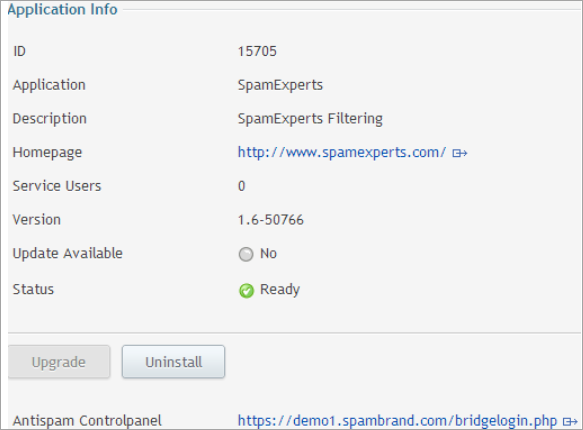
Overview in the Applications Manager:

Settings
End-User
Overview in the Applications Manager:

Detailed overview:
Upgrade notes
For some upgrades special care is required, because it may introduce new behavioral changes or changed default values.
Before upgrading / providing your customers with an upgrade always make sure you have read this section.
1.7-x> 1.8-x
If you upgrade from version 1.7 to version 1.8 please make sure the new Application Resources (Unit) have been added to the Service Templates and Subscriptions.
By default only Incoming filtering will be enabled, so if these Application Resources are not created it will effectively disable any other services (Outgoing, Archiving) and enable Incoming for a domain which will override any changed domain services that may have been enabled manually via the Control Panel, the Control Panel API or the Software API.
Disclaimer
We no longer develop new features in the APS 1.2 add-on and we recommend that you upgrade to APS 2.0. We will only release fixes for critical bugs or security issues.
We will only receive requests for bug fixes that are critical or security related. If you want to further develop the add-on, you are welcomed to fork our project on GitHub and develop any additional functionality you want.
If you have feedback on this add-on, let us know. Please contact our support team by raising a support ticket through N-AbleMe, including the following details in your email:
- Version of the add-on used
- Version of Parallels Automation used
- A description of the problem, if possible steps to reproduce.
Update to APS 2.0
If you want to upgrade to APS 2.0 please follow our guide from the Odin Automation APS 2.0 Add-on page.
Usage Terms
Please see the included EULA file for the full End User License Agreement before using this product.