Use the Email Scout Report templates feature to customise the format of your reports. This can be accessed at the Admin Level from Reporting > ESR templates.
This page contains the following tabs:
- Templates - Lists all custom templates (and any copies made from the Recommended Templates tab). Using the menu to the left of each template listed, you can create, edit, remove and copy templates. You can also view all incoming and outgoing Email Scout Reports that use each template
- Recommended Templates - Contains the default templates available to all users. Using the menu to the left of each template listed here, you can copy each template and view all incoming and outgoing Email Scout Reports that use each template. Copying a template in this tab pastes a copy into the Templates tab:
- Column based - suitable for reports containing a small number of results
- Row based - suitable for reports with a large number of results
- Automatic Email Scout Report Activation Messages - Contains all templates created for the Email Scout Report activation messages (sent when an ESR is scheduled to be sent to a recipient). You can add a new activation message template in this tab (by clicking the + Add activation message template link at the top of the page). In this tab, you can also copy an existing template - the copy is listed here too
Use the Recommended Templates to base your own custom ones on. For information on default template content, see Template Defaults and Variables.
Create Email Scout Report Template
The templates are written using the Jinja templating language. If you are unfamiliar with this, we recommend that you begin by copying and editing an existing template. If you have used templates before, and feel confident in creating a new template, this can also be done by following these instructions. For information on the default templates available, see Template Defaults and Variables.
Create a Copy of an Existing Template
- Login to Spam Experts as an Admin Level user
- In the Admin Level Control Panel select Reporting > ESR Templates
- You can copy a template from the Templates or Recommended Templates tabs by selecting Copy from the menu to the left of the template you want to copy:
- In the Copy Email Scout Report template dialog, replace the copied template name with a new name in the Template name field
- In the Admin field enter the Admin user for which this template applies
- Use the HTML and Plain tabs to add your template format
- HTML - content here will be displayed in the text/html version of the report which is the default for most email clients
- Plain - content here will be displayed in the text/plain version of the report. Older or limited email clients will use this view
- You can add variables from the set listed in the Variables reference panel to the right of the page. For more information on how to use the variables, refer to the examples given in the list or see Template Variables
- Click Save
- The new template is placed in the Templates tab irrespective of the tab from which it was copied
The following shows an example HTML template containing a selection of variables - and comments describing the content used:
<html>
<head>
<meta http-equiv="Content-Type" content="text/html; charset=utf-8"/>
<!---- Add some basic styling --->
<style>
table
border-collapse: collapse;
}
td, th {
border: 1px solid grey;
padding: 5px;
}
tr:nth-child(even) {
background-color: ivory;
}
tr:nth-child(odd) {
background-color: azure;
}
</style>
</head>
<body>
<!-- Set the column labels, names and formats -->
{% set column_order = [
("Datetime", "datetime", "date_format"),
("Filtering server", "filtering_host", "decoded"),
("Message ID", "message_id", None),
("Sender IP", "sender_ip", None),
("Sender hostname", "sender_host", "decoded"),
("Sender", "sender", "decoded"),
("Recipient", "recipient", "escaped"),
("From", "from_header", "escaped"),
("To", "to_header", "escaped"),
("CC", "cc_header", "escaped"),
("Subject", "subject_header", None),
("Incoming size", "incoming_size", "size"),
("Outgoing size", "outgoing_size", "size"),
("Delivery date", "delivery_date", "date_format"),
("Destination IP", "destination_ip", None),
("Destination host", "destination_host", "decoded"),
("Destination port", "destination_port", None),
("Status", "status", "status"),
("Classification", "main_class", None),
]
%}
<!--- Here is your header content -->
<div id="header">
<!-- An example of using a data URI to encode images -->
<img src="data:image/jpeg;base64,/9j/4AAQSkZJRgABAQEAYABgAAD//gA7Q1JFQVRPUjogZ2QtanBlZyB2MS4wICh1c2luZyBJSkcgSlBFRyB2NjIpLCBxdWFsaXR5ID0gODUK/9sAQwAFAwQEBAMFBAQEBQUFBgcMCAcHBwcPCwsJDBEPEhIRDxERExYcFxMUGhURERghGBodHR8fHxMXIiQiHiQcHh8e/9sAQwEFBQUHBgcOCAgOHhQRFB4eHh4eHh4eHh4eHh4eHh4eHh4eHh4eHh4eHh4eHh4eHh4eHh4eHh4eHh4eHh4eHh4e/8IAEQgAZAEOAwEiAAIRAQMRAf/EABsAAQADAQEBAQAAAAAAAAAAAAAEBQYBAwIH/8QAGQEBAAMBAQAAAAAAAAAAAAAAAAEEBQID/9oADAMBAAIQAxAAAAH9lAAAAAAAAAAAAAOHQAAAAAAAAAAAAAcqZWezbnfism4GrPm+Vvt5kga1EAAAAZ40LI/RrKehlGsZ7Pn6Cxk80jGe5rGUiG2YiSa6moum1fn2yI2f22YxNH2v4s3QqdFvxAAAAQJ4wNlrBiZ2oGN89sMxpuj87t9aKak2iFFD1IxPtr+mUk6IPH2Q+fokEgAAAAAAAAAOZnTVFGxAk+yr719hyPE9lwrDvmyGtRAAAAAAAAAAAAAA5EmOJjSOpB1AAAAAAAAAAAAAAAAAAAAAH//EACcQAAIDAAECBQQDAAAAAAAAAAIDAQQFABMVEBESMEAUFiNgMTVQ/9oACAEBAAEFAv1t95QcO++eKuMgz0T5Rhpz8ywiHC+iwPBVVzOJrVlSDVl8CzclN721XJPV8LoGK1rfYlNZAmMQMe3vm5efQr55suyy3rX1dqnS/u9YaszWYhOpfA3blmlCclluftzI9Va9hSTnYxFOJmUyu0MciTYoV+5hmK6O/wDgdoUkglHLE2CsVUCgPcuv+nUfptXrwuq6l0z1C0AOdi36q2003WdRgH9xfzynXd9ZtC1VrGT0M7IWwcXCEgy6Ci7pQczNDPh57du4giwFNTQ5Kx8xjyj/AGqKeuqqsmnU81XfxS+wIhnrq9WvmtJiPl5gEtNIDGwsD7k5pTyVkvMU54VqCpSj59pctRXCQT+n/wD/xAAlEQABAwMDAwUAAAAAAAAAAAABAgMRACFABBIxIzBxMlFhgaH/2gAIAQMBAT8BzNK2yo9Q0pnToTeK1C2wNrSfvA0bxgpt5p90rVzOBMd1pe1Co5tS3JKh8ftc7fIp70nd72wAYMiiZvj/AP/EACQRAAIBAwQBBQEAAAAAAAAAAAECAwAEERIhMUBBBRMjMIGh/9oACAECAQE/Ae5fTXEY+JdqW4upHyCatI5WbVM350PULdQwffB8CrWARrxjoEA8/bcR65UB43qOEqqMOc/ysaQ4G+x3q1x7ilB436DqGBBpV0jA6/8A/8QANBAAAgEDAgMFBAoDAAAAAAAAAQIDAAQREiEiMUEQE1FhcTBAgZEFFCMyQlBSYGKhstHw/9oACAEBAAY/Av23heM+VcOFrVIzN5VwRgV30xP8R77guw9KyvGP77Pu6R4msySKx8zWFdT6H3C3ttAIl6+HtJbPQMImrV8v99pkh4T+LArbJ8yaCu3eP4CsKMD2mYiw4hqK9BSSWt1IXU5xr3PqKFj3jJEqan0nnUVzbO4TXpdC2QasfjSG6uniX9CtzqBbKeRopNnVs0tuJnjVoeLTU8MLyfrGTvSMCdbjuxU9k7FuEOuT86u7okkNJhauiSc5f/Go3ubmYruFQHHWry2MjPHDuuelNd3Ukm7YRFbAFXEWtnxFzbn+GrhfpKeRGD/ZjOBitMcjSJzBY57DbpsPAbVgbnqfa6+5eUZwQgq3azs5ISr5dymnalvkiaWNl0yBeYqK3hglWINqd3XFWTBGKjOTjlX1qWGSWLRhSq50mrOb6rLHGCcFh/2KjfQ2nuueNuvZFZtG/dQzM+ojY+FQ3cKMx0sh0jy2qJCMMRqPxq6RkYMS+AR/GoldSp32PrV/qVgrcjjnTWlxbzNhsoyLnNTXEkDRB4ts/Cmiufo+dyDgfZ5zWJVK5clVPQdhON251gfnZ1u2kHYZqSFpG0IfGpIAxK4pxdls529KYRtlelK7SNrxtvyriOSDj3xg6leLrU5ZSAW2p30nTp5/KijWjNTK/OlQQltuFhWG+8dz+QMi4yaVTzA/aH//xAAqEAEAAgECBAYCAgMAAAAAAAABABEhMUFRYZGhEEBxgbHBMFBg8NHh8f/aAAgBAQABPyH97fnVAtYu2dJ1juj5FveUB5oGj3izqbct1NUmKONedqW+Cw+sLcbwPhKbreaB7BISPeQHtE7bwDyBUuN3/ISYGFsviVclmhacblB5vAJ08THr/uV+FsFfkcXktdlv6g8aPZOJtAVo9jy9yWmwLgP/AB8GFPCij66MstfJgHcmp68ZS1rtF5KFLwlNHTvLPhc2bunsMGe8lmx8ntGBmNcBr9kQrFCudE0RrDFIzxiNqLNozFaw1AJLMr1PdOKW7FCs9v1CTY7NvB4RyUxU62gaVzmrR9z8rAXsyIU5qA/2rDoxKS9ZvmV06QcyaQP7bMb4Rh6oytH9ym/WFoHZB5pCi0au85ogESxlNa7GgrV7d4IflouV8lirVApm8pdhwUXDaHYuYU65dqzEoatIanajizET0PMlvHGkfSLCHMMvm9ZOLHz4JpaKXGAekFHmb8bOPnnSJpegi0mxRqzX1CRDcHbT/MxYb+6hEVFq73jXvZ9HBMjskd/Nu8egKwORMqwR3ywT7NCmHEbvQGLGYPNVcMkaHO8Fc4I1j0P0FUSir01lC6Ia/iH/2gAMAwEAAgADAAAAEPPPPPPPPPPPPPPPPPPPPPPPPPPPPDE0fPPPPOMLNNMNOOMO3fPPPPPPPPDHOnvlh3vPPPPPPPPPPJgVlvPPPPPPPPPPPPPPEOPPPPPPPPPPPPPPPPPPPPPPP//EACERAQACAQQCAwEAAAAAAAAAAAERMQAhQEFRYZEwocHh/9oACAEDAQE/EN5yZ6o94wCD793iOAc6q8TrsEkAmsuD9yxQd/hxsBUcWdX5JMolDvmsBtIgldH3eStLHBIj5Ar+40Nj0RoazVFbBysGcdKt2/8A/8QAIBEBAAEDBAMBAAAAAAAAAAAAAREAMUEhQFFxMGGRgf/aAAgBAgEBPxDeJNTJu/KIKJjWPlqBT0tIvyhp1sFApI5HHU5ovpTi8ely+RQqSpKkasiaCCDyQ4mEuMRNAA6ous3EdQFAIXDBE9K39dUEiMiJLpF7s8bCy0iP7RBaCNv/AP/EACcQAQEAAgEDBAICAwEAAAAAAAERACExQVFhQHGBkaGxMMEQIFDw/9oACAEBAAE/EP8AuoEFBWG+fWoxAbVeMRMPRQP/AJ0uOjt37TT8ZzYgMz7Djxjo8k/6zHaghoTkDi8D2vrQBDyI9hN4+PMSQP2+PrBICpkm8eFer/bbfgxgfUBV7nfz9YzNOpP4fQbqSJjHYm/5C8qBqo4nBy+v8PGOI0mbrtFp+svgx2z7y/o3j922l77HAeR7Yc4MGB8H8hA+jBpQTjcXzj4wQgUKAFXDAMiFNW7Intpnle0iHQgZbHhgXukm7lPEKoLvImHFDWcTeFrGJLw3cnO5g8zDmFQ6CwXt34xsjBwKIBpJnllNSYVlbuauwbbf1aIXwfbE2/BRqoew/GV4uKiRjkCBgzoPa6O3ghi6AnroL7B4osLjUo0dnB1uvitXHCU11VAusEPYMbisVI0Mhqqy27riulkVA0GnTXvgEAR0jguNEoYIo6R308Ya65c2/wCjx/KNjFx6PeNB84G6phhFGlMHnbxu5xlkg3R2afbYUpjcLnEBId2aOVnTebc2OfeBD5wbZrRq6dGnZppjtDjhaUVjZK73iXDSuOg8Ls1hlgIjwmKkJoFaURq8ykupVBA4EXwY3FEAEYTogh8ZvJmAYkRWusRY9mVUo743lA9ZgMNJHnpnbkJq8bN0vzGTYLqrjAAhBFvI+MTSTJAUFog8074muAK0hDs2KefOTxiygevAQLgyQwdg16mO595TuZTviHIPnKS0mU7n+vHp+b2x0sEEVBV5vJiwOuRdCvbZndwxJnbW5+EfBgU8Q2DWpOD8YFiDoZHCdMYIEhpBBPYL85sEZtUQRfO58erNAdsSEUQKcn4cuIcSBvT7PvAUxJ2OAfh+s1U6kjdGzWcvabbLI/v5wrSBGwaQGkvjjJACSG0gB9B+fXyYxgdGmgdwe2K0hVRQ6ZN317Mn+Nf83//Z/>
><p>
<h1>Email Scout Report</h1>
This is the email scout report for {{ destination }}, sent at {{ format_time( now ) }}.
</div>
<!-- Here is the report content --->
<p>
<div id="content">
<!-- Create a table to hold the content. Use the column_order array to get the headings for the colums -->
<table>
<thead>
<!--- A for-loop to iterate through the column_order array and get the column label and format for the columns that have been included in the report. -->
{% for label,column,column_format in column_order if column in columns %}
<!--- Use the label from the array as the column heading --->
<th> {{ label }} </th>
{% endfor %}
<!-- Add a column heading for the view message column -->
<th>View message</th>
/thead>
<tbody>
<!-- Fill in the table contents by iterating through the objects list -->
{% for object in objects %}
<!--- Create a new row for each object -->
<tr>
<!-- Get the list of column labels and formats from the colum_order array --->
{% for label,column,column_format in column_order if column in columns %}
<!--- Create a new table item for each column -->
<td>
<!-- Insert a blank for null items --->
{% if not object[column] %}
{{ "" }}
<!--- For each column, apply the appropriate format from the column_order array -->
{% elif column_format == "date_format" %}
{{ format_date(object[column]) }} {{ format_time(object[column]) }}
{% elif column_format == "escaped" %}
{{ object.get(column, "")|replace(".", "<span>.</span>"|safe) }}
{% elif column_format == "decoded" %}
{{ decode_idna(object.get(column, ""))|replace(".", "<span>.</span>"|safe) }}
{% elif column_format == "size" %}
{{ object.get(column)|filesizeformat }}
{% elif column_format == "status" %}
{{ object[column]|replace("-", " ")|title }}
{% else %}
{{ object.get(column) }}
{% endif %}
</td>
{% endfor %}
<td>
<!--- If the object is quarantined or queued, add a link to allow actions on the object -->
{% if object.get("status", "") == "quarantined" %}
<a href="{{ view(object, ['release', 'release and train', 'remove', 'block list sender', 'allow list sender', 'lock identity']) }}">View quarantined message</a>
{% elif object.get("status", "") == "queued" %}
<a href="{{ view(object, ['cancel delivery', 'add recipient', 'cancel delivery and generate bounce', 'show next delivery attempt', 'retry' ]) }}">View queued message</a>
{% endif %}
</td>
</tr>
{% endfor %}
</tbody>
</table>
</div>
<!--- Footer content goes here --->
<div id="footer"><p>
This report was created by the <strong>{{ brand }}</strong> mail protection system.
<!-- Include an unsubscribe link for any automatically generated ESRs -->
{% if unsubscribe_link %}
<p>Click here to unsubscribe: <a href='{{ unsubscribe_link() }}'>Unsubscribe</a>
{% endif %}
</div>
</body>
</html>
The following shows the Email Scout Report email using the example content shown above:
If you are familiar with the Jinja templating language, you can create a completely new template by clicking on the + Add template link at the top of the page and adding your own content.
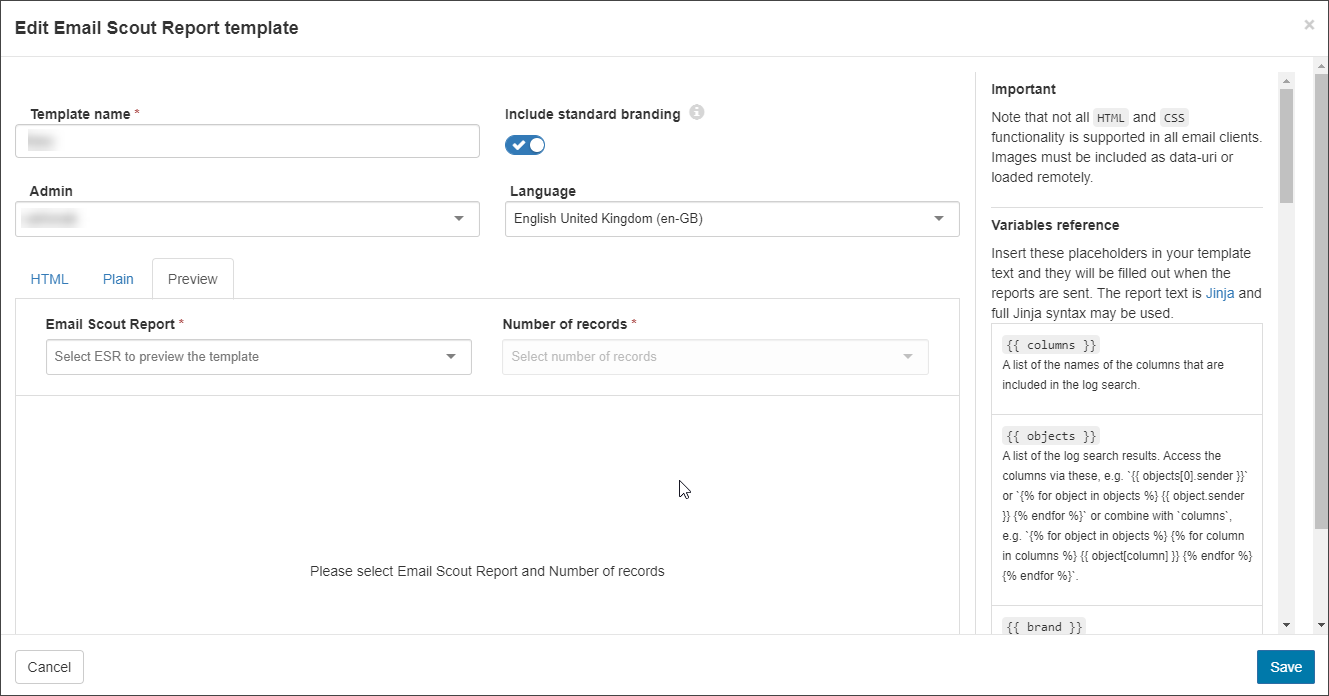
Create a New Template
- Login to Spam Experts as an Admin Level user
- In the Admin Level Control Panel select Reporting > ESR Templates
- You can create a new template in the Templates tab by selecting Add Template
- The Add Email Scout Report template dialog opens
- Give the template a name in the Template name field
- Slide the toggle to Include standard branding if you require this to be enabled
- In the Admin field enter or select the Admin user from the dropdown for which this template applies
- Select the language that the template is in from the Language field
- Use the HTML and Plain tabs to add your template format
- HTML- content here will be displayed in the text/html version of the report which is the default for most email clients
- Plain- content here will be displayed in the text/plain version of the report. Older or limited email clients will use this view.
- You can add variables from the set listed in the Variables reference panel to the right of the page. For more information on how to use the variables, refer to the examples given in the list or see Template Variables
- Use the Preview tab to view what the report will look like when applied to an existing Email Scout Report
- Select the report to preview from the Email Scout Report field
- Choose the Number of records to view:
- Up to 2 records
- Up to 50 records
- Click Save. The new template is placed in the Templates tab

If Branding is enabled, the option for Include Standard Branding will be displayed in the add wizard. If Include Standard Branding is enabled, the brand logo or name will be added to the top of the generated message. If this is disabled, the message will be white-labeled, or custom styled if styling is added within the template.
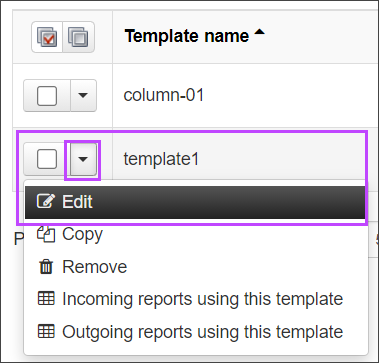
Edit Existing Templates
To edit an existing report:
- Go to Reporting > ESR Templates > Templates
- Find the template you wish to edit
- Click the dropdown arrow to the left of the template name and select Edit
- Make any changes to the report as required
- Save the changes made
If Branding is enabled, the option for Include Standard Branding will be displayed in the edit wizard. If Include Standard Branding is enabled, the brand logo or name will be added to the top of the generated message. If this is disabled, the message will be white-labeled, or custom styled if styling is added within the template.
View Incoming/Outgoing Reports from a Particular Template
You can find out what Email Scout Reports are using any of your templates:
- Login to Spam Experts as an Admin Level user
- Navigate to Reporting > ESR Tempplates
- In the Templates or Recommended Templates tab, click on Show Results to display all existing templates
- From the dropdown to the left of a template, select Incoming reports using this template or Outgoing reports using this template:
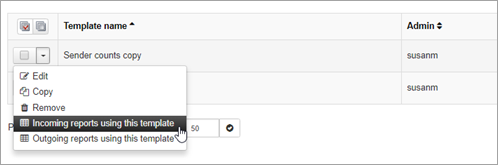
The Email Scout Reports page is displayed showing search results for the Template equals <templatename> query.
Choose the default Automatic Email Scout Report Activation Messages
In the Automatic Email Scout Report Activation Messages section you can select the activation email that is sent when Email Scout Reports are created. For example, set the default for a different language or welcome new mailboxes using content specific for their service.
To choose the default template.
- Go to Reporting > ESR Templates > Automatic Email Scout Report Activation Messages
- Click the drop-down against the target template
- Select Make Default
As a visual indicator a default template that is marked with a tick.