Setup Network Management
After the installation completes, or when connected to a new network, the Discovery Agent runs an initial scan to retrieve basic information on the wired and wireless networks the device is connected to that has at least one other device attached.
This process may take between five and ten minutes and once finished any discovered networks meeting the search criteria are available for management in the All Devices view under the Networks tab.
Select a Network to bring under management
- Navigate to the Networks tab
- Click Manage a new network
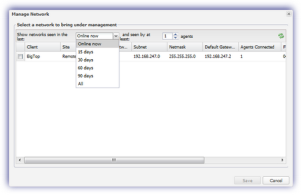
- Networks available for management are displayed in the Manage Network dialog.
- Click the tick box against the target network to select
- Save to apply
Defaults to currently online and discovered by at least one Agent view.
Filter by Show networks seen in the last, and seen by at least (1 to 100 Agents)
Dialog displays information on the Client, Site, Wireless Network name (where available), Subnet, Netmask, Default Gateway, number of Discovery Agents Connected and when the network was First Seen and Last Seen
Configure Managed Network
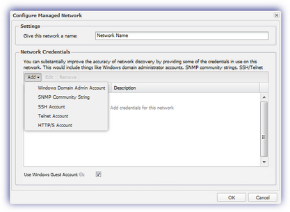
- Give the network a name to identify the network on the All Devices view
- Add Network Credentials and Use Windows Guest Account (optional)
- OK to save and apply
Post-configuration, the network name and credential settings may be amended via the Edit Networks dialog.
Add Network Credentials
The accuracy of the information returned by the Network Discovery scan may be significantly improved by including the credentials for devices attached to the network. Windows Domain Admin Account, SNMP Community String, SSH Account, Telnet Account and HTTP/S Account.
To include this access information when scanning the network click Add in the Network Credentials section then choose the type of credentials to enter from the drop-down.
To delete any Network Credentials use the Remove button.
The more credentials entered, the more accurate the returned information.
Use Windows Guest Account
By default, Network Discovery uses the Windows Guest account to anonymously query the SMB data of newly discovered Windows devices. Untick Use Windows Guest Account, to disable this behavior.
Public Community SNMP String Credential Management
To reduce the potential for errors when scanning the network where the Public SNMP Community string is unsupported, you can disable the Public Community SNMP string so only entered SNMP Community string is used by the Network Discovery scan. With this release the Public Community SNMP string is displayed in the list and may be edited or removed like other credentials.
Once complete click OK to save.
| Type | Required information | Note |
|---|---|---|
| Windows Domain Admin Account |
Description | Username | Password |
Username is entered as: Improves the accuracy and quality of Network Discovery using WMI, NetBIOS, etc. When provided, these credentials are used to query the devices rather than the Windows Guest Account. |
| SNMP Community String |
Description | SNMP Community String |
Connects to SNMP enabled devices including routers, access points, printers, servers, etc. |
| SSH Account |
Description | Username | Password | SSH Key File [Option to Drop SSH key file here or Select file] |
Connects to *nix based systems including computers, routers, firewalls etc. |
| Telnet Account |
Description | Username | Password |
Connects to *nix based systems including computers, routers, firewalls etc. |
| HTTP/S Account |
Description | Username | Password |
Connects to web administration pages for routers, firewalls, etc. |
Windows Security Event Log: Failed Login Attempts
Depending on your security configuration, the use of the Windows Guest account or Windows Domain Admin Account credentials to run the network scan may result in failed login attempt messages in the Windows Security Event Log. This in turn can result in the failure of the Failed Login Check where configured for the device.


