
Map Datto Autotask User Defined Field to Asset Tracking Element
After the integration is enabled, at least one N-sight RMM asset must be mapped to one of your Datto Autotask User Defined Fields to import an asset element against.
- In the All Devices view, go to Settings > PSA Integration > Configure.
- Select the Asset Tracking tab.
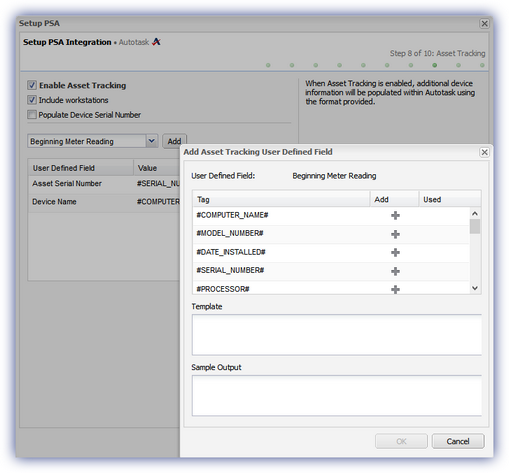
- Select your Autotask User Defined Field from the drop-down menu.
- Select Add to open the Add Asset Tracking User Defined Field dialog with a list of the available All Devices view Asset Tags.
- Choose the add button (+) against the required Tag to mark it as Used and populate the Template with the relevant string. For illustrative purposes the Sample Output contains an example of the selected asset information in the data format to be transferred to Datto Autotask.
- Select OK to save and apply.
After the information is transferred to Datto Autotask, it becomes available when selecting the device in the Configuration Items section of the Account. The following table provides the available Asset Tags along with an example output.
| Asset Tag | Example output |
|---|---|
| #COMPUTER_NAME# | Exchange Server |
| #MODEL_NUMBER# | NEC Computer International POWERMATE VL5 |
| #DATE_INSTALLED# | 07/10/2009 |
| #SERIAL_NUMBER# | 123456789AD$#CD |
| #PROCESSOR# | INTEL ® Pentium ® 4 CPU 3.60GHz |
| #IP# | 192.168.200.254 |
| #DEVICE_ID# | 12345 |
| #OS_TYPE# | Windows <xxx> |
| #OS_INFO# | Service Pack 2 |
| #RAM# | 2048 MB |
| #LAST_USER# | J Doe |
| #HARDDRIVE_1_DESCRIPTION# | HITACHI DF600F SCSI Disk Device |
| #HARDDRIVE_1_SIZE# | 80GB |
| #HARDDRIVE_2_DESCRIPTION# | HITACHI DF600F SCSI Disk Device |
| #HARDDRIVE_2_SIZE# | 80GB |
| #HARDDRIVE_3_DESCRIPTION# | HITACHI DF600F SCSI Disk Device |
| #HARDDRIVE_3_SIZE# | 80GB |