
Datto Autotask PSA LiveLinks Integration
Part of Passportal's integration with Datto Autotask is compatibility with the Datto Autotask LiveLinks feature. This is a useful feature that allows you to link directly from any ticket or company page in Datto Autotask straight to its corresponding client entry in Passportal.
Ensure your organization has properly set up the Datto Autotask integration in Passportal - see Datto Autotask PSA Integration Configuration .
Company Tickets
When you initially go to set up the Datto Autotask LiveLinks, you will need to ensure you add a User Defined Field following the below steps.
From the Datto Autotask Menu select Admin Section > User Defined Fields.
On the Accounts tab create a New User-Defined Field called PassportalID (ensure there is no space between Passportal and ID)
Set up the LiveLinks
- Ensure LiveLinks is enabled for your Datto Autotask account. To do this select the "A" drop-down menu in the top left-hand corner. Select LiveLinks Designer.
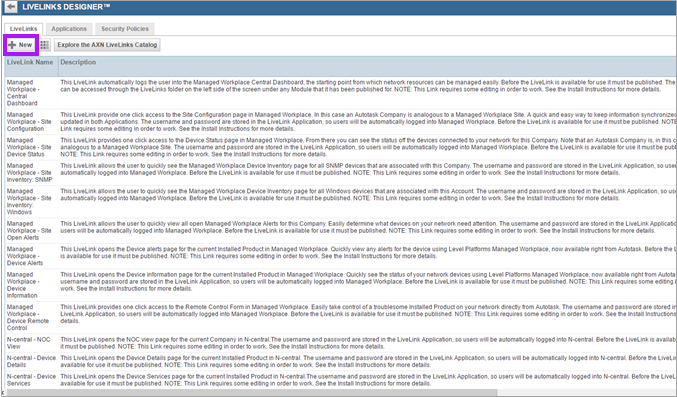
- On the LiveLinks Designer page, select the + New button to create a new LiveLink.
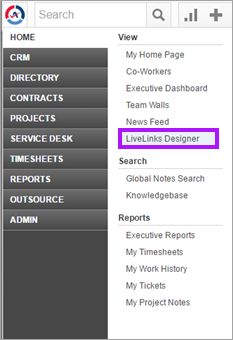
If you do not see LiveLinks Designer on the menu, then you need to contact Autotask to enable it for your organization. LiveLinks is not enabled by default, and system administrators do not have default access.
If you have access to LiveLinks elsewhere, but do not see the LiveLinks Designer link, then someone else in your organization has the required permissions (Again, system administrators do not have these permissions by default). You will need to find that person and ask them to grant you access.
Company LiveLinks
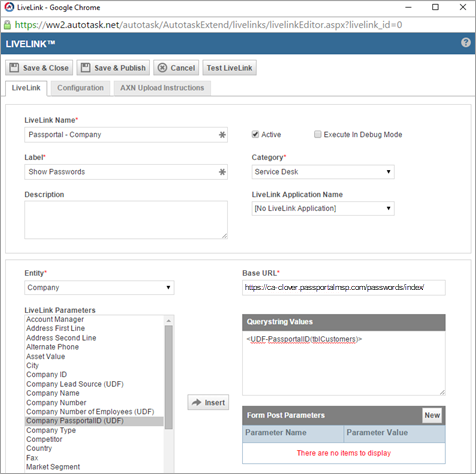
First you need to create the LiveLink for company pages.
- Enter Passportal - Company as the name.
- Enter Show Passwords as the label.
- Enter Service Desk from the category drop-down.
- Select the Entity drop-down and select Company.
- Hit Okay on the warning pop-up.
- Select Company PassportalID (UDF) from the list.
- Click inside the Querystring Values box.
- Click the Insert button and then enter the URL for your Passportal region into the Base URL field:
- Select Save & Publish.
- Select at least one Security Level from the Security Levels tab (make sure you are included).
- Select at least one Department from the Departments tab (make sure you are included).
- Select Save and Close.
| Region | URL |
|---|---|
| United States | https://us-clover.passportalmsp.com/passwords/index/
|
| United Kingdom | https://uk-clover.passportalmsp.com/passwords/index/
|
| Canada | https://ca-clover.passportalmsp.com/passwords/index/
|
| Germany | https://de-clover.passportalmsp.com/passwords/index/
|
| Australia | https://au-clover.passportalmsp.com/passwords/index/
|
The end results should look like this:

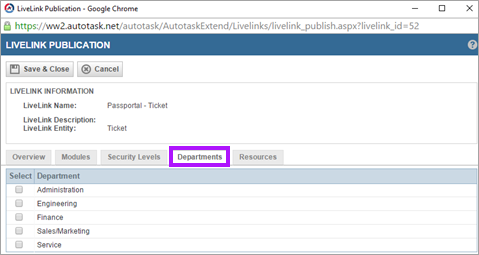
Ticket LiveLinks
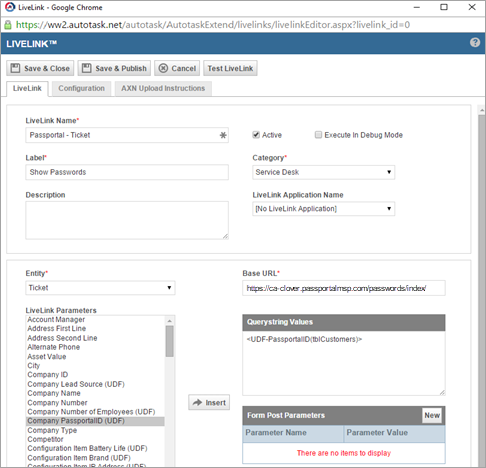
Next you need to create the LiveLink for ticket pages:
- Enter Passportal - Ticket as the name.
- Enter Show Passwords as the label.
- Enter Service Desk from the category drop-down.
- Select the Entity drop-down and select Ticket.
- Hit Okay on the warning pop-up.
- Select Company PassportalID (UDF) from the list.
- Click inside the Querystring Values box.
- Click the Insert button and then enter the URL for your Passportal region into the Base URL field:
- The end result should look like this:
- Select Save & Publish.
- Select at least one Security Level from the Security Levels tab (make sure you are included).
- Select at least one Department from the Departments tab (make sure you are included).
- Select Save and Close.
| Region | URL |
|---|---|
| United States | https://us-clover.passportalmsp.com/passwords/index/
|
| United Kingdom | https://uk-clover.passportalmsp.com/passwords/index/
|
| Canada | https://ca-clover.passportalmsp.com/passwords/index/
|
| Germany | https://de-clover.passportalmsp.com/passwords/index/
|
| Australia | https://au-clover.passportalmsp.com/passwords/index/
|
To test the "Company" LiveLink go to any companies page. On the top bar, you should see a "LiveLinks" drop-down. Select "Show Passwords". This should open a popup or a new tab with a Passportal window (if it doesn't, please check the settings in your pop-up blocker). Login to Passportal (if you aren't already) and you should see the selected companies Client page in Passportal.
If you get the error message You do not have access to this client that's okay. The Datto Autotask integration can sometimes take up to an hour to auto-populate each Datto Autotask client with it's PassportalID user-defined field. This error just means that the ID field hasn't been filled in yet.
If it's been longer than a few hours since you first set up Datto Autotask and your LiveLinks are still taking you to a page that says "You do not have access to this client", then please file a support ticket from the left-hand menu-bar in Passportal. We can remotely refresh your Datto Autotask Integration to ensure that your LiveLinks will work.
To test the Ticket LiveLink go to a ticket page. On the top bar, you should see a LiveLinks drop-down.
Select Show Passwords. This should open a pop-up or a new tab with a Passportal window (if it doesn't, please check the settings in your pop-up blocker).
Login to Passportal (if you aren't already) and you should see the selected companies Client page in Passportal.