
Auto Provisioning Users
Passportal Auto Provisioning allows creation of Pro-Users and Site-Users in bulk using Active Directory or Entra ID Synchronization.
Selecting the required Active Directory Organizational Units (OUs) or Entra ID Administrative Units (AUs), Auto Provisioning then creates the contained users as Pro-Users when actioned from the Company Vault or Site Users when actioned in the Client view.
Auto Provisioned User Sync Behavior
- The sync is one direction from Active Directory/Entra ID to Passportal.
-
The Auto Provisioning window allows changes to be applied to up to 100 folders (OUs or AUs) at a time. There is no limit to the number of folders that can be configured.
- The user name detail is taken from the Active Directory/Entra ID First Name and Last Name fields, not the Display Name field. If the First Name or Last Name field is updated in Active Directory/Entra ID, the change is communicated back to Passportal, which updates to match.
- New users created under an already configured OU/AU are automatically created in Passportal when the OU/AU syncs. New OU folders and users sync from the agent every 6 hours, unless the agent is restarted. New AU folders and users normally sync in five minutes, although we run an overnight job to ensure they have synchronized.
- When a user is disabled or deleted in Active Directory/Entra ID, the user will be disabled in Passportal.
- When the link to Active Directory/Entra ID is disabled, all users from that connection are disabled in Passportal.
- Manually set Permissions Levels for existing Pro Users are not updated or overwritten by Auto Provisioning mappings
Requirement
-
An email address is not mandatory when creating users in AD or Entra ID. However, an email address is required to create a user in Passportal. Please ensure that when creating users in AD or Entra ID the user's email address field is populated.
Duplication
-
To avoid the creation of duplicates in Passportal, we do not recommend using sub-domains to connect to the same Entra ID instance.
Entra ID Force Re-sync

|
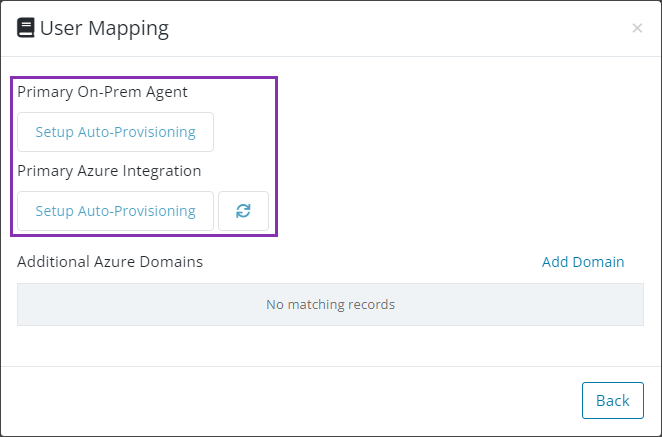
The Force Re-sync button available in the User Mapping dialog next to Primary Entra ID Integration and each Additional Entra ID Integration may be used at anytime to force a re-sync of auto-provisioned users. Doing so does not effect nightly auto-sync. |
Pro Users Auto Provisioning using existing integration with AD/Entra ID
Where an existing Active Directory or Entra ID integration (or both) already exist;
- From the Company Vault view, select the context menu at the top right and choose Edit Client
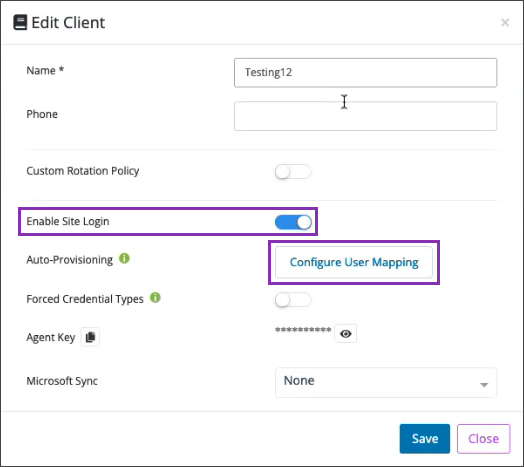
- Set the Enable Site toggle to On (if not already enabled) then Save and then Edit Client again
- Click the Configure User Mapping button
- In the User Mapping dialog, select the
- Active Directory: Primary On-Prem Agent Setup Auto-Provisioning button
- Entra ID: Primary Entra ID Integration Setup Auto-Provisioning button
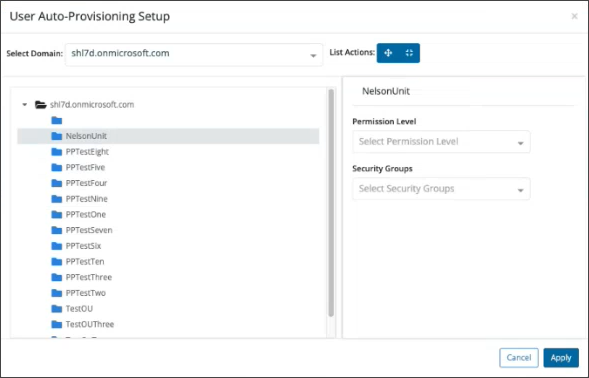
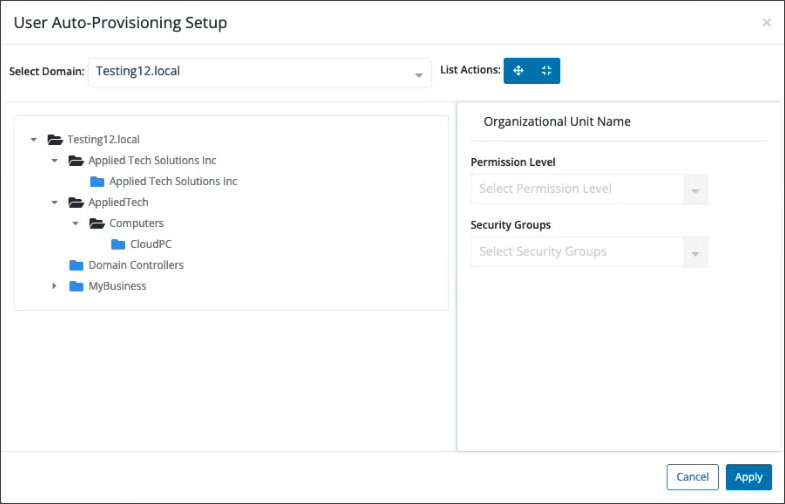
- Select the Domain and OU/AU on the left of the User Auto-Provisioning Setup Dialog and set any required Permission Level and Security Groups on the right
- Click Apply once all required OUs/AU's have been set
- Click Yes to confirm and continue or Cancel to back out of the action
- Passportal will now create
Each user will then receive an Account Activation email prompting them to complete their Passportal account setup.
Site Users Auto Provisioning using existing integration with AD/Entra ID
Where an existing Active Directory or Entra ID integration (or both) already exist;
- From the Client view, select the context menu at the top right and choose Edit Client
- Set the Enable Site toggle to On (if not already enabled) then Save and then Edit Client again
- Click the Configure User Mapping button
- In the User Mapping dialog, select the
- Active Directory: Primary On-Prem Agent Setup Auto-Provisioning button
- Entra ID: Primary Entra ID Integration Setup Auto-Provisioning button
- Select the Domain and OU/AU on the left of the User Auto-Provisioning Setup Dialog and set any required Permission Level and Security Groups on the right
- Click Apply once all required OUs/AU's have been set
- Click Yes to confirm and continue or Cancel to back out of the action
- Passportal will now create
Each user will then receive an Account Activation email prompting them to complete their Passportal account setup.
Pro Users Auto Provisioning with No pre-existing integration with AD/Entra ID
Where there is no pre-existing Active Directory or Entra ID integration;
- From the Company Vault view, select the context menu at the top right and choose Edit Client
- Set the Enable Site toggle to On (if not already enabled) then Save and then Edit Client again
- Click the Configure User Mapping button
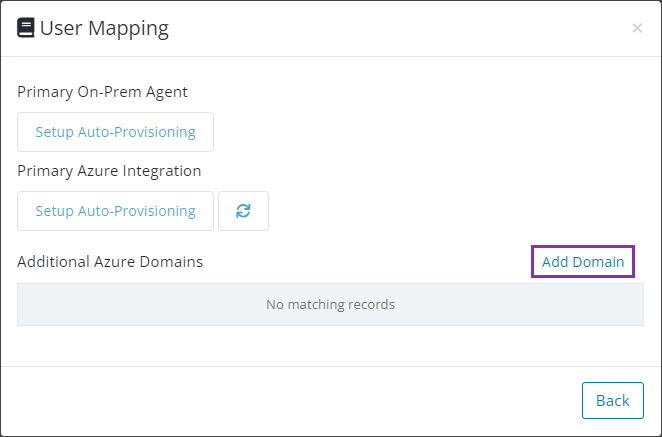
- In the User Mapping dialog, select Add Domain in the Additional Entra ID Domains section
- Enter the domain and credentials information to authenticate with Entra ID as per screen prompts
- Select the cog icon to the right of the Entra ID Domain in the User Mapping dialog
- Select the Domain OU/AU on the left of the User Auto-Provisioning Setup Dialog and set the required Permission Level and any Security Groups on the right
- Click Apply once all required OUs/AU's have been set
- Click Yes to confirm and continue or Cancel to back out of the action
- Passportal will now create
Each user will then receive an Account Activation email prompting them to complete their Passportal account setup.
Site Users Auto Provisioning with No pre-existing integration with AD/Entra ID
Where there is no pre-existing Active Directory or Entra ID integration;
- From the Client view, select the context menu at the top right and choose Edit Client
- Set the Enable Site toggle to On (if not already enabled) then Save and then Edit Client again
- Click the Configure User Mapping button
- In the User Mapping dialog, select Add Domain in the Additional Entra ID Domains section
- Enter the domain and credentials information to authenticate with Entra ID as per screen prompts
- Select the cog icon to the right of the Entra ID Domain in the User Mapping dialog
- Select the Domain OU/AU on the left of the User Auto-Provisioning Setup Dialog and set the required Permission Level and any Security Groups on the right
- Click Apply once all required OUs/AU's have been set
- Click Yes to confirm and continue or Cancel to back out of the action
- Passportal will now create
Each user will then receive an Account Activation email prompting them to complete their Passportal account setup.
To review Passportal user creation issues, click on the bell notification icon in Passportal's top menu.